An in-depth look at recording electric guitar – with audio examples!
By John Shirley
Let’s look at guitar recording methods, from common monophonic miking to more esoteric treatments and emulation technologies.
To aid in demonstration, we conducted a special recording session, following the outline of the article and designed specifically to provide audio samples of the various approaches discussed. The numbered soundfiles referred to below are all from this session and are available for download at the bottom of this page.
On Mics & Miking
- Great Guitar Gear + Great Setup = Great Sound
- Recording the Vocalist/Guitarist
- Spank the Plank
- Going Deep With Electric Guitar Miking
- Is There A Shred Behind the Couch?
- Recording the Classical Guitar
- Nine Unusual Guitar Tips
- Electric Guitar For The Non-Guitarist
- Eclectic Electric Guitar
- A-List Guitar Miking Setups
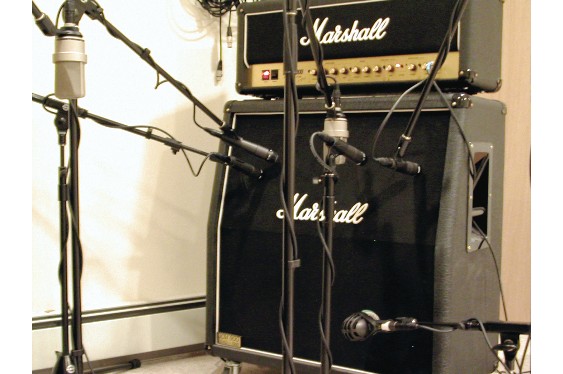
The amp with the mics in place — all four SM57s, both TLM 103s, and the D112. RODE NT2 and Lawson room mics not shown.
Demonstration session setup
To capture an initial performance, we plugged the guitar into a Behringer Ultra-DI, using the link output to go to the guitar amp, and the balanced XLR output going directly into Digidesign Pro Tools to record a clean track. We activated the DI’s ground lif t to reduce hum. Nine microphones were set up to capture the sound from the Marshall 1960A 4×12 speaker cabinet, powered by a Marshall JCM2000 DSL 50 head (see Picture 1).
We recorded all microphones simultaneously and used a single take of a simple guitar part to ensure the most straightforward comparison. The setup is listed in the table below.
Mic — Aimed to this part of speaker — on or off axis? — distance from grille
Shure SM57 — center — on axis — 1″
Shure SM57 — 3.5″ right — on axis — 1″
Shure SM57 — 3.5″ right — 45 degrees off axis — 1″
Shure SM57 — center — on axis — 6″
AKG D112 — center — on axis — 1″
Neumann TLM 103 — center — on axis — 6″
Neumann TLM 103 — center — on axis — 4′
RODE NT2 (omni) — room — N/A — 5′
Lawson L47MP (omni) — stairs — N/A — 15′
Unless otherwise noted, all of the audio examples were left as recorded without compression, EQ, or effects of any kind. This was not an artistic decision, but purely to help isolate what each technique offers by itself for purposes of comparison. God bless the scientific method.
Basics
A good electric guitar recording comes first from a good guitar, amp, song, and player. The guitar should have new strings, preferably changed the day before and played a bit to stretch them. Tuning should be checked often against a reliable tuner. The gear should have no loose connections, all cables should be of high quality and no longer than necessary.
Lighting that causes amps to hum should be replaced or turned off. Objects in the room that may rattle or buzz when the amp is cranked to earth-shattering levels should be damped or removed. Finally, close attention should be paid to proper grounding; a lift may be necessary between the guitar and the amp. Do not remove or lift the power ground from the amp itself, as that can certainly wreck your day (and your life).
Single-microphone techniques
Most everyone who has played or recorded the electric guitar probably knows the tried and true mono SM57 approach to miking, right? Simply place the microphone a few inches from the speaker. What you may not realize is the wealth of tonal variation available simply by adjusting distance, angle of axis, or location along the speaker’s radius.
Varying the microphone’s distance from the speaker changes the bass boost due to the proximity effect, the ratio of direct to indirect sound, and both the amount and frequencies of comb filtering between speakers in cabinets which have two or more. When closer to the speaker, the directional mic exhibits more bass, with less first-order reflections, room ambience, and cross-speaker interference. As it is pulled away (even from 3 to 6 inches) the bass decreases and the reflections, ambience and interference become greater. [See audio examples 1 and 4.]
While most people who record or perform with microphones are aware that directional mics are less sensitive to sound from the side than the front, the effect that this difference in angle has on frequency response is less well known. All mics, even most omnidirectional ones, exhibit variations in frequency response when rotated to another angle of axis. [See audio examples 1 and 3.]
When a mic is placed close enough to the speaker, its location along the speaker cone can also influence tone, since the mic focuses on one specific area. This is similar to close-miking an instrument; if the mic is placed too close, it will pick up the tone of that area of the instrument rather than a complete picture of the sound. [See audio examples 1 and 2.]
OK, now that that’s been said… why not try a mic other than a 57? Maybe an AKG D112… or even a condenser. Why not a ribbon? Different mics offer not only different patterns and frequency responses, but timbral variation due to their transient response characteristics. [Compare audio samples 1 vs. 5 and 4 vs. 6.]
The way each mic interacts with a preamp to color the sound also changes due to both sensitivity and impedance differences. When choosing microphones to place in front of a guitar cabinet, just be sure they can handle the high SPLs popular with many guitarists. A rating of 138 dB or greater for SPL handling is generally a good starting point.
Ambient miking
While the sort of close, or spot, miking discussed so far is simple and can yield great results, it sometimes lacks the sense of space you may be looking f or. While placing the microphone further away would capture a greater sense of the acoustic environment, it may also sacrifice clarity and strength. [See audio examples 7, 8 and 9.]
Using extra mics, placed away from the guitar cab, is one way to capture natural ambient sound which can be mixed back in with the close mics as desired. Two such room mics can be panned hard left and right respectively, with a close mic panned center. The appropriate amount of faux-stereo ambience can be created by adjusting the balance between the distant mics and the close center image. [Audio example 13 does just this.]
Adding simple channels to make a more complex sound. This panning delay can be heard in Example 15.
Multi-mic setups
This last example brings up the notion of the stereo or multi-mic setup. By using two or more of the above techniques and placing them creatively into the stereo field, a thicker and more interesting image can be created. [Audio examples 11,12,13,14,16,17.]
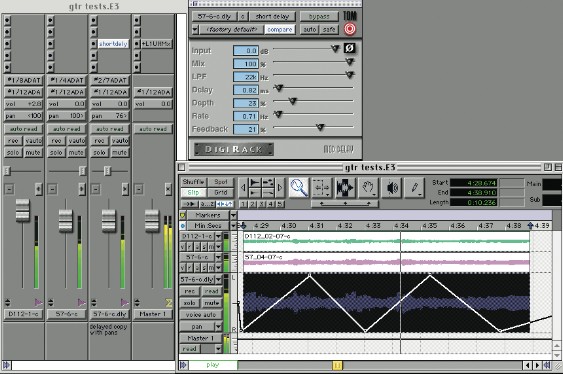
Simple effects can be added to one or more channels to make the tonal result even more active and interesting (see Picture 2). [Audio example 15, a variation on 14, uses a basic panning delay on one channel.]
Multi-amp/multi-cab
An additional, related method comes from the fact that many guitar amps can be run in “stereo” and most will allow another 16 or 8 ohm cabinet to be added. Splitters, some DIs, and amps with sends, also allow the option of running two amplifiers at once. Either way, multi-miking these setups can be another useful source of tonal variation.
Layering
Using extra mics to double, triple, or even quadruple the number of guitar tracks can certainly thicken and liven up the tone but each track, different as they may sound, is still a copy of the same exact performance. A similar, yet sonically distinct, technique is that of recording and layering several different takes of the same part. The slight fluctuations in pitch, intensity, rhythmic placement, and articulation create a different feel than doubling tracks of the same take. [Audio example 18] Different amps, guitars, or effects can be used to increase distinction between takes if desired.
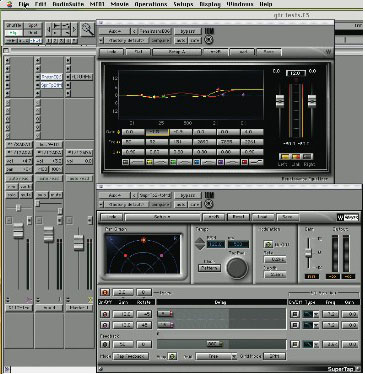
Original track as a center image, with eq and delay versions on the sides. Compare example 4 to example 27, example 5 to example 28.
Simple stereo EQ and basic FX
Sometimes a more direct approach to achieving a wider, more diverse stereo image is appropriate. Simply splitting a mono guitar recording into two hard-panned channels and eqing them differently can make a big difference. [Compare audio example 4 vs. 26 .]
Delaying one of the two channels slightly is also a useful technique, but care should be taken to ensure good mono compatibility. Another variation on this is to use the original track as a center image, while both EQing and delaying the split side images differently (see Picture 3). The delay on the sides can be modulated slightly as well for a less static effect. [Compare audio examples 4 vs. 27 and 5 vs. 28]
The Big DI
Using a DI (direct inject) to record a clean guitar sound creates a track which can be utilized later in a number of creative and flexible ways. The clean signal can be mixed in with other versions, it can be run through amp/cab/mic modeling software or hardware, and it can also be used to reamp later, either for effect or to redo the sound of the take (e.g. if the performance was good, but the amp hum was unacceptable).
A common complaint about most amp, or microphone, emulators is that they don’t sound exactly like the make and model of a particular device they may claim to emulate. People who cannot see past this shortcoming often disregard the exciting new technology and miss out on a very useful and creative tool. If you really want an AC30 that badly…buy an AC30!
If you want a whole bunch of useful new and classic-sounding amp tones for a fraction of the price of one real amp, then emulators may be just the thing. When using them, treat them as you might any new or unfamiliar real amp; simply monkey around with the settings until you become familiar with the character of the amp and can find tones you like.
As with real guitar tones, more timbral and spatial interest can be achieved by using multiple emulators. Try busing a mono DI track to two mono auxiliary inputs, inserting an amp emulator on each and then hard panning. [Samples 10, 19, 20, 24]
Using the microphone tracks as a source, with or without the DI track, can also achieve great results. [Samples 22, 23]
Acoustic miking
Another technique for recording a direct, clean guitar sound is to mic the electric guitar itself, picking up the acoustic vibration of the strings more directly. To accomplish this, the guitar must be isolated from the amp cabinet, or an acoustic-only take must be recorded separately. While many popular artists use this technique on bass, not as many are taking advantage of its possibilities for the guitar. Layering a true acoustic or classical guitar part may also do the trick.
Reamping
Using a send to feed a prerecorded track back to a guitar amplifier is a sort of historical precursor to the way emulators are used now for flexibility, and this “old school” method (which goes by the name of “reamping”) is still a fun way to expand your tonal palette. Amps that may not have been available during the original tracking session can be added later, or mini amps can be used for that band-limited sound. [See audio example 25.]
Be aware, however, that an aux send has neither the same level nor impedance as the output of an electric guitar, so the amps response may differ greatly when used in that manner. Fortunately, some DIs are designed to both change an instrument signal to a properly balanced pro audio signal, and the reverse as well; these are often called “reamp boxes” although the actual name Reamp belongs to a line of reamplification boxes now made and sold by Radial Engineering. Many modern amplifiers are also equipped with alternate inputs which can also be tried; a stereo line in for CD or an insert send and return.
Synth and Hybrid Systems
Finally, there are now numerous guitar synths, producing synthesized guitar tones using the specialized performance data from a guitar controller. These are capable of not only emulating their physical counterparts, but also melding guitar performance parameters with non-guitar sounds.
The distinctive pitch manipulations, vibrato, and picking characteristics can be imparted onto a clarinet patch or another truly electronic sound. These can be used on their own or, as mentioned so often above, mixed in with a more traditional guitar sound.
Conclusion
This outline of techniques and technologies to capture electric guitar parts is by no means exhaustive. What it does offer is a foundational knowledge and starting point to explore this highly creative endeavor. Obviously you won’t often be using nine microphones and 12 tracks to record one guitar pass; just keep these options in mind when you prepare to lay down a take.
Try a few variations until you find the one that works for you… on that day… in that style… with that guitarist… and that equipment. Understanding the basic methods and experimenting with a variety of approaches will keep you interested, and your tracks fresh.
Audio Examples
Here are the audio examples cited, so you can hear what’s going on. Note that you’ll want to download these to a pretty large hard disk; MP3 tends to mess up subtle details, so these short audio snippets are stored here as WAV files.
John Shirley provides the following commentary:
“OK… so it’s not much of a lick. I don’t fancy it all up with EQ and FX for a while. And you get to hear it 28 times. The purpose of this series of audio demonstrations, however, is simply about the various techniques and the wide array of tonal qualities they can achieve. In this case, the actual tune and style are irrelevant. Move quickly from one sample to another so you can compare them closely. You may want to put them all in your favorite DAW and time-align the first note so you can easily A/B them.”
First, here is the identifying text for what is in every audio example file:
01 57_1_c.wav: A single Shure SM57 placed one inch from the grille, on axis to the center of the speaker cone.
02 57_1_rt.wav: A single Shure SM57 placed one inch from the grille, on axis but 3.5-inches right of the c enter of the speaker cone.
03 57/45_1_rt.wav: A single Shure SM57 placed one inch from the grill, angled 45-degrees, placed in front of the center of the speaker cone.
04 57_6_c.wav: A single Shure SM57 placed six inches from the grill, on axis to the center of the speaker cone.
05 D112_1_c.wav: A single AKG D112 placed one inch from the grill, on axis to the center of the speaker cone.
06 103_6_c.wav: A single Neumann TLM103 placed six inches from the grille, on axis to the center of the speaker cone.
07 103_4’_c.wav: A single Neumann TLM103 placed four feet from the grille, centered, on axis to the speaker cabinet.
08 NT2_room.wav: A single Rode NT2 (in omni) placed in the room about five feet from the cabinet and to its side.
09 LMP47_strs.wav: A single Lawson L47MP (in omni) placed in the adjoining stairwell, some fifteen feet from the guitar cabinet, around the corner.
10 DI.wav: The signal of the guitar before the amp. Split and balanced by a Behringer Ultra-DI.
11 triple_A2.wav: Track 05 panned hard left. Track 04 in the center. Track 03 panned hard right. (D112-1″c/57-6″c/57-45deg-1″rt)
12 triple_D.wav: Track 04 panned hard left. Track 08 in the center. Track 07 panned hard right. (57-6″c/NT2-room/103-4’c)
13 triple_E.wav: Track 08 panned hard left. Track 04 in the center. Track 09 panned hard right. (NT2-room/57-6″c/LMP47_strs)
14 triple_C.wav: Track 05 panned hard left. Track 01 in the center. Track 04 panned hard right. (D112-1″c/57-1″c/57-6″c)
15 triple_Cplus.wav: As 14, but with the a panning delay on the 57-1″c (track 01).
16 quad_A.wav: Track 08 panned hard left. Tracks 04 and 05 in the center. Track 07 panned hard right. (NT2-room/57-6″c and D112-1″c/103-4’c)
17 Quad_C.wav: A mix of 05, 09, 08, and 04. (Panned from left to right in that order)
18 layer.wav: A mix of two different takes. The D112 (@1-inch) to the left and the 57 (@6-inches) to the right.
19 DI_farm_B.wav: The DI (track 10) split and run through two Amp Farms; one channel panned left, one right. Both channels were then run through Lo-Fi for a bit more distortion and then through a reverb.
20 DI_4xfarm_C2.wav: The DI (track 10) split and run through four Amp Farms (two per channel); one channel panned left, one right. Both channels were also run through Lo-Fi for a bit more distortion and then through a reverb.
21 57_6_farm2.wav: Track 04 is run through the same function as the DI in 19.
22 D112_farm.wav: Track 05 is run through the same function as the DI in 19.
23 TriFarm_A.wav: A triple mix of 05 (left), 10 (center) and 04 (right) run through “the double farm” function of track 19. (D112-1″c/DI /57-6″c)
24 GSP2101.wav: The same lick played through a hardware emulator, the DigiTech GSP 2101. This is the only track that is based on another take of the lick.
25 57_6_c_mini.wav: A reamped version of track 04, through a Fender Mini Twin. Rerecorded with a TLM 103.
26 57_6_c_stEQ.wav: Track 04 with different EQ for each side of the stereo field.
27 57_6_stEQ_crs.wav: Track 04 with different EQ for each side of the stereo field and run through a delay/chorus function (with a minor amount of modulation).
28 D112_stEQ_crs.wav: Track 05 using the same treatments as on track 27.