
Common problems and solutions when recording electric guitar
By Paul Stamler
Most electric guitar recording articles start with mics and the amp. I’m going to dig a little deeper here, and start with the guitar itself, since that’s where the sound begins. Follow along and you’ll see how a great electric guitar tone starts with the simple stuff that eager engineers often overlook.
The ringy-dingy string thing
When you’re recording guitar (electric or acoustic), you don’t want the strings to be too new. A set of newly-installed strings has a ringy-bright, fizzy sound that is bound to excite resonances in condenser microphones, resonances that in turn will bring out the worst in many preamps and A/D converters. Old strings, on the other hand, sound dead and muffled, and may not tune properly. My experience is that strings that have been on the guitar for 3–5 days are, like Baby Bear’s porridge, just right.
On Mics & Miking
 A different twist on tuning
Most players tune the open strings to EADGBE (in standard tuning) when they use an electric tuner. On my guitars, at least, this produces a slightly sour sound, one that doesn’t quite work with most chords. (Can you tell I’m a rhythm player?)
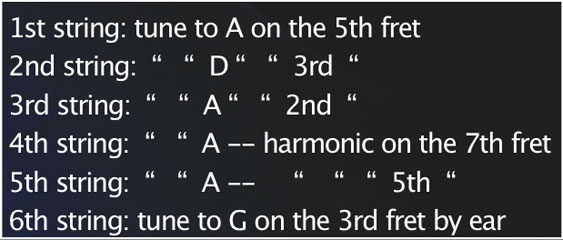
A few years ago, someone on an Internet newsgroup suggested an alternate method, tuning each string via the “A” note that can be found on it someplace—1st string 5th fret, 2nd string 10th fret, etc. I tried that, and it almost worked, but the second and sixth strings, on my guitars, still sounded bad. So I modified the method; here’s what I do, starting with the high E (1st) string and working downwards:
I find that the tuner isn’t really accurate on the lowest-pitched string, so I fret it on the 3rd fret and listen for a perfect octave (no beats) played against the 3rd string, open. For Dropped-D tuning, I tune the 6th string similarly, but fretted on the 5th fret instead of the 3rd, then double-checking for a perfect octave against the 4th string when both are open.
This system works for me, on my guitars, but not for everyone—my friend Joe Bigham, for example, tried it on his Parker and got a jangly mess. But it’s worth trying; it might work for you, too. Certainly my playing has been sweeter when I’ve used this system.
In line or out of line?
While we’re talking about tuners, many electric players leave a tuner connected between their instruments and amplifiers all the time, even when recording. I’m not sure this is a great idea; some tuners insert a buffer amplifier between the input and output jacks, which can alter the sound significantly. Sometimes, as with certain acoustic-electric pickups, this is a Good Thing, but with many electric guitars, I find that the tuner rounds off some of the raw power an electric guitar can (and should) generate. This is why some guitar pedals nowadays have dedicated tuner outs to avoid this issue, but not everyone will have one of those…
For best results, I suggest unplugging the tuner when tracking (or, perhaps, plugging into an extra speaker output, perhaps with an attenuator). Or you can do what I do, and simply use the tuner’s built-in microphone, as if you were playing an acoustic instrument, and let it pick up the sound from the amp.
Up around the bend
This seems obvious, but if you change tunings, let the guitar rest in the new tuning for at least 10 minutes, then tweak it and record. Why? Let’s say you go from standard tuning to Dropped-D, where the bass string is lowered two steps. This slightly decreases the overall tension on the neck, so it will unbow a little bit, which in turn pulls the other 5 strings slightly sharper. The wood takes a few minutes to settle into its new shape and reach equilibrium; if you record during that time, you may find the end of the song out of tune with the beginning.
This is less of a problem with some guitars than others, depending on the rigidity of the truss rod mounted in the neck; most Fenders, for example, will show little or no change when retuning (thanks, Leo), and a carbon-fiber neck will be pretty much impervious to this effect. A 1962 SG, on the other hand, or a 1948 Martin…
The good little bad amp
Most of you probably know this, but…a lot of times, when you’re recording, the best sound you will ever get on tape will come from a small, cheap, dirty amplifier. To be specific, a small, cheap, dirty low-powered tube amplifier, of the sort that Supro, Valco, and Montgomery Ward sold in the 1950s. (The Fender Champ was a slightly upscale version of the same basic design.)
Typically these amps had only two tubes in the audio circuit: a 12AX7 that provided voltage amplification and output tube drive, and a single 6V6 or EL-84 pentode on the output, with no feedback anywhere. (If you’re not a circuit connoisseur, ignore that last sentence.) On a good day, with fresh tubes, they’d provide about 8 watts of pure hamster power.
But oh, could they wail. The best of these little wonders have a down-and-dirty, in-your face distortion that no “drive” circuit or digital simulator has matched yet, and best of all, the degree of bite is exquisitely controllable by the attack of pick on string, combined with the volume settings on your guitar. These amps usually have only two knobs on them (volume and tone), but they possess an infinite palette of touch-controlled shadings.
You can still find these amps for sensible prices at music stores, although people are beginning to treat them as “vintage” instead of “old and cheap,” which inevitably pushes up the price. However, it’s worth noting that there are a number of new amps available with at least a semblance of the old magic; the little Fender Blues Junior, for example, is a more-than-credible modern option.
Don’t die for love
Listen, maybe I should have put this first. Those wonderful old tube amps had an Achilles’ heel: they used a godawful noisy and dangerous grounding system. Typically, the amp had a 2-prong non-polarized plug, plus a switch to flip the input transformer’s polarity. At best, if you set it wrong, you got more hum and buzz in your sound; at worst, if you touched a microphone while holding your guitar, you could get electrocuted. (Indeed, a few unfortunate guitarists have died that way.)
We hate to lose readers. Amplifiers like these should always, always, always be modified for safety; install a 3-wire cord with the proper polarity on the hot and neutral wires, and ground the chassis to the ground prong on the cord. If you’re not experienced with wiring, have your local guitar shop do it. Listen to me on this; an amp of this type could kill you. Better you should violate the integrity of a vintage amplifier than it should violate yours.
No more buzz on Sunday
Another curse of electric guitar recording is hum and buzz. Electric guitar pickups are high-impedance electromagnetic devices, and they’re just dandy for picking up all sorts of crud in the air. Or through the wall; radio-frequency interference (RFI) has a nasty habit of riding the power lines into an amp.
The first step is to turn off every dimmer in your house; the silicon-controlled rectifiers (SCRs) in home dimmers generate sharp spikes as they switch on and off rapidly, and these spikes in turn generate buzz in guitar pickups, both via the AC line and by broadcasting directly to the instrument.
Ideally, you won’t even own any dimmers; I took the one unit out of my dining room when I discovered it was inducing hum into a condenser microphone. But if you have dimmers, turn ‘em off. Bring floor lamps in for lighting if necessary (not halogen torchieres—those usually have dimmers of their own).
Next, turn off any and all fluorescent lights—their starters act like the SCRs in dimmers, and generate the same sort of RFI problems. This includes the compact fluorescent lamps (CFL) being used to replace incandescent bulbs. LED lighting is now affordable and has much less noise, and the light temperature no longer makes you insane if you work near it for too long.
While you’re at it, unplug the bug zapper in your back yard and the electrostatic precipitator on your furnace, if you own either one. They’re spark generators, and those make tons and tons of radio waves (why do you think the radio operator in the old movies was called “Sparks”?) Turn ‘em all off.
Something else that will usually help and never hurt: Clean every contact in the chain (guitar, cables, input and output jacks, the works) with DeOxit, then treat with PreservIt, both products available from Caig Corp. (www.caig.com) or a good stereo store. This not only can clean up buzz problems, but can get obnoxious radio stations out of your guitar amp. Don’t forget, especially, to do your stomp boxes; you’ll be surprised how much better they sound with clean jacks.
Batting cleanup
More strategies to combat buzz: Try a new cord between your guitar and amplifier—even better, try a new short cord. A 20′ cord will act as a great antenna for picking up taxi dispatchers and CB wackos. Shorter and better shielded is the way to go; for recording purposes, where you won’t be moving around much, you might even try a foil-shielded cable; they’re more fragile but quieter.
Shorter may sound different, too. An electric guitar is, electrically speaking, a resonant circuit, with the inductance of the pickups combining with the capacitance of the cable to generate a resonance someplace high in (or above) the audio spectrum. (The sharpness of the resonance is controlled by the input impedance of the amplifier, among other factors.) Using a shorter cable pushes the resonance to a higher frequency, all other things being equal; you may like the result (I often do) or you may not. Experiment.
Back to buzz. It’s almost always worthwhile to plug your amp into a good surge absorber, especially if you have one that also filters out RFI. I use one of the Monster Cable units, and get noticeably less crud when recording electric guitar.
In extreme cases, you might look into shielding kits for your guitar. Alembic used to sell one that was remarkably effective; it’s gone now, but there’s a lot of information available on the Internet for doing it yourself, and Stewart MacDonald (www.stewmac.com) sells the stuff you’ll need—hey, they even have a partial kit of their own. Do a Google search on “guitar shielding” and follow the links.
Finally, if all else fails, some people have reported significant reduction in hum when they ran their guitar amps from a balanced, transformer-isolated AC supply. Some, not all. While I’ve seen balanced power hyped as a cure-all, in practice its efficacy seems to vary from miraculous to none at all, depending on the user’s situation. If you’ve reached that point, see if you can borrow or rent a balanced-power unit before springing for one, or make sure you have an ironclad money-back guarantee.
It’s not the same
It’s been observed often that “drive” circuits in guitar amps don’t really quite mimic the sound of an amplifier that’s really cranking, but I’ve seen very little discussion of why that might be. (Prepare for some oversimplifications.)
First off, the small-signal tubes in guitar amplifiers are triodes (three active elements per tube section, not counting the filament). Output tubes are almost always pentodes (five elements) or tetrodes (four elements); these produce different types of distortion products when overdriven. Not better or worse, necessarily, but different.
Second, the output tubes operate (via a transformer) into a loudspeaker, rather than a simple resistor as small-signal tubes do. A loudspeaker’s cone moves (that’s the whole idea), and in the process, it also acts something like a microphone. When inertia causes the cone and attached voice coil to overshoot its mark, it generates additional voltage in the coil, rather as if the speaker was a dynamic microphone. That voltage is called back EMF (EMF is electromotive force, a technical term for voltage), and it goes back into the amplifier, where it mixes with the amp’s own signal. This creates a different sort of distortion, one which is devilishly hard to mimic, but one that can sound really cool under the right conditions.
Here’s what this discussion is leading up to: If, for some reason, you want to record the amplifier without miking the speaker (why?), the way to do it is to tap into the output signal that actually drives the speaker, rather than someplace earlier in the circuit. Many DIs will let you do this, incorporating an attenuator to drop the signal level down enough to avoid overdriving your microphone preamps. Add a 1/4″ Y-connector and an extra cable, and you’re good to go.
Go stand in the corner
The last bit notwithstanding, you probably want to record your amplifier with a microphone, so you can include the sound of the speaker. Standard practice is to stick the amplifier someplace in the studio at random and put a Shure SM57 about 1/4″ from the grille cloth, perhaps with another microphone out in the room—but that’s not the only way or even, necessarily, the best way.
First, let’s talk positions, shall we? The sound of a speaker, at least if it’s in an open-backed cabinet, is much affected by its surroundings. Back in the early days of rock ‘n’ roll, Sam Phillips of Sun Records used to place open-backed guitar amplifiers facing into a corner, sitting on the floor, then face the microphone into the rear of the amp (the part still facing the room). I haven’t heard many complaints about the sound of those records. Try different positions; experiment. Let a hundred schools of thought contend.
Other voices
You’re not limited to an SM57, either. I’ve written, elsewhere, that this isn’t my favorite microphone for guitar amps; it produces a type of grunge that doesn’t tickle my ear quite right. (Your mileage, obviously, may vary.) So here are a few alternatives.
First of all, microphones for guitar amps can be divided into those that compress and those that don’t. Most dynamic microphones become somewhat nonlinear when hit with loudish noises, that is, they produce a waveform which is a slightly squashed version of the sound impinging upon them. This can sometimes be good, as the slight compression can let the sound sit better in a final mix.
Compressing microphones I have liked include the Electro-Voice RE15 (now gone) and its slightly brighter cousin, the RE16 (still with us), the Sennheiser MD 421 (Mark I) and MD 441 (a remarkably good-sounding microphone that almost no one owns, probably because it’s pretty expensive for a dynamic), the beyerdynamic M 201 (looks like a KM 184 with a glandular condition) and the Electro-Voice RE20 (a richer-sounding cousin of the RE16—check out Bob Dylan’s “Blood on the Tracks” for some well-employed RE20s). My favorite, however, is probably the venerable beyerdynamic M 88, a dynamic mic with a slightly elevated high end that’s wonderfully clean, even when faced with roaring stacks.
On the other hand, in recent years I’ve begun changing the way I record electric guitars, going for less compression from the microphone and aiming at something truer to the sound of the amplifier in the room. To this end, I’ve found a few condenser mics that do a remarkably good job on amps, giving a real sense of the transient bite that (for me) is crucial to an electric guitar’s sound. (I think what I’m hearing and liking is the little “chiff” of increased distortion at the start of a note.)
In reviews I’ve mentioned the remarkable performance of the Blue Dragonfly, which conned me into thinking a Fender Deluxe amp was actually in the room, and the similarly realistic job a Groove Tubes GT67 did on a Roland Jazz Chorus. Another condenser mic that has done yeoman service for me is the Electro-Voice RE200, which has the same sort of high-frequency spike in its frequency response as the SM57, but none of the wiriness. Especially with jazz players, I’ve gotten some lovely sounds from this underappreciated little gem. (I don’t think I’d use it on a stack turned up to 11, but then I haven’t had the occasion to record that for a while.)
And from here, we can dive into the details of mic placement and other mic choices, and what to do afterward… which are topics for another article.