Capturing a band’s sound in a home studio is by no means impossible… if you know the tricks!
By Sven-Erik Seaholm
You and your bandmates have spent the last several months writing, arranging and rehearsing your music and finding your own ‘sound’. You’re now feeling more than ready to take to the stage and share your collective musical vision with your friends and fans. Why can’t you just go on stage and strut your stuff? Because no self-respecting club owner will even book you without first hearing you. So that’s one reason for coming up with a recording.
Record? Why oh why?
That’s not the only reason to have a recording of your band’s music! Perhaps you’ve already passed the audition, but your fans are clamoring for “product”. Maybe you want to sell them an EP, or an entire album’s worth of material. Alternatively, you might just want to capture a rehearsal so you can finally point out to the bassist that the F he’s playing under your B chord doesn’t sound nearly as cool as he thinks it does.
Start by assessing your needs, and plan accordingly. For instance, recording a simple demo for the band’s internal use is less involved than producing a retail-ready CD. Lots of bands simply post one mic (or even a smartphone) in the middle of the rehearsal space and hit Record. Probably the lowest-fi of all solutions, it also has its positives: Energy, atmosphere, excitement—that elusive “live” element that even the best producers and engineers can find difficult to capture or replicate.
For the purposes of this article, let’s assume one of two scenarios: Either your band can’t afford tracking in a professional studio, or past studio experiences have produced less than stellar results. You really want to take the reins this time, without worrying about the studio clock constantly running in the background. You want to make the very best recording you can, one that sounds like you and your band on your very best day, giving your very best performance. This is not only possible, but people are actually doing it in home studios every single day.
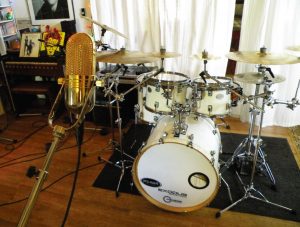
Figure 1: Capturing an entire drum kit with a single ribbon microphone.
Full band vs. rhythm tracking
Record the full band live and you get the most of the band’s unique “flavor”. That’s good. But live tracking means bleed among microphones, and that’s bad, because it means things can be hard to fix.
For example, you could have everyone playing and sounding terrific, but the guitarist flubs his solos. You try to overdub him, only to find that the original performance is still in the drum tracks and can’t be mixed out. This often happens with vocals too, or really anything that is loud enough to be picked up by neighboring mics. So what is the solution?
Rhythm tracking can balance a live feel with a focused, articulate sound and arrangement. This most often involves the drummer, bass player, and at least one “chordal” instrument (guitar or keyboard), along with a “scratch” vocal so that every-one knows where they are in the song. With these players all performing at once, you get the energy, feel and bedrock groove of the arrangement, which provides a solid and more emotionally connected foundation on which to build.
You can then spend a lot of care, time and attention on the overdubs, and even if each rhythm part is eventually replaced and re-recorded, the final result will have a different character compared to a project that was entirely done one track at a time.
Space and isolation
Up to now, you’ve been doing most of your recording in the space you’ve set aside as your personal recording studio. Maybe that’s a spare bedroom, or the garage, or a walk-in closet. It may not accommodate more than one or two musicians besides yourself, if that. Now you’ll not only need musical communication (preferably sightlines), but also separation between players, so it’s probably time to stretch out a little bit. Designate the space where your computer or multitrack recorder currently resides as your “control room”, and see if you can make available other parts of your house, at least temporarily… as long as you get the consent of your spouse, partner and/or roommates.
Scouting locations to set up instruments and players in your home can be fun. Some rooms sound great when responding to the energy of a drum kit or a guitar amp. Others provide silky textures for vocals and horns. Bathrooms and shower stalls can lend a brightly reflective, even metallic flavor that can be useful. Mostly, though, you’re trying to find a spot where the musicians can all see each other, while simultaneously isolating guitar amps and other loud sources.
Let’s assume you’ve got a modest living room with a couch, a coffee table, an armchair, television and stereo. If you can move the furniture out of the room completely, great. If not, try at least pushing things towards the walls, to open up as much space in the center of the room as possible. At one side, set up the drums in a way that the drummer can play comfortably, facing toward the center. Alternatively, you can set up the drums in the center of the room, with the other musicians scattered around the room’s perimeter.
The main thing is to open up those sightlines. When a band performs, there is a lot of subtle communication that happens: A simple head nod may signal the entrance of the chorus. A subtle facial expression and slight bend at the knees can ask the band to bring down the dynamics. The drummer can mouth “1, 2, 3, 4” before a big ending, etc. Without these understated cues, hours of precious recording time can be wasted on otherwise needless retakes and arrangement-related discussions!
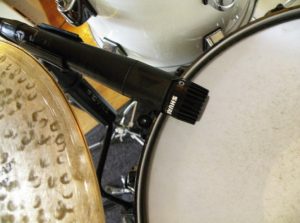
Figure 2: Proper positioning of a Shure SM57 on the snare.
Once you have your musicians in position, you need to decide where to put the guitar or keyboard amplifiers. Any adjacent room that can be closed off is a good start. Room tone for rhythm instruments usually matters less than for subsequent overdubs like riffs and solos, so the nearest bedroom may provide a nice controlled environment for this stage. If you have no separate room or closet for this, at least set the amp up as far away as possible.
Now you can set up mic stands, mics and DI boxes. You may need many more mics and stands than for a regular rehearsal or gig. Ask everyone to pitch in what they can—headphones, headphone extension cords, mics, cables, guitar stands, etc. Plan the signal chain for each element you’ll be tracking, including the distance to the control room where they will ultimately be plugged in. Do it ahead of time. If you have spare mics and instrument cables on hand, you’ll probably never need them. If you don’t, Murphy’s Law will strike!
How many inputs (and how many tracks) do you have? This will affect how you will proceed. For a recording of the full band, with everybody in it at once, the methods will be different depending on whether you have 2, 4, 8, 16 or more inputs. The fewer inputs you have, the more creative you will need to be.
When two inputs are all you have
Let’s start with a minimal setup, one that calls for “creative” (read: desperate) measures when you’re caught in a pinch. If you have a DAW with an interface that only has two line inputs, your first recourse should be to look around for a loaner or a rental with more inputs.
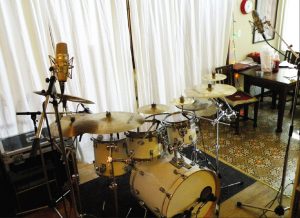
Figure 3: Overheads are positioned to capture cymbals and other parts of the kit not directly miked. Place them equidistant from the snare mic.
Failing that, an auxiliary mixer or two can help. With four mic inputs on a mixer, you mike the drums, EQ and pan them, and run the stereo submix into your DAW interface. The problem: If it only has two inputs, all you record is the drums. If you’re desperate, you can pan all drums to one mono channel and use just one of your two DAW inputs, and all other instruments including vocals go in mono to the other of your two DAW inputs. That will give you a recording in mono after you pan everything to center in your DAW. (Like I said: desperate!)
If you don’t have an external mixer, the best way to capture the drums is to set a single microphone up about 4 feet in front of the kit, as high as the drummer’s head and tilted down slightly, so as to capture the snare and bass drum most particularly (see Figure 1). You can then use the other of the two inputs to lay down a rhythm guitar or keyboard part for reference.
Alternatively, you can record a guitar or keyboard part along with a vocal into the two inputs, then have the drummer record his parts while playing along to those tracks. In this case, the bass drum and snare go into one input and the rest of the kit into the other. If the resulting drum sound is not defined enough for your tastes, you may be able to further enhance things by using Beat Detective, Drumagog, Tracker in Superior Drummer, or some other sound replacement solution.
Things improve with four and eight inputs
If your DAW interface has four line inputs, you can use two for a stereo submix of however many mics you use on your drums through an external mixer, and use the other two for a submix of everything else that you miked. That opens up a lot more possibilities, as long as you have the mixer or mixers to create those stereo submixes. Quite likely you or your band have a PA mixer that can do the job, or you can borrow one or two mixers—small but capable mixers are cheap these days.
With eight inputs on your recording interface, you definitely have enough to capture a solid representation of your band: Scratch vocal, rhythm guitar, bass, two overhead mics, snare and kick. If that interface has eight mic inputs, better still—you won’t need an auxiliary mixer unless you want to submix more mics for, say, the drums.
The beat goes on
Drums are always the primary challenge. Not only do they define the tempo, groove and overall feel of each song, but they’re just so… loud. They will find their way into every mic; not just the ones you want them to, but vocals, guitars, and any other mic that is open in the same room, or even in neighboring rooms!
Attempting to isolate and contain their volume can also create problems. For instance, if you were to place them in their own room and close the door, you may be able to minimize this leakage quite well. However, unless this room has a window that affords visual communication between the drummer and the rest of the band (sliding glass doors are wonderful this way), this will be at the expense of sightlines, and will adversely affect the actual sound of the drums in the room where everybody else records.
Start with the kick drum mic; dynamic models like the AKG D112, Electro-Voice RE20, Audix D6 are great choices, or in a pinch you could even use the venerable Shure SM57 (although the Beta 52 would be a better choice). With a head (skin) that has a hole, place the mic just inside the hole, pointed towards the beater. If there’s a head with no hole, then just point the mic where one would be (at about the 4 o’clock position) 2–4″ away from the head. If there’s no outer head, again, pretend there is one and place the mic accordingly. To help deaden the drum’s resonance, place a towel, blanket or small pillow inside the drum, right up against the batter head; move it around until it gives you a punchy and controlled “thwack”, without a lot of the ring or rumble that can quickly muddy up your bottom end.
The snare is another drum that works very well with dynamic mics like the SM57 (a classic on snare!), but I’ve heard great results from condenser and tube mics as well. If you’re seated on the drum throne, the mic would be positioned at 10 or 11 o’clock, about an inch above the rim and hanging over the inside edge about an inch as well (Figure 2). Tilting the mic down will highlight the tone of the drum’s body, while keeping it more parallel with the drum head will provide more “crack”. Experiment with this until you find an angle that provides the right combination for you.
Overhead mics are generally condenser models, like the Sennheiser e614, Aston Origin, and Roswell Mini-K47, but on certain sessions I’ve heard two SM57s sound simply amazing in this role. They should be set up at the sides of the drum kit, lined up with the front of the kick drum. Place them at a distance equal from each other as their proximity to the snare (Figure 3). You can start by pointing them at the drummer, but as you rotate them outward you’ll capture a wider stereo field. Again experiment until you find the sonic ‘image’ that you like the best. Try to keep these mics situated higher than your cymbals and, if possible, not too close to any one of them. I like trending toward the direction of the ride and hi-hat, which helps to bring those elements out while minimizing ‘cymbal wash’ and other potential problems.
If you have a compressor available, dedicate it to the kick drum. This is one piece that needs to be a constant presence in your mix, unless you’re recording a jazz player where subtle nuances on the kick drum are a part of the style. Set your Attack so that the click and other transients are able to slip through before the compressor kicks in, set a Ratio of about 4:1, and a Threshold setting that gives you a total of about 3 to 6 dB of attenuation. Set the Release to a fairly quick setting, so that the signal isn’t still being attenuated by the time the next hit comes in. Then use makeup gain to bring the overall loudness back in line with the rest of the kit.
Drum EQ will depend on the style of music, and—since the kick drum and the bass need to have a good relationship both in time and in tone—the EQ will also depend on what your bass player’s tone is like. Start by pulling out a little at around 350 Hz, as it often keeps things clear down there. A subtle bump at both 100 Hz and 3 kHz can bring more presence to the kick drum’s most critical frequencies.
Snare drums are often compressed as well, but I would advise against using a compressor in the tracking stage, as it can very easily be overdone, robbing it of both its tone and inherent dynamic excitement. There are quite often rings, rattles and unwanted resonances associated with the snare drum, and this is usually the element of the kit that requires the most attention. A product called RTOM Moongel is a great solution, as are little pieces of tape, or even the drummer’s wallet!
The best method I’ve found is to use duct tape (or better yet, gaffer’s tape, since it comes off without leaving any residue) that has been folded to make little ‘fins’ (Figure 4). These seem to absorb more energy without overdamping the drum. Lightly run a finger along the outside of the snare head, while simultaneously hitting the drum with a stick, until you hear the offending frequencies subside. That’s where to stick your damping material. Repeat this process for your toms as well.
It’s wise to note that no amount of Moongel or gaff tape can take the place of proper drum tuning. With your heads properly seated and tensioned lightly, tap the head near each rim lug. Using a drum tuning key, tighten to raise pitch and loosen to lower pitch until all of the lug locations ring at the same note or frequency. You want to do this in the same way you’d change a tire on your car: Tune the lug at the 6 o’clock position, then tune the one across the drum from it at 12 o’clock. Then go to the one at 9 o’clock, 3 o’clock and so on. Press your open hand onto the center of the drum occasionally to be sure you have a solid ‘seating’. The Drum Dial is a great product for doing this fast and easily, and I’ve had good results using a simple guitar tuner in this role. Toms should also be tuned in this fashion, but be careful to check that the “pitches” that the toms are tuned to are compatible with each other, if not the song itself. Otherwise you may hear ‘beating’ or even phase cancellations that can diminish their overall tone.
Provided you have the available inputs, miking the toms would be the next order of business, starting with the floor tom. Dynamic mics like the Sennheiser MD421 are once again the go-to choice, but this is an application where I’ve seen tube mics and other condensers work equally well. Pointing the mic toward the center of the drum head at about 6 inches up and away sounds great and keeps your precious mics from being struck by the sticks of an overzealous drummer. Stick with a cardioid pickup pattern, as omni or figure-8 will introduce unwanted cymbal bleed. Rack toms may require a slightly more perpendicular orientation in order to help other drums and cymbals from taking over as well.
Once you have the drums sounding the way you like, you may then employ some subtle EQ. You can add a little ‘snap’ to the snare at 4.5 kHz, as well as add some body at around 450 Hz. Try cutting or boosting at 800 Hz to dial in the right amount of ring and woodiness for your style of music. Toms like a bit of 3.5 kHz to help cut through, as well as a bit of boost at 135 Hz for a little velvety thunder. Season your low mids (250–450 Hz) to taste.
Although the drums are obviously a collection of different components, it is best to think of them as being one instrument. Consequently, it’s often best to listen to them as a unified whole. With your snare and bass drums centered, pan your over-heads hard left and right, your floor toms 50% to one side and the rack toms 50% to the other. Listening to them this way not only gives you a better ‘visual’ picture of what you’re working with, but it also gives you instant feedback as to how your adjustments to one element are affecting all the others.
The bottom
Bass can be quite a bit easier to capture than other instruments, especially if you’re not having to mic up an amp. A DI box (Direct Inject) will help—they come in active and passive versions, and with varying input and output configurations; for bass guitar you probably want an active model. There are lots of companies making great DIs of all styles, but the website for gear maker Radial Engineering (radialeng.com) is noteworthy for its tutorials on the subject of DI; see the “Important Links” on its DI product pages.
I prefer to run the bass into a tube stage of some sort, because I feel that a very slight bit of harmonic distortion helps the sound to cut through the mix slightly and “speaks” more throughout its upper registers. The PreSonus Studio Channel and the Universal Audio 6176 are channel strips that provide a tube preamplifier with instrument input as well as a com-pressor and an equalizer. This goes a long way toward capturing a tone that you may not have to do much else to after tracking.
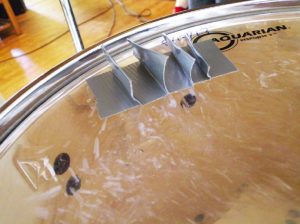
Figure 4: This little trick with gaff tape can help your snare and tom tone immensely, if you don’t have other dampers.
Driving the preamp’s tube ever so slightly will give you that previously described edge and compressing the signal at 3:1 for 3–6 dB of compression will keep its level reliably present. You may want to engage a highpass filter to remove any excess boom and rumble below 50 Hz. The upper register can benefit from a slight rise around 200 Hz and the sound can be brought further forward with a little taste of 1 kHz.
This DI signal chain may well be your best bass recording scenario, because once this is dialed in, you’re only hearing it in the headphones and not all over your drum tracks, even though the bassist is often standing right near the drummer! However, if an amp is absolutely required, try to use the smallest cabinet available, situated as far from the other instruments as possible (preferably in another room).
One other thing to keep in mind: it’s a good rule of thumb (not an unshakable law!) that if the bass has active electronics, it pairs up best with a passive DI, and a bass with passive electronics benefits from an active DI. Some recording musicians find that active-with-active gets too loud, bright, and “clanky”, while passive-with-passive can be more muddy and undefined than you might remember the bass sounding. Experimentation is key here, and having a passive DI and an active DI or channel strip to choose from is helpful.
Finding your keys
Keyboards like synths or samplers benefit from the use of a DI box as well. Unlike the bass, their sound usually tastes great ‘right out of the can’, so the mic cable(s) from the DI box can go straight into the interface or mixer, without the need for additional signal processing. Keep in mind that if you want the full-fidelity stereo sound inherent in most modern patches, you need two inputs.
When straining for available inputs, this is one place where you might be able to work around your limitations by using MIDI, as opposed to audio cables. This would require loading a software instrument into a track on your DAW and then controlling it via the keyboard. A band set on recording a Hammond B3 sound, for instance, could do so in this fashion without the space, weight and potentially deafening volume that accompanies that particular instrument. You also have the additional benefit of being able to experiment with different sounds and patches at any time in the process, all the way up to the final mix phase.
Those bands that include acoustic keyboards like piano and organ, or vintage ones like Wurlitzers, Clavinets and Fender Rhodes might do well to track with “modern” keys as described above and subsequently overdub their acoustic counterparts at a later session… assuming they’re even needed, considering the quality of many of today’s virtual instruments!
Six-string solutions
Guitars can be the proverbial pebble in your recording shoe, because they are often so integral not only to the groove, but the song’s initial inspiration. I know several artists who can’t sing the song without simultaneously playing it. So, with singing guitarists, problems arise not only from the sound of an amp bleeding into the tracks, but even from the sound of the pick on the strings if the guitarist is standing too close to the mics!
You can try tracking with an electric guitar into a DI, but this yields a sound that is not only weak, but uninspiring. You may be able to turn this negative into a positive by employing software guitar amp simulators (digital multitrack recorders often offer these too). As with MIDI keys, you are afforded the additional benefit of getting exactly the sound you’re looking for at a later stage in the process.
The problem of picking up the guitar in the vocal mic can be further compounded by the use of an acoustic guitar, which is of course designed to command its own ‘acoustic’ space.
Electric guitar can be tracked with great results by placing the amp in another room. I prefer bedrooms, because the bed offers sound-absorbent qualities, helping to reduce some of the acoustic anomalies inherent in smaller rooms, and even a bit of soundproofing. Cord length can be an issue here, depending on how far away the room is. Again a DI box can be used, because they usually come with two 1/4″ inputs which can allow you to “daisy chain” two instrument cables to the desired length. Or you can run a long cable to your tuner or other effects and retrack these parts later.
Whether recording electric or acoustic guitar, you’ll usually want to situate the musician as far from open microphones as possible, although some of my favorite guitar tones came as a result of hearing the pick and strings in the room along with the amplified guitar signal!
I hear voices
The concept of “scratch vocals” is almost certainly a direct result of how completely unusable a vocal recorded during a band session can be, considering all of the leakage from the drums, amps and guitars that usually finds its way into those vocal tracks. Even if that bleed could be considered acceptable, missing a note or forgetting a line would mean overdubbing it with everyone else playing along, which is definitely not the best way to go. Encourage the singer to sing with an energy that is just loud enough to be clearly heard, without being so loud that it makes its way into the other mics. Stops and a capella breaks should be sung extremely softly or even mouthed, so as to keep the vocals out and the excitement in.
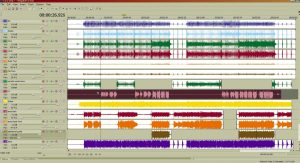
Figure 5: In this song, the lead vocal is on Track 8. We use it as a guide to see where to remove audio from Track 7, which is the scratch vocal. What’s left behind on Track 7 is a nice extra room sound that can really liven up your mix if used judiciously!
Here’s a really cool trick I developed from my desire to “use all of the buffalo” when recording basic tracks: When listening back to the rhythm tracks, try muting and unmuting the scratch vocal track. You’ll usually find that the drums sound a lot more exciting and alive when the scratch vocal isn’t muted, even though the performance or sound of the vocal itself leaves a bit to be desired. This is because you essentially have an extra “room mic” at your disposal.
Intros, riffs, segues and solos where there are no vocals can be bolstered by this phenomenon, by simply muting or deleting the sections of the scratch vocal track that have vocals (Figure 5 shows an example, with the Lead Vocal on Track 8 as a guide for where to cut out the Scratch Vocal on Track 7). The end result is a depth and “kicking up a notch” to the drum sound behind these instrumental sections, lending an even more thrilling and live-sounding dynamic to the band’s presentation.
Can you hear me?
In addition to the visual cues we’ve touched upon, audio monitoring is key; if your band can’t hear the music correctly, they can’t communicate it clearly, either. Again, depending upon your situation, solutions will vary.
Most professional studios have headphone amplifiers with more than enough outputs to ‘feed the cans’ for a large band. PreSonus, Mackie, ART and others all provide solutions that can power up to 4–8 pairs at a time. You may not be in the market to upgrade your studio in this way just yet, so once again, you may need to improvise. If your interface or digital multitrack has two head-phone outputs, you may be able to feed 4 pairs of headphones, utilizing cable splitters you can find at your stereo store. This doesn’t necessarily provide you with a bona-fide “monitor mix”, though. It will be the same mix for everybody, with little or no ability to customize it to suit anyone, much less everyone!
If you have the ability to send a monitor mix (or even better, multiple monitor mixes) to the main headphone outs (or preferably a headphone amp), you’re probably good to go. This is a good way to make use of the multiple outputs provided on many mid-priced audio interfaces.
Start by taking the drums out of the headphones, except for the bass drum, which helps to anchor things for the rest of the band, especially the bass player. A decent vocal level is really one that’s just loud enough to guide the players through the song with lyrical, melodic or verbal cues. More than that is usually overkill (except to the vocalist, of course).
The bassist often asks for a lot of himself in the monitors, but this can come at the expense of unwanted distortion, because the bass frequencies are hard for the small speakers in the headphone to reproduce. If your monitor send has EQ, you could cut those lower frequencies, allowing for a higher overall bass level.
The guitar or keys need to find their space somewhere between all of that and it can be an arduous process to find a happy middle ground for all. Eventually you will arrive at a place where you can move forward, but keep in mind that you can’t usually get a great performance from a musician who’s unhappy with what they’re hearing. A little extra patience and effort here will pay larger musical dividends later in the session.
Headphones that are open-backed will bleed into nearby mics—try to use the closed-back circumaural ones that wrap around the ears and keep the sound confined. Closed-back supraaural (on-the-ear) phones can also work if they seal tightly enough, and don’t discount in-ear monitors if the band does a lot of gigging… they’re what the players are used to, and provide great isolation.
It’s alive!
The time for tracking and listening back has finally arrived. Be sure to record count-ins at the beginning of each song. Something that goes “1, 2, 3, 4, 1, 2… ” with the last two counts silent works great and gives you cleaner band intros. Setting and/or readjusting your levels as the band performs will get you to a point where the session starts to drive itself. Relax, have fun and remember that you’re enjoying the privilege of making and recording music!
At the end of these rhythm sessions, you’ll be able to use all of the space, mics and other gear to get great sounds in the overdub stage. Close-mic the guitar amp and add a room mic as well. Record the family piano in the corner. Sing in the hallways. Stomp and clap in the living room. Explore and discover. This is all the fun part!
Once you’ve recorded all of these tracks, you can then return to your DAW or multitrack and focus more on the finer points of editing, eq-ing and otherwise effecting your tracks on their way to the final mix stage. Arriving at your previously stated destination: A recording that sounds like you and your band on your very best day, giving your very best performance.