
Stereo miking techniques for capturing a tricky instrument
By Robert Auld with Mike Metlay
Imagine that I am a typical pop music engineer, and I get called up for advice on how to record a classical guitar:
Rrrrring!
“Hello, AuldWorks Recording, Bob speaking… OK, you have a solo guitar recording. Piece of cake; just put an SM57 in front of the amp and yer done… Whaddaya mean there’s no amp?… Oh, you got some of that Bach and Segovia stuff, huh?…. Well, gee, I dunno. Most of the sound comes out that hole in the front, right?… You tried that….It sounds boomy?… Didja try switching in the bass rolloff?… You did… It still don’t sound good… Well, I really dunno what to tell ya…”
All right, stereotypical pop music engineer. But you get the point; classical acoustic guitar is a very different animal from its amplified descendant. Just sticking this month’s hot microphone in front of it will not necessarily satisfy you, or the guitarist (whether that is you or a second party).
What’s going on in there?
To get a handle on how best to record classical guitar, let’s start with some acoustical analysis. Here is how Harry F. Olson describes the instrument in Music, Physics and Engineering (2nd edition (New York: Dover Publications, Inc.), p. 114):
“The acoustic guitar consists of six strings stretched between a combination bridge and tailpiece fastened on the flat top of the body and the end of a fretted fingerboard. The body is made of two flat parallel boards, fastened together along the outer edges. Vibrations of the strings are transmitted from the tailpiece to the top of the body. The bottom of the body is mechanically coupled to the top by means of a post. The cavity of the body, coupled to the outside air by means of a hole, constitutes a resonator. The top and bottom of the body and the cavity and port combination form a multiresonant system for coupling the vibrating strings to the air.”
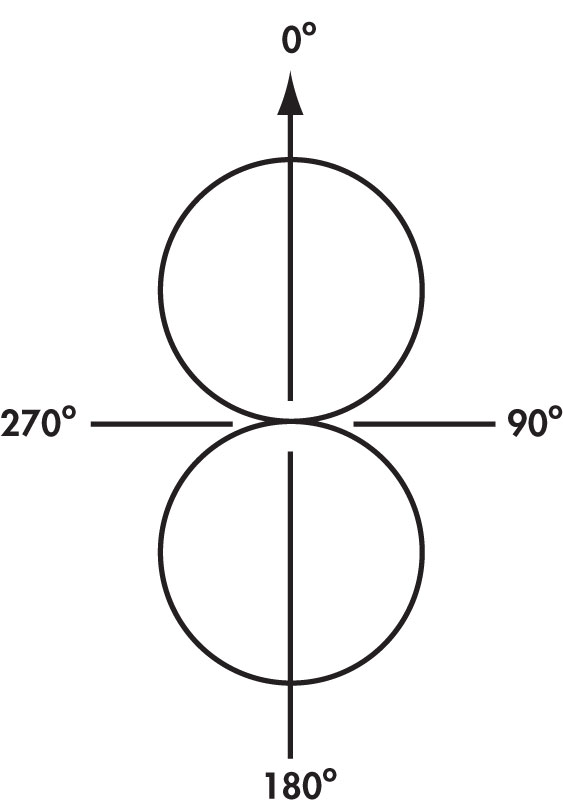
One consequence of this “multiresonant system” is a directional sound pattern that varies with frequency, sometimes almost from note to note. At low frequencies, the directional pattern of the guitar is a figure-8, which is characteristic of an acoustical doublet. That is, the top and bottom of the body vibrate approximately in phase, connected as they are by the sound post. In the mid-frequency range the directional pattern starts to show lobes, as the top and bottom are no longer in phase, so we get cancellation effects. In the high-frequency region, most of the radiation comes from the top of the body. There is very little coupling between top and bottom in this range because of the large mass of the post and bottom, so that the amount of high-frequency vibration transmitted to the bottom is very small.
Clearly, if we try to close-mic the acoustic guitar, the results will vary greatly depending on the exact position of the microphone relative to the body, the register in which the instrument is played, and the amount of proximity effect inherent in the particular microphone we have chosen. When we add in differences between instruments and variations in playing styles, it is no wonder that there seem to be as many different acoustic guitar recording techniques as there are engineers!


Directions as they relate to polar patterns…
Give me some space
When recording solo classical guitar, we do have a way out of this mess: we can move our microphones back, and so pick up the whole instrument in the perspective of the room. This method implies several things:
1. We need microphones with low off-axis coloration, as they will be hearing at least some of the room acoustics, which approach from all angles. In many cases, this means small-diaphragm condenser mics.
2. The instrument is not very loud, and is often played with great subtlety. The sound pickup is not very close. Microphones with low self-noise and mic preamps that can add a lot of gain without adding a lot of noise are an advantage.
3. The recording room needs to be fairly quiet, should have decent acoustics, and should not be too small. A medium-sized domestic living room is probably the lower limit, and in that case you might want to add some reverb to create the impression of a larger room.
In any case, good results will depend on intelligent application of classic stereo microphone techniques. Here are some of the options available:
Spaced pair omnidirectional
You usually need a really good sounding room to get away with spaced omnis, but given that, the sound can be exceptional. As you are recording a solo instrument, you do not need wide spacing between the microphones; eighteen inches or so should work just fine. Distance from the microphones to the instrument will vary, depending on room size and acoustics. For a fairly intimate sound, you might try starting at about three feet back. Larger rooms may allow more distance. Experiment.
One thing to avoid is microphones with a pronounced high frequency peak. Good classical guitarists do not like hearing a lot of string and finger noise on playback, and hyped high frequencies will emphasize those noises. Good omni condensers with extended, flat high end response are available from a number of manufacturers.
Another consideration is floor bounce. With conventional microphones mounted on stands, sound bouncing from the floor will interact with the direct sound arrival, producing a comb filter effect. Audibility of the effect will depend on timing, which varies with microphone and sound source position, and the floor material (reflective or absorbent). Here is where minor adjustments in microphone position can make a surprising amount of difference.
One way of avoiding floor bounce problems altogether is to place the microphones on the floor. This can be done with conventional microphones (placing them on a foam pad can help avoid picking up floor vibrations), but is better done with microphones designed for the purpose. These so-called boundary mics use a a small-diaphragm omnidirectional mic element facing a mounting plate at a very small distance—a small fraction of an inch. When the mounting plate is placed on the floor, the mic element is said to be in the pressure zone of the floor, and achieves a uniform hemispherical response above the floor.
Floor-mounted microphones can also be an effective live concert recording technique; the low profile of a pair of floor-mounted microphones may be acceptable where stand-mounted mics would not be.
A final consideration with spaced omnis: the monophonic compatibility is potentially poor, as the two spaced microphones, when combined in a single channel, can produce a comb filter effect just by interfering with each other.
Blumlein Stereo, achieved with two bidirectional microphones.
Blumlein pair
This is another technique where a really good sounding room is important. Again, given a good room, the results can be outstanding. Named after Alan Blumlein, the great British engineer who first outlined this technique in the 1930s, the Blumlein pair uses two crossed figure-8 pattern microphone elements. While it can be implemented with separate microphones, it is far easier to use a stereo microphone that can be adjusted for crossed figure-eight patterns.
The Blumlein pair has a number of advantages for this type of recording. The figure-8 pattern tends to discriminate against floor bounce in the vertical plane, the rear lobes pick up room ambience in stereo with low coloration, the off-axis response of figure-8 pattern microphones tends to be much more uniform than that of other directional microphones, and the monophonic compatibility is inherently good.
In the right kind of room, a Blumlein-pair recording can give you a stereo image that verges on the holographic. However, in an unsuitable room, a Blumlein pair will mercilessly reveal just how unsuitable the room is. And in live concert recording, there will be no suppression of audience noise.
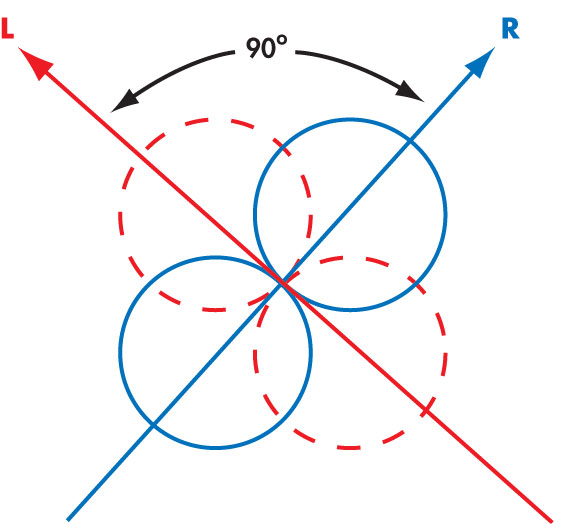
X/Y Stereo
XY stereo
XY stereo is usually implemented with a pair of cardioid microphones placed at a single point, angled 90 degrees from each other. Wider angles can also be used, for a wider stereo image. XY stereo tends to pick up less of the room than the previously described techniques, and so can be useful in smaller rooms, or for discriminating against audience pickup in live concert performances. The coincident placement of the two mic elements ensures good mono compatibility. The stereo image of the XY technique tends to be narrower (especially over headphones), and reproduces room ambience less well than some other stereo techniques.
When XY stereo is used to record a solo instrument, the direct sound approaches each microphone from about 45 degrees off-axis. Cardioid-pattern microphones typically have rougher off-axis response than omni or figure-8 types, especially in the case of the large-diaphragm models commonly used for studio vocal pickup. For that reason, a pair of the cheaply-made condenser studio mics that are so popular right now may not be the best choice for recording solo classical guitar. Small-diaphragm condenser mics will probably give more predictable results, given their more uniform polar patterns and smooth overall response. There are also a few dedicated stereo microphones that will record in the XY pattern.
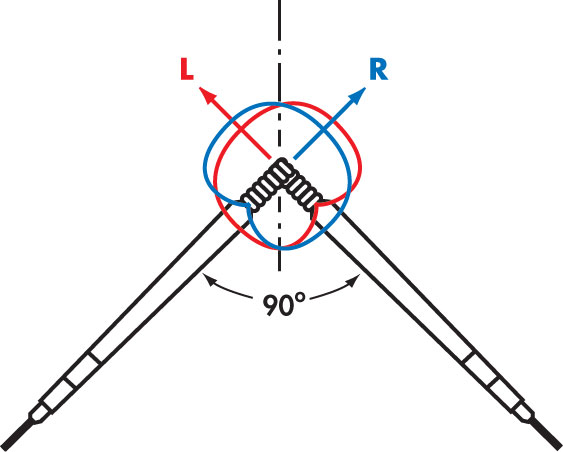
ORTF
A close relative of XY stereo, ORTF also uses two cardioid elements, but they are spaced about seven inches apart and angled away from each other by 110 degrees. This quasi-human ear spacing ensures excellent imaging on headphones and also works well with loudspeakers, at the expense of some mono compatibility. ORTF picks up about the same amount of room ambience as XY stereo, but seems to spread it wider in the stereo image—no doubt a function of the spacing between the microphones. The cautions against using microphones with poor off-axis response in XY stereo also apply to ORTF, for the same reasons.
Dedicated ORTF microphones are fairly rare, but it is common to implement ORTF (or a close approximation) using a pair of conventional microphones mounted on a stereo “T bar.”
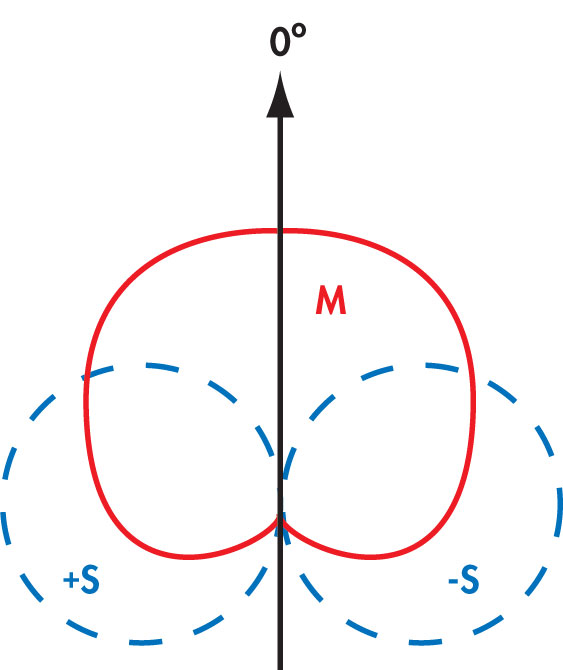
M/S Stereo
Mid/Side (M/S) stereo
Mid/Side stereo uses a middle element (usually cardioid, though it can theoretically be any pattern) facing straight at the sound source, and a bidirectional (figure-8) element facing sideways. The middle element is responsible for the monophonic element of the sound, and the bidirectional mic picks up left and right. The two elements are then matrixed together to produce the L/R stereo output; this fancy-sounding but very simple operation can be done on any mixer with polarity inversion on its inputs, or in a dedicated box.
The big advantage of M/S is that you can adjust the ratio of the two elements for more or less room ambience and stereo spread without moving the microphones. With the right setup, this can even be done remotely during a live performance, or afterwards at mixdown. (To accomplish the latter, you record the Mid element to one track and the Side element to another, leaving the matrixing until later.)
Mono compatibility of the Mid/Side array is as good as it gets; when the two channels of a matrixed M/S recording are combined, the Side part simply cancels, leaving the monophonic Mid element. For this reason, M/S stereo has been very popular with broadcasters. Off-axis coloration is much less of a factor with M/S stereo than with X-Y or ORTF setups; the Mid element is pointing right at the sound source and the Side element is a figure-8 mic, inherently smoother off-axis than other directional microphone types.
Surround sound
When recording solo classical guitar, the main point of surround sound will be to reproduce the sound of the room. The front channels can be fed by almost any of the stereo techniques described previously, and the surround channels can be handled by a pair of mics out in the room. Spaced microphones are usually thought to be superior to coincident stereo pickups for reproducing surround ambience; their output decorrelates better.
If a front center-channel feed is considered necessary, combining spaced microphones for the left and right front channels with a center channel microphone would likely work. Mono compatibility (and stereo downmix compatibility) would be variable, depending on things like relative microphone positioning and balancing.
Classical guitar with other instruments
If you are recording the guitar with other instruments of about the same loudness, such as other guitars, flute, etc., the recording becomes an exercise in recording a group of musicians in a given room. If the room is large enough that you can record everybody with a simple stereo pickup, it is largely a matter of moving the musicians around relative to the microphone array until the balance is satisfactory.
If the room is too small for recording everybody with a pair of microphones, you will have to use more microphones, closer to the musicians. In the case of the guitar, try not to get any closer than necessary, and pay special attention to proximity effect if using directional mics. A cardioid mic with a healthy bottom end can get boomy pretty quickly if too close to the body of a guitar. Be prepared to use EQ and reverb as needed. This is not an ideal recording situation, so don’t be afraid to try whatever methods might help the sound.
If you are recording a guitar concerto with orchestra, the orchestra will be far more powerful than the guitar, and you will have no choice but to spot-mic the guitar. I would recommend using a small-diaphragm cardioid condenser with a smooth top end. Point the mic right at the guitar from about 18 to 24 inches away. As your objective is to give the guitar a little boost over the orchestra, this should do the trick without overdoing it. If you feel the guitar spot pickup is too monophonic sounding, use two microphones in the same position, pointing at the guitar, about 6 to 7 inches apart. Pan them left and right. This will give you a stereo spot pickup, which may blend better with the stereo orchestra pickup.
The DPA d:vote 4099 is an exception to the rule of needing 18–24 inches of space, as it has exceptionally smooth off-axis response. It can be mounted to the guitar itself without interfering with the performer’s playing, which in turn allows for player movement with no attendant tonal changes.
Classical guitar and sound reinforcement
Due to the need to prevent feedback, especially from onstage monitor speakers, use of a sound reinforcement system often requires close microphones on virtually all instruments, especially a soft one like classical guitar. Even with careful choice of microphone and placement, the result will be a compromise. If the sound reinforcement microphone seems well chosen and placed, using a microphone splitter for your guitar recording feed should work adequately. If the sound reinforcement mic is something along the lines of an SM57, you might be better off setting up a separate guitar recording mic if possible.
I know of one classical guitarist who uses a high-quality portable sound reinforcement system for performing with classical groups that would otherwise overbalance him. He uses a small-diaphragm cardioid condenser mic on a short stand, a high-quality mic preamp, and a small powered loudspeaker. This little purpose-built system sounds very good and blends well with the acoustic chamber groups with which this artist performs. When recording those groups, I have not found it necessary to spot-mic his guitar; the speaker is picked up adequately by the main stereo microphone. You may want to experiment with setting up a similar system if the situation warrants.
The recorder question
The main requirements for recording machines used for recording classical guitar are: wide, flat frequency response, low noise, low distortion and little or no wow and flutter. Most digital recorders will be more than satisfactory, provided data compression is avoided—record to WAV or AIFF rather than MP3, even if the final product will be compressed for streaming.
In the analog domain, a professional quality open reel machine operating at 15 ips tape speed is probably the minimum. Despite its recently having come back into fashion in the indie world, analog cassette is not recommended, mostly due to the wow and flutter typical of that medium. Also, acoustic guitar is one of the instruments most likely to reveal any weakness in analog noise reduction schemes. The sharp transient attack and limited sustain of the guitar work against the psychoacoustic masking of tape hiss. This is a situation where unless you have the best possible analog equipment, you will get more consistent results by sticking to a digital recorder or DAW.
In conclusion
The normal objective in recording classical guitar is to create a realistic illusion of how the instrument sounds in a good room. Using good stereo microphone technique in an acoustically suitable room is the surest way to accomplish that.
This does not mean that you cannot use the techniques of the pop music studio to modify the sound of the instrument. But if you want the classical guitar to sound like itself, typical studio close-miking techniques are not ideally suited to that purpose. As always, choosing the right tools and techniques for the job can make a big difference in the final result.
DPA Microphone Reviews From RECORDING Magazine
d:vote CORE 4099 Microphone – PDF
New electronics means cleaner, hotter sound
d:vote 4099 Microphone – PDF
Clamp and Stand Mounts
2000 Series Reference Standard Mics – PDF
The DPA reputation for excellence in a surprisingly affordable format
d:vice MMA-A Microphone – PDF
Impeccable stereo field recording that fits in the palm of your hand
d:screet Necklace Microphone – PDF
A mic that’s great-sounding, simple to use… and yes, discreet
d:fine Series Headset Microphone – PDF
Techniques for an unusual approach to vocal recording—and a great mic to do it with
d:facto II Handheld Vocal Microphone – PDF
New options in sound quality and application flexibility grace this lovely handheld mic