Everything from basic mic placement to phase issues and vocal leakage, covered in depth
By Joe Albano
Many of the same overall issues discussed in this article’s companion piece in regard to recording electric guitars and amplifiers come up again when recording acoustic guitars. But, of course, now the devil is to be found in a different set of details. Without the amp factored in, the art of capturing the sound of an acoustic is (almost) all about mic technique. An electric guitar amp’s speaker projects sound primarily forward, while the body of an acoustic guitar resonates sound out in all directions, with different tonalities to be found at different angles. This also means that the contribution of the room (ambience) is more critical to achieving a natural quality in an acoustic guitar recording.
Additionally, the bandwidth of the acoustic is wider, with typically an octave more of high-frequencies (harmonics and overtones) than the more limited range of the electric guitar’s pickup and amp. And the volume of an acoustic guitar is typically much lower than even a small amp, making issues of isolation more critical in some situations. As a result of the differences, mic choice and placement will vary from the usual approaches taken for electric, and that’s where I’ll start.
On Mics & Miking
- A Producer’s Take On Acoustic Guitar
- One Amp Three Mics
- DI Recording and Reamping
- Going Deep With Electric Guitar Miking
- Going Deep With Acoustic Guitar Miking
- Understanding the Acoustic Guitar
- Recording the Classical Guitar
- Miking the Acoustic Guitar
- Guerrilla Guitar Mic Technique
- A-List Guitar Miking Setups
Pick your poison
You may remember that one of the most popular mics for recording a guitar amp is the Shure SM57, a dynamic cardioid (see the brief mic primer in the previous article, or the more detailed material on mics up on recording mag.com); the ‘57 imparts a nice presence to the sound of an electric guitar through an amp. This mic (or similar models) could also be used on acoustic (in a pinch, or on stage), but a dynamic would no longer be the first choice here. The extended bandwidth—the presence of strong higher frequencies—from an acoustic guitar calls for mics with both a more extended high-end response, and greater clarity. The go-to choice for acoustic guitar is usually a studio-grade condenser mic, which brings those qualities to the table. Ribbon mics can also offer good clarity for acoustic recordings, although with a warmer overall balance, and would be an alternative.
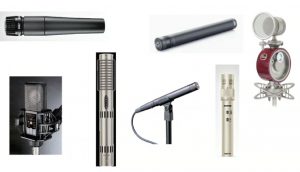
Figure 1. These mics from Shure, Blue, DPA, and Lewitt are all suitable for acoustic guitar recording, and you can hear them demonstrated in our videos.
There is no shortage of good condenser mics available for acoustic guitar recording, at every price point from around a hundred to a few thousand dollars. Both large-diaphragm and small- diaphragm condensers are employed. Some of the traditional favorites include “pencil” mics (thin small-diaphragm models) like the AKG C450 Series, the Audio-Technica AT4051, and the Neumann KM Series. I’ve also often used a Neumann U87, AKG C414, or Audio-Technica AT4033, all large-diaphragm side-address models. If you go to /recordingmag.com/recording-resources/videos/ and look at the Acoustic Guitar series, you’ll see several other makes and models in the five video demos there—in particular, check out Acoustic Guitar video Part 2 for a comparison of various mics (and see Figure 1 for a teaser of some of the featured models). I’ll refer to those videos periodically through this article—they’ll provide picture and sound to complement the descriptions in the text, and the figures in this article are all taken from them.
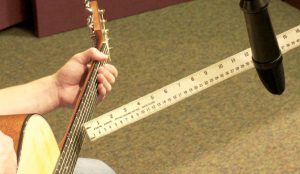
Figure 2. The classic placement: 12 inches away, aimed at the 12th fret. The mic here is a side-address large-diaphragm condenser, the affordable and popular MXL 2001.
Pick your spot
It’s fun to experiment with different brands and models, and each will offer a unique tonality. But the fact is that most any decent-quality condenser mic can provide at least an acceptable tonal balance for an acoustic guitar recording. So in this article I’ll focus more on mic positioning as the key to capturing the best sound from a specific guitar in a specific room.
Obviously, the easy trick of just sticking a mic an inch from the speaker, so often cited and employed by engineers after electric guitar tones, is not applicable when it comes to the acoustic flavor of the instrument. First off, the player tends to move the instrument around a bit (even a seated player trying to stay still for a recording), and their hands are moving up and down the fretboard, not to mention strumming motions—you don’t want that delicate condenser mic to be sent flying across the room when some wannabe Pete Townshend decides to do a few acoustic windmills!
But more seriously, the sound waves coming off the strings and body of an acoustic in all directions need space to blend. The gold standard for acoustic guitar close-miking distance is about a foot away—this provides enough room for the player, as well as picking up a better tonal balance from the combination of the guitar strings and body. A mic at 12″ is the typical starting point—in individual cases, distance can then be adjusted by ear, until the best overall tone is heard. See Figure 2.
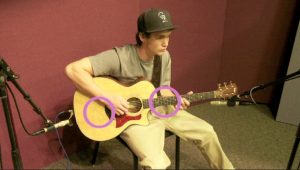
Figure 3. Here’s where you should first try aiming your mics if you’re using more than one: the 12th fret and the bridge area of the guitar. These are Shure KSM141 mics.
Are you lookin’ at me?
Now, novices to the art of recording acoustic guitar often assume that the obvious place to point the mic would be the sound hole—after all, isn’t that where the best/fullest sound is supposed to be coming from? Well, it is an option, but as often as not, pointing a mic at the sound hole, even from a foot away, tends to capture too much “boom”.
Mics are typically positioned (again, about a foot or so away), somewhere between the 12th fret of the guitar and the back of the instrument, by the bridge. Many engineers feel that the 12th-fret position is the best option, and that’s probably the “go-to” spot for most recordists. At the 12th fret, you’ll get a nice crisp string sound, so it’s also common to angle the mic in toward the body to add more fullness. If you were to position a mic there, and then gradually move it towards the back of the guitar (maintaining the same distance, adjusting the angle as you go), you’d hear gradual changes in tonal balance: extra boom as you pass the soundhole, and then a more midrangey presence as you approach the bridge and rear bout of the instrument. See Figure 3.
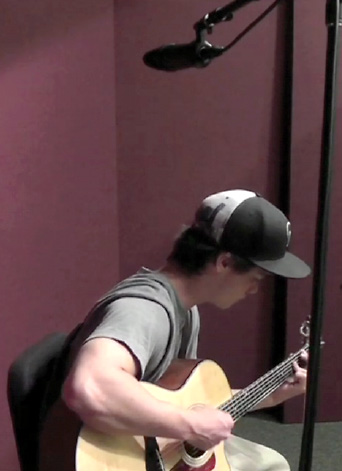
Figure 4. Miking over the shoulder can produce a realistic player’s-perspective tone.
Any of these positions can provide a good balance—what works best in a particular situation will depend on the mic, the room, the overall tone of the guitar itself, and, of course, the player. For example, I would often position my studio’s U87 a foot or so out, angled at the bridge of a client’s Taylor guitar (a bright, crisp instrument) to get more of the body resonance, but the same mic gave better results angled in at the 12th fret with another client’s Gibson jumbo (a larger-bodied, warmer, fuller sounding guitar), to avoid picking up too much body and an overly-boomy quality. Of course, your mileage will vary—see the Acoustic Guitar video Part 1 to see and hear a comparison of different positions with the same mic.
When it comes to acoustic guitar, miking from a foot or so away still constitutes close-miking, but it’s possible to use more distant placements as well. A more ambient sound can be captured by pulling the mic back to three or four feet, assuming that the extra distance does not exacerbate room issues like leakage or flutter echoes. A mic could also be placed in an overhead position, a couple feet above and just to the front of the player’s head (AG video Part 1)—think of this as the equivalent of the overhead mics that provide air and depth when recording an acoustic drum kit. See Figure 4.
Of course, just as with electric guitar (and drum kit) miking, you can combine multiple mics for a richer sound. And speaking of which…
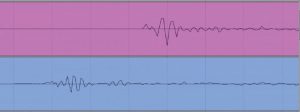
Figure 5a. In this two-mic recording, the neck mic’s audio (lower track) is about 1 millisecond ahead of the bridge mic’s audio (upper track).
The more the merrier
If you decide to employ more than one mic, there are two ways you can approach this: two mics can be arrayed for stereo recording, or the mics can be combined in mono (as described in the electric guitar article), simply to bring a rich blend of different tonalities to the overall recorded sound. Let’s look at the mono approach first.
The most typical ways to combine two mics on acoustic guitar would be to either set up a closer mic and a distant mic, or to set two closer mics at different positions in front of the guitar between the 12th fret and the bridge. With either choice, it’s important to remember the “3-to-1” rule (sort of the Golden Rule of multi-miking), which says that the distance between two mics should be at least three times the distance from either mic to the sound source instrument (AG video Part 3). The idea here is to avoid detrimental colorations from phase interference, which can happen if the mics are too close together, especially when they are panned to the same position in mono, as would usually be the case. When stereo miking is used, sometimes this rule is not observed strictly, but stereo mics will be panned apart, and classic stereo miking techniques are designed to control and make use of the phase interference to enhance the stereo quality of the recording—see below.
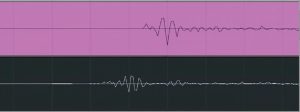
Figure 5b. We select the neck mic track and drag it backwards in time…
A typical setup might combine a mic at the 12th-fret position with one pointing at the bridge area, as shown in Figure 3 on the previous page. The 12th-fret mic will accentuate the strings and the bridge mic will focus on the body, and the blend will be a richer tone than either alone, even if similar EQ was employed on a single mic track (see Part 1 of this article for a further discussion of this). I often like to use a 12th-fret mic plus a more distant positioned mic, which I can then use to add in some natural ambience to taste later on during the mix—the result can be a more subtle sense of depth on the guitar track than I might get from the use of artificial reverb.
Figure 5c. … until the two signals are time-aligned. No more phase problems!
Just as with electric guitar (and drum) multi-miking, the issue of time alignment comes up when the mics are at different distances from the source instrument. When the waveforms from mics at different distances are combined, the waves’ peaks and dips will likely not coincide, causing phase interference, and resulting in anything from a pleasant ambient quality to an unpleasant thinness or hollowness.
DAWs nowadays make it easy to edit the position/timing of the audio regions (clips) to advance or delay the audio from one or more tracks, until all tracks start together in phase alignment. The benefit is usually a fuller, punchier sound, but sometimes this comes at the expense or ambience or depth. It’s a judgement call, to be determined on a case-by-case basis—check out AG video Part 4 to hear the difference in one particular situation. See Figure 5.
Stereo guitar
Given that acoustic guitars radiate sound in a wider pattern than electric guitar amps, it makes more sense to consider recording the acoustic in stereo, for a greater sense of width and three-dimensionality. This would probably be most appropriate if the guitar was to be featured as solo instrument, or in a simple guitar-plus-voice arrangement, rather than blended into a busy arrangement with many instruments vying for space in the mix.
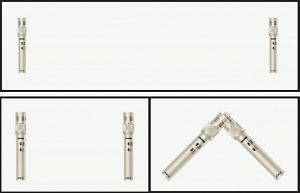
Figure 6. Three ways to stereo-mic a guitar: spaced (top), near coincident (left), XY (right)
Keep in mind that the use of two mics as described above is not necessarily the best way to go about making a stereo guitar recording. You could, of course, pan any two mics to separate sides of the mix, but that may result in a more diffuse sound, with a vague sense of stereo imaging, rather than the clear image with an enhanced sense of depth that a proper stereo recording can provide. The best way to go about stereo-recording acoustic guitar is to use classic stereo miking techniques, adapted for the instrument at hand.
There are a number of classic stereo miking techniques that can work well for acoustic guitar. Here are the most basic options, as shown schematically in Figure 6:
- Spaced mics: the mics are widely spaced on either side of the instrument (this is where the 3-to-1 rule should be followed).
- Near-coincident: the mics are about a foot or less from each other, at about the position where a listener’s ears would be; this picks up both level and timing differences between left and right, for a great sense of depth, but watch out for phasiness, especially if the recording is collapsed to mono.
- Coincident (XY): the mics are crossed with their diaphragms adjacent, as close as possible; this insures phase coherency and time alignment, and collapses to mono without problems, but achieves less depth than the near-coincident technique.
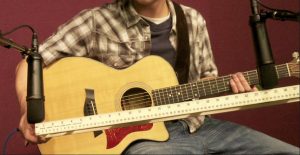
Figure 7. Spaced pair of mics on a guitar, showing the 3-to-1 rule: 24” apart, 8” from the guitar.
For illustrations and audio examples of these techniques, see Figures 7, 8, and 9 as well as AG video Part 5. Any one of these approaches can sound great, resulting in a guitar that seems to sit in a more three-dimensional space between the speakers, with a much greater sense of air and depth.
If you’re doing a stereo guitar recording, but you think the recording might likely have to be collapsed to mono at some point, the coincident technique might be the safest to use. Another approach, called M/S (Mid/Side) recording is also possible, which guarantees good sound even if ultimately used in mono. Briefly, an stereo pair can be employed like so: a directional center mic is pointed straight ahead, and a bidirectional (figure-8) mic picks up ambient sound from the left and right only, rejecting direct sound from the instrument—the resulting recording is matrixed for variable stereo width, and if collapsed to mono, only the center mic ends up being heard, eliminating any phase issues.
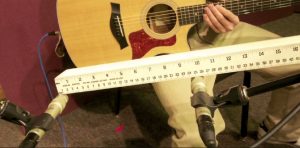
Figure 8. Near-coincident mics on a guitar, 10” apart.
Isolation: divide and conquer
One issue that comes up to a much greater degree when recording acoustic guitar than when recording electric is isolation. With electric guitar, the biggest problem is often the loud guitar amp bleeding into other mics during a band tracking session, and this can often be addressed by isolating the amp in a booth. The amp’s close mic(s) rarely pick up too much bleed, since the signal at the mic is so loud, even with a small amp, relative to other sounds in the room.
With acoustic guitar, the opposite is true. The guitar is not usually loud enough to cause insurmountable leakage problems for other instruments, but other instruments and sounds are much more likely to leak into the guitar mics—since the guitar itself is not that loud, and the mics are not that close, the leakage can become significant. And since the player is “attached” to the instrument, it can’t be physically isolated without separating the performer as well.
Now, this is often done—the player can be put in a booth within the larger tracking room, or surrounded with baffles (a.k.a. gobos), to block other sounds in the room from reaching the guitar mics, which would be directional types, positioned to minimize leakage (see below). Since monitoring is usually done via headphones, these kinds of isolation techniques should not cause too many problems.
However, sometimes the player rejects this solution, needing to maintain better eye contact with the other musicians, or a suitable booth or baffles may not be available (I’m not even going to get into the issue of live stage recordings). And of course, there’s the most tricky isolation issue of all—the singer/guitarist who needs to sing and play at the same time, but isolation between the voice and instrument is still required. Let’s take a look at these situations and some possible solutions.

Figure 9. This is what an XY coincident pair of mics looks like, seen from above.
To dub or not to dub
Of course, the ultimate solution to any isolation issue with an acoustic guitar recording is overdubbing. Having the player perform the parts on his/her own, alone in the room, listening to the previously-recorded tracks on closed-ear headphones, eliminates any leakage problems, and allows for the most flexibility in miking techniques as well.
Unfortunately, this is not always an option, for a variety of reasons. There may not be time to go back after a band tracking session and add or redo parts. The musicians may insist on playing all together, or be unable to perform as well in isolation (a common occurrence). A scratch (temporary) part played during the main tracking session, but intended to be replaced with a cleaner overdub later, may be deemed musically perfect, and end up being used after all, making it important to capture the best sound possible even under less-than-ideal conditions. All of these scenarios are pretty common, but there’s always something to be done to improve the sound of the recording.
The null spot
Traditionally, the first step to minimizing leakage is to take advantage of directional microphones’ null spots—the angle from which those mics reject sound. Both cardioid and bidirectional (figure-8) mics offer this capability. Regular cardioids pick up primarily from the front, and reject sound from the rear (180°), hyper-and supercardioids move the rejection angle a bit more toward the sides. Bidirectional (figure-8) designs pick up sound equally from front and rear, and reject quite effectively from both sides (90°). Position/angle the player and mic so the front of the mic faces the guitar (at the desired distance and position), and the null spot (rear/side) directly faces the source of potential leakage, and you may achieve a surprising degree of isolation, even when the other sound source is fairly loud. See Figure 10.
A less-ambient recording space will be helpful here, as well as the additional use of baffles between the musicians, as mentioned above. You may not achieve complete separation, but hope to reduce the leakage to the point where it’s drowned out when the guitarist is playing, and can be edited or gated out in between phrases (later on, in the mix, if needed), for an acceptably clean track.
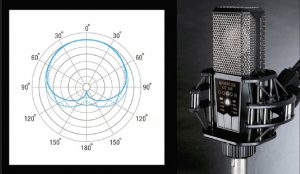
Figure 10a. A cardioid polar pattern (shown here on the Lewitt LCT 640) has a broad, shallow null at 180º, which rejects sound from behind. The dotted line represents lower frequencies, which aren’t rejected as well… a common issue with most if not all mics.
The DI conundrum
Another possible solution, if available, is to use the onboard pickup system built into the acoustic guitar. Many fine guitars include an onboard pickup nowadays, recognizing that in live situations, it can sometimes be the only way to amplify the guitar without feedback and insurmountable leakage. However, if someone suggests this option in the studio, many engineers will cringe or make a face like they just smelled a dead rat, and with good reason.
Traditionally, onboard acoustic guitar pickups have provided a fairly harsh, two-dimensional sound, compared with what even a mediocre microphone recording delivers. Piezo/bridge (contact) pickups overemphasize the strings and attack at the expense of fullness and body resonance, for a brittle sound, while magnetic pickups lack crispness and air, with an overly midrangey and often muffled sound.
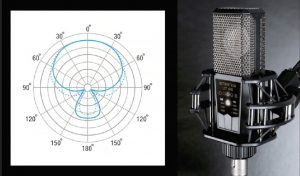
Figure 10b. In supercardioid mode, the nulls are deeper and narrower…
However, if worse comes to worst, it may still be possible to get a usable sound for a recording. Remember, what you’ve got going for you here is that the pickup is probably in use because of isolation issues, which means that that particular guitar part is likely to be somewhat buried in the mix later—if it was an isolated part, you’d be able to use mics more readily, right?
If a direct input must be used from an acoustic guitar, the first line of defense would be EQ. Depending on the type of onboard pickup system, you could try to minimize (if not eliminate) poor tonal balance. With bridge piezos, a sharp cut in the upper mids, around 4–6 kHz, may help reduce what guitarists and engineers derisively refer to as piezo “quack”, a harsh spiky tone. Magnetic acoustic guitar pickups, often mounted in the soundhole, usually require the opposite: a broad treble boost, often combined with a lower midrange dip.
Next, a little fast-attack compression might help tame the excess “splat” that is the other component of piezo quack. The addition of a little very-small-space ambience could help to restore some of the missing body resonance also common with piezo systems—a convolution reverb loaded with an impulse (sound print) of a very small room or even a sample of a wooden box (like a guitar body!) might be useful.
Some higher-end guitars like Taylor and Martin have much more usable onboard pickup systems, combining elements (bridge & body sensors, and even internal mini-mics) that can provide a far more suitable sound than the more common inexpensive designs. Taylor’s “Expression” system offers high-quality onboard sound. And Martin licenses an advanced system from Fishman, which is also available as an add-on outboard product, that to my ears comes the closest to the sound of a miked-up recording.
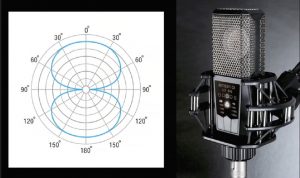
Figure 10c. …and in Figure-8 mode, they’re very deep, making them really useful for a singer/guitarist miking arrangement.
The Fishman Aura is a system which combines an onboard pickup with an electronic section (built-in or in stompbox format) that contains “sound prints” of various models of real guitars miked up with various high-end mics. If the player chooses a guitar that Fishman has used for its sound prints (or a guitar of similar design), the Aura system will add the missing body resonance and mic tonality and ambience to the sound from the onboard piezo or magnetic pickup. The results are surprisingly rich-sounding, and while the system is designed more for live than studio work, it could be used to provide a more-than-usable track even in recording.
One trick the Aura system uses is also another good approach, in general, to try to salvage a DI acoustic sound—mix a little bit of mic signal in with the DI signal. Even if the mic signal, on its own, might have too much leakage or other problems to be used at full level, a lit-tle of it blended with the DI can restore some of the missing air and tone, and, in combination with EQ and other tweaks, turn an unusable recording into a passable track.
The singing guitarist blues
The situation that may provide the biggest challenge when it comes to isolation is the singer/guitarist who needs to play and sing at the same time when recording. Now, in the old days, this was not an issue—everybody played and sang together, and were all recorded in one pass (in mono, no less!). Even nowadays, if you’re not worried about having to separate or edit the performances after the fact, the leakage doesn’t have to compromise sound quality, as long as you observe the usual conventions for multi-miking (see above). But sometimes isolation will be required between the voice and the guitar, for later editing, or for independent processing, and then this can be a problem. There are, however, ways of addressing it.
You could, of course, simply ask the player to perform the two parts separately, overdubbing one at a time. If he/she is amenable, and the performance doesn’t suffer, then—problem solved. However, this may not work out for musical reasons, and the quality of the performance must take precedence over recording considerations. So, assuming you’re stuck trying to capture the two together, with at least a modicum of separation, what to do?
Well, if a decent onboard pickup system is available, that might be a partial solution. You could achieve an isolated guitar track, and the guitar leaking into the vocal mic will even blend with the DI, warming it up as discussed above. However, the vocal track may still have too much guitar on it to control or process as required, and a fuller solution may be needed.
I’ve seen people try to isolate the guitar and vocal mics with small baffles placed above the player’s hands and below the neck, with the vocal mic above and the guitar mic below, in an attempt to block sound waves from the guitar and mouth getting into the wrong mics. While this may sound promising in theory, it’s kind of a risky and somewhat dubious approach for a number of reasons. First off, you won’t really achieve as much separation as the visual might lead you to expect—remember, sound waves can easily get around barriers. The baffle itself might cause unwanted and problematic reflections to back up into the mics, negatively impacting sound quality. And it can feel awkward for the performer, who will likely either complain, or worse, soldier through but deliver less than the best performance.
Probably the best approach to this situation is to try to take advantage of the polar patterns of cardioid and figure-8 microphones, which reject sound from certain angles as discussed above. Again, all directional mics have a null spot, where they will pretty effectively reject sound even from a close source—or at least reduce it to a severely attenuated, muffled low-frequency signal. If the mics can be angled to take advantage of those null spots, while still capturing high-quality sound, then a surprising degree of isolation can often be achieved, even with the sources as close together as in this scenario.
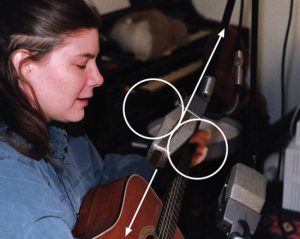
Figure 11. A singer/guitarist miked with two RCA ribbon mics. The mic on the vocals is aligned to capture the voice while rejecting the guitar signal (the arrows are the nulls), while the guitar mic, visible at lower right, is aligned to do the opposite.
For example, if a cardioid-type vocal mic is positioned so the back of the mic (its null spot) faces the guitar while the front faces the singer’s mouth, and a similar guitar mic angled down at the guitar with its back facing the singer’s head, decent isolation can result. Given the angles and distances involved, and the size of most mics, that placement may be a bit physically awkward, though. Supercardioid and hypercardioid designs have the null spots a little to the side, and might make effective placement a bit less clumsy, and side-address mics make this easier still.
But the best results are likely to be achieved with bidirectional (figure-8) mics used for both voice and guitar. A figure-8 pattern has its null spots at the sides of the mic, with full response at the front and back; additionally, most figure-8 mics are side-address designs. This can allow for more convenient positioning, while assuring that the null spots are angled where they need to be for maximum rejection, as shown in Figure 11. Furthermore, the null-spot rejection in this design is generally even more effective than null-spot rejection in the various cardioid models. As long as the room isn’t too live, this can provide remarkably good isolation, even in situations where it might seem like a hopeless cause.
The end of the road
Well, on that note, it’s about time to pack it in. Of course, there’s a lot more to be said about achieving great guitar recordings, but now we’d be getting into the post-recording/mixing phase, and that’s certainly a topic for another day. So good luck nailing that guitar track… and now, get back to recording!