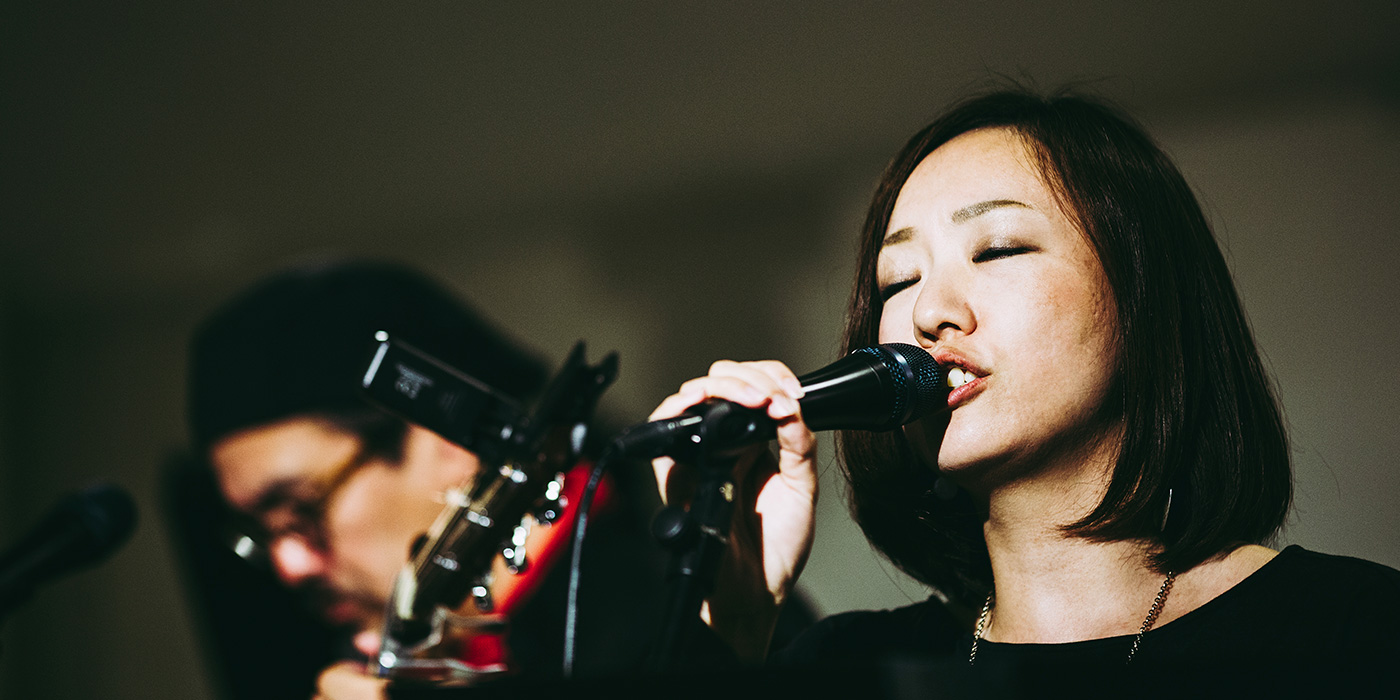
Old-school vibe from bands playing together
By Michael Schulze
Sometimes the best way to make a record is in stages: track drums and bass, overdub guitar and keyboards, then vocals, etc.. This lets you make sure each part is perfect before moving on; that’s great for songwriters fleshing out arrangements or for really awful bands that just can’t get through a song without a train wreck. However, when you have a band that rocks hard together, you can capture a much more ass-kicking performance by having the whole band play together, feeding off of each other in a way that just doesn’t happen when the drummer has already gone home and the guitar player is asked to shred all alone in a big, cold room under a bare bulb.
This approach was once the norm, but fell somewhat out of favor in the 1980s and 1990s as advancements in multitrack technology made it possible to piece records together in multiple studios on multiple continents. Some producers sacrificed musical spontaneity in search of perfection, tracking some very big hits with virtual bands that never sat in the same room together.
Today, though, the old ways are coming back. In Dave Grohl’s documentary Sound City, we hear Tom Petty talking about slogging through take after take after take, all together in the big room with the drummer, the vibe and feel coming together ever so incrementally with each take and each early morning hour, until finally—after weeks of this long siege—a top 10 hit would emerge, something that just would not have rocked so hard any other way. Bands like Foo Fighters and Queens of the Stone Age are new proponents of, well, being a band. There is just something you get with the band all in the same room, with everyone feeling the kick drum thumping at their internal organs.
Some history
Many early music recordings were made in concert halls. Classical ensembles were set up on a stage as if they were performing a concert. One or two mics were set in front of the ensemble and recording ensued. The aim was to capture the balance of the instruments just as an audience member might perceive it. By the 1940s, big band swing was king and the approach was not much different. When Tommy Dorsey’s band performed with the young and still submissive Frank Sinatra, there was but one mic for vocals and solos. When they went into the studio, usually for a live broadcast, a recording would be made as well, direct to acetate disc. Maybe 3 mics were used: one on the rhythm section, one pointing at the horn section, and one up front for Frank and Tommy. The 3 mics were mixed to mono and sent out over the airwaves while being recorded, all in real time, no headphones, no Pro Tools, no Auto-Tune. Each musician played perfectly or was on the next bus back to Kalamazoo… or perhaps on a train to the front lines, if you got fired from Glenn Miller’s Service band. You’d better practice!
Early rock recordings modified this approach. Common practice was to put a mic on each instrument; however, they all still set up in the same room because that is how they rehearsed and performed! In 1963 the Beatles were recording in Abbey Road Studio 2, 40 by 37 feet with 28-foot ceilings, in an arrangement shown in Figure 1. The drums were placed in a corner and miked with an overhead ribbon and a dynamic on the kick. Two VOX guitar amps were placed on stands a few feet in front of and facing away from the drums, miked close with 2 Neumann U47s.
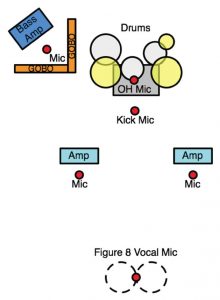
Fig. 1: Here’s the layout for the recording of the first Beatles album.
John, Paul, and George stood 8 to 10 feet in front of these amps on either side of a Neumann U48 in the figure eight polar pattern, singing all together. The U48 was pointed sideways with respect to the drums to minimize leakage into the vocals. Paul’s bass amp was behind a partition, or “Gobo” (see below), to the left of the drum set so Ringo could hear it, but with reduced leakage into the drum overhead. The boys heard what was in the room; nobody wore headphones!
The sessions were recorded to 2-track reel-to-reel, with instruments on track 1 and vocals on track 2. Overdubs were accomplished by playing the 1st take back through a loudspeaker while the Beatles performed additional vocals, hand claps, percussion, etc.. These two stereo feeds were mixed on the fly to a new stereo master, and your final mix was done at the end of the take. No remixing, no endless tweaking, just stiff upper lip determination in the English way. As George once said, “We recorded the first Beatles album in a day, the second album took even longer.”
Engineer Norman Smith and producer George Martin agreed that as the Beatles were such a powerful live band, it made sense to record them this way. These early albums were released in stereo in the U.S., and by muting one side you can hear the isolated vocals, but with tons of drum and guitar leakage. However, this leakage gave those records a lively sound that helped convey the raucous energy that was a Beatles performance. The band was used to playing with only their vocals amplified (in addition to guitars and bass). As a result, they were good at blending their dynamics. They played as a cohesive unit, having proven themselves in the trenches of a noisy postwar club in the Hamburg red-light district.
This setup isolated the individual instruments enough that the engineer could optimize the balance. However, problems arose when trying to equalize vocals. There was enough cymbal and guitar leakage on the vocal track that boosting highs made the cymbals louder in the mix. This problem led to the radical decision to place the vocal mic a few yards off to the side for the second album… and with that, the quest for isolation was born!
By the time Muscle Shoals Sound Studio was opened in a former casket warehouse in 1969, the benefit of isolation was recognized, but the band would still set up in the same room. Drums, instruments, amplifiers, and singers were strategically placed around the room to minimize leakage. The drums were set up against one wall and quieter instruments like piano were placed at the opposite wall, as far away as possible. Amplifiers were placed in between, against the side walls. This setup allowed microphones to be placed close to each instrument but pointing away from the other instruments. Figure-8 ribbon and condenser mics were used often, because this narrow polar pattern enables effective isolation with strategic placement, as in the Beatles sessions.
Gobos were used to get even more isolation. These are movable partitions, usually made from plywood sheets with fiberglass insulation on one side. They are typically 4 feet wide and 4 to 6 feet high. Tall gobos might be placed around the drum set with short gobos enclosing the amplifiers. Sometimes a window was built into the tall gobos so the drummer could see out of his little fort!
The use of gobos made it hard for the musicians to hear each other, so each wore headphones, or a “headset” as they were called back then. Reasonable isolation was achieved, and 8-track tape recorders were available, so each mic could be given its own track and a careful mix could be achieved after the session. However, there was still enough leakage that the band had to play great. If the piano played a wrong chord you might have to replay the whole take, because you could still hear the drums in the piano mic, and a punch-in on the piano track might cause a momentary change in the drum sound.
A decade later, the continuing quest for isolation prompted studio designers to construct isolation booths for different instruments. Drums were given their own room, singers a smaller room, and the rest of the band could set up in the “big room”.
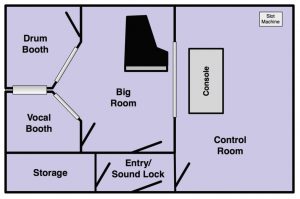
Fig. 2: The Lamont School of Music Studio A is a typical modern studio layout.
Figure 2 shows the floor plan of our Studio A at the Lamont School of Music, University of Denver. You can see the typical four-room setup used in so many studios, with three rooms for recording and a large control room.
This intimate setting makes it easy for us to record bands playing all together. We can get the best of both worlds: total isolation between instruments, and the vibe of the band all feeding off each others’ energy. You may not have access to a multi-room facility like this, but chances are you can achieve the same results in your basement with a bit of strategic thinking.
Communication
Before I even start thinking about where amps and instruments will go, I think about where people will go. It is important to place the musicians so that they have eye contact with each other. In our studio this is easy. In your basement it’s easy too—just put everyone in the same room with the drum set! The players can easily talk to each other, and there is something about being able to feel the thump of the kick drum that can drive a performance.
It is also very important to provide multiple, customized headphone mixes for different groups of players. If you are the engineer, make sure you have a way of listening to the headphone mixes, and realize that the players might need a very different mix than you do in the control room. For example, a guitar player in an isolation room with his amp is hearing plenty of that amp already and might not need any of it in his headphones, while the rest of the band will. If everyone is in the same room with the drums, but the amps are elsewhere, it may be that nobody needs drums in their headphones, or maybe just not much. If you do put drums in the headphones, make sure that the drummer hears the drum set from his perspective, with the hi-hat off to his left.
Multiple headphone mixes can be done in any DAW with prefader auxiliary sends, assuming your audio interface has enough outputs. To set these balances I usually start by making the headphone mix sound perfectly balanced, then lower certain instruments in the individual mixes as needed. Basically I will do a separate mix for each room that musicians are in, tailored to what they are already hearing acoustically. I will also do an individual mix for any singers, as they will need to be just a little extra loud in their own head-phones so they can sing in tune. Worse than usual intonation from a singer is sometimes an indication that they cannot hear themselves. Also keep in mind that some musicians will have a hard time identifying what is wrong with their headphone mix, or clearly expressing it to you. That’s why it is very important to listen to the headphone mixes during your first few takes, then recheck them periodically during the session.
Listenback microphones are also very helpful to keep things moving. For example, if you have a guitar player in an isolation room with an amp, the mic on that amp will do a very poor job of picking up the guitarist speaking to the rest of the band. I’ll give this guitar player a vocal mic and route it into the headphone mix without recording it.
Once the guitar starts shredding, that mic would become a problem in the headphones, as you would hear all this extra guitar coming through. The cool trick to avoid this is to put a compressor plug-in on the listenback mic. Set the highest possible ratio, fast attack, and slow release, like a full second, and leave the output gain alone; do not boost it. Set the threshold so that the compressor is just on the edge of compressing when the guitarist speaks, and compresses like crazy once he starts shredding. It may help to put the mic closer to the amp than to the guitarist to get this right. Once he starts playing, the compressor will attenuate the guitar out of the headphone mix. Once he stops playing, the gain will come back up and everyone will be able to hear him speaking.
You can set up a listenback mic in the middle of any room where it is difficult to hear people talking between takes, and it will help keep the creative flow going! And of course make sure the engineer has a talkback mic to regularly tell the band how awesome they sound, or at least how cool they look.
Isolation
The Black Keys (Dan Auerbach and Patrick Carney) decided to somewhat ignore isolation when tracking their album El Camino. Having tracked a previous album in the Muscle Shoals Sound Studio building, Auerbach decided to build an old school one-room studio of his own: Easy Eye Sound Studio in Nashville. The guitar amp was placed behind gobos in the same room with the drums, and each tune on the album is built up from one basic take of the drums and guitar playing together. There is plenty of guitar leakage into the drum mics. This emulates the sound of those great old rock and roll recordings, and also presented a challenge to Auerbach and Carney to nail takes the way the late great ones did.
This approach can result in a fantastic old-school live feel if done carefully. Basically you are not trying to eliminate leakage, but rather make it good leakage. For example, a band with drums, two guitar amps, and a bass amp could be set up in a square room with the drums on the North wall, guitar amps at the West and East walls facing in, and bass amp facing in on the South wall. Place gobos in front of the amps. The guitar left-and right-oriented amps will leak into the drum overheads in stereo and the bass leakage will be centered! You can put a vocalist behind tall gobos very close to the mic. Use an expander or gate on the vocal mic and make sure the voice isn’t leaking into the drum mics, unless you are extremely confident that the vocal track will not need editing or punches. Failing that, you can just bring the singer into the control room and monitor the session with headphones. Instruments such as bass guitar and keyboards can be recorded direct through direct boxes (DIs) to eliminate that leakage from the picture. You can always reamp those instruments later using any of the reamping boxes available at your local gear store.
You can still have all the players sharing the love in the big room, even if you want to isolate everything. For example, guitar amp isolation boxes can be bought or built. These are tightly sealed boxes about 2 or 3 feet square with a guitar speaker and mic clip mounted inside. On the outside are jacks for speaker in and mic out. Simply connect the speaker output of an amp to the box and start shredding; the sound stays in the box. Or you can locate amplifiers in a closet off the big room, perhaps further isolated with gobos, blankets, clothing, or whatever you have on hand. Just run the guitar cable under the door.
If your guitar cable gets longer than 15 or 20 feet, you are going to start losing high end from the guitar due to interactions between the pickups and the cable. To get around this you can use the excellent SGI (Studio Guitar Interface) system from Radial Engineering. The SGI is a cool little yellow box that you plug your guitar into. It has a balanced XLR output with a signal that can be run for miles without any high-end loss. On the other end is another yellow box with an XLR input on one side and a 1/4″ high impedance guitar output on the other. You use a regular short guitar cable to connect the box to the amp. This allows you to put the amp in another room, far enough away not to leak into the drums at all. You could even put it upstairs in your dining room with a close and a distant ambient mic or two to capture some air. With this kind of a system you can remotely locate all of your amps and still have all the musicians sharing the drum room love!
We use this system all the time at Lamont, where we sometimes put the drum set in the cavernous Orchestra Rehearsal Room and have the rest of the band in the studio. Musicians use Google Hangouts on their laptops so that everyone can maintain eye contact!
Now, back to the basic focus of this article: the vibe. Try to schedule your session so that you can get all your sounds and maybe run a throw away take or two, then go out for dinner, or maybe even come back the next day. I have found that separating the music making from the tech setup by at least a few hours can result in much more exciting takes. When you come back try to switch out of audio engineer mode and into music mode. Maintain a relaxing, intimate set-ting for your players and you can forget about science and cut a record!
Bonus studio tip: Make your own gobos
You can build your own gobos using plywood, two-by-fours, and ordinary fiberglass insulation. The density of the insulation does not matter as much as the thickness, so Owens Corning house insulation will work fine, and it comes in rolls. Don’t waste your money on more expensive high-density fiberglass boards! Just make sure to cover the front of your gobos with flame retardant fabric and take normal precautions against the dangers of handling fiberglass—gloves, long sleeves, and a dust mask or light respirator. Plans can be easily found on the Internet, and Paul Stamler sketched out a basic design in the March 2014 issue of RECORDING.