
From popping plosives to pitchy performances—plug-ins to the rescue!
By Jason LaRocca
P-Popping plosives
When I get tracks from an artist or film/TV composer, sometimes there are a few things that need a little help beyond the usual EQ and compression plug-in to get the track into shape.
For instance, I have mixed a number of live records recently, one of them for the Grammy-nominated rock band DeVotchKa. The recording for this performance was very good, but the vocals were recorded with a typical “live” cardioid dynamic mic. These mics are great for live use, as they are very durable and provide great feed-back rejection. One drawback that comes with this sort of mic is a rather large build-up of sudden plosives (“P” noises) on certain words.
Of course, throwing a compressor on this would, for the most part, control these sudden peaks, but if you do this it also takes with it the entire rest of the audio signal, causing a rather nasty and obvious dip in the overall audio signal. You could even eq this frequency out, with a standard EQ plug-in, but then it would leave your vocal sounding “thin”… Hmmmm, what to do?
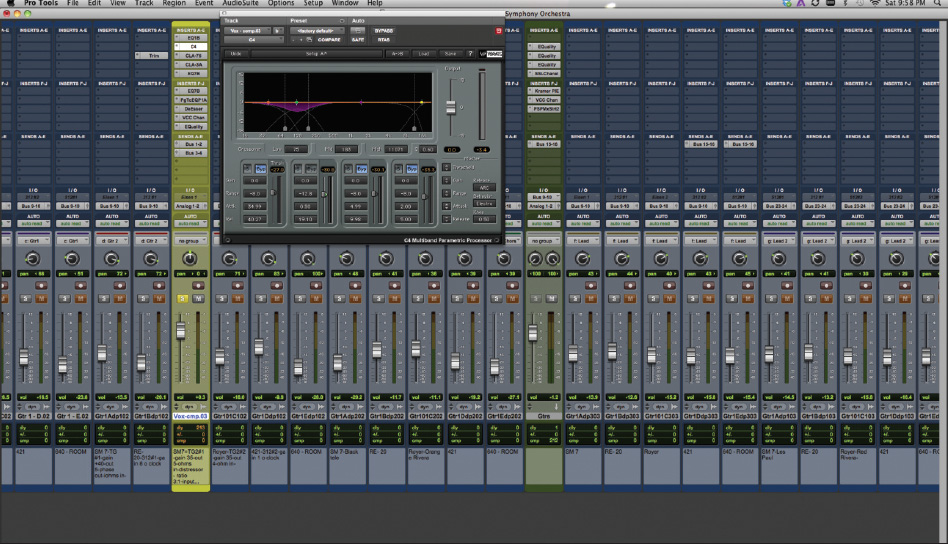
Figure 1: Waves C4 multiband compressor set to control plosives, shown in the context of a large Pro Tools mix.
I like to use the Waves C4 multiband compressor to control the plosive peaks of the performance. (See Figure 1 for a screenshot of the C4 in the context of a typically complicated mix.) I typically bypass all of the bands except for the “Low Mid” band and find where the plosive peak is, then center the frequency of the compression to just that range.
The DMG Equality plug-in (shown in Figure 2) is a good way to help find the exact frequency to attack. This plug-in has an amazing frequency analysis that lets you see exactly what is happening on a given track across the entire frequency spectrum, even at low levels where you might not even hear a given frequency. Very useful! I will set the “range” or ratio to taste, but sometimes I will be fairly extreme with it. I will generally set the attack and release times very quick and the make-up gain anywhere from 0–5 dB. Try it, you will enjoy the results!

Figure 2: The DMG Audio Equality eq plug-in, set up to help spot plosives.
Reverbs and space problems…
I think everyone has encountered this at one time or another: You begin a mix and solo up the vocal, and you find that it has too much “room” sound from the space it was recorded in. Perhaps it was tracked in a less-than-ideal acoustically treated space, or even a bathroom (yes, it happens…). This can be a good thing and may be perfect for a given track, but sometimes it was not an intentional move on the part of the recording engineer (or lack thereof). You may be left with a performance that everyone is in love with and doesn’t want to change, but it sounds “washy” or doesn’t cut enough in the mix.

Figure 3: SPL Transient Designer can work miracles when focusing overly washy vocals.
One solution I have found to solve this problem is to use the SPL Transient Designer plug-in shown in Figure 3. It has an amazing algorithm that accurately follows transients, not just of vocals but also of a given drum hit, bass note or whatever. It can be used to actually sculpt the attack or release nuances of a given performance, much like you can do with an amplifier envelope on a synthesizer.
In the case of a vocal track with too much unwanted room sound in it, I have found that simply drawing back the “Sustain” knob on the plug-in is just about all you need to do, and you will begin to notice pleasing results almost immediately. Somewhere between –3 and –6 seems to work nicely for this task. I typically would do this in front of a compressor, as a compressor can often “open up” the background noise of a given signal when used in heavy doses. By using the plug-ins in this order you can use the compressor to help smooth out the vocal part, and control the track’s background ambiance with the Transient Designer.
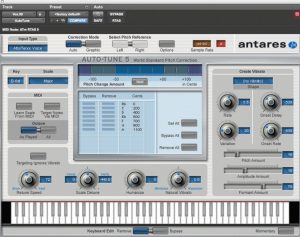
Figure 4: The first instance of Auto-Tune for a pitchy vocal has a fairly slow Retune Speed so it’s gentle on the audio…
Transparent use of Auto-Tune
Here is a tip that is pretty straightforward, regarding tasteful and subtle pitch correction. I am not much of a fan of using Antares Auto-Tune for the purpose of correcting pitch, but sometimes a final vocal track comes to me for a mix that, to my ear, needs a little help. I have found a way to use Auto-Tune with a more subtle but effective result, by applying two or sometimes even three instances of the plug-in, each one with a little faster retune speed than the one before. I find that this has a more transparent effect in getting a vocal track into shape, be it for just a single vocal line of a song or some-times even for an entire track.
To achieve this effect, I put an Auto-Tune plug-in into the first insert slot and set the correct key of the song. Then I set the Retune Speed somewhere between 70 and 80 (see Figure 4). Then, I put another Auto-Tune plug-in into insert 2 and set it to a slightly tighter Retune Speed, somewhere between 30 and 40 (see Figure 5). In some cases I may even put a third Auto-Tune plug-in between these if I feel I am still “hearing” the effect of the plug-in. In any case, I tend to put the Auto-tune plug-ins first, before any eq or compression etc., as it seems to work best this way most of the time.

Figure 5: …and the second instance has a faster Retune Speed to do the rest of the cleanup, for an overall more musical and realistic result.
In the case of background voices that are for the most part sung very well, I may use Auto-Tune as follows: If there are two background voices, I apply Auto-Tune to only one of them, with a low-to-medium Retune Speed. If there are four background voices, I apply Auto-Tune to two of them, again starting with a low-to-medium Retune speed. I leave the other tracks in the backgrounds untouched. This can sometimes help make the backgrounds feel a little tighter as an ensemble, but it still leave the human element intact. I find that if you start to fix it too much, it just sounds like one voice, and then it doesn’t sound “big” anymore.
These are just a few of the many cool ways that plug-ins can rescue problem vocals without making them sound unrealistic. Experiment and you can discover ways to adapt these and other techniques to clean up your toughest vocal problems.