You’d be amazed at how many different tones you can get with so few tools!
By Michael Schulze
Let’s talk about guitar tone (by this of course I mean electric guitar tone—who cares about the other kind? Just kidding).
I’ve always had a thing about electric guitars and old tube amplifiers. I have a small collection of old tube amps. The oldest one is a 1959 Gibson Explorer—solid pine, tweed covered, and, since manufacturers in those days used circuits verbatim as published in the RCA tube applications book, electronically and sonically identical to a 1959 Fender Tweed Deluxe… except for the fact that I paid $300 for it instead of the $2000 I would have shelled out had it said “Fender” on it.
On Mics & Miking
These old amps glow when you turn them on. After fifteen or twenty minutes the power tubes warm up and spew forth the luscious sonic goo that has made these amps so popular among players and engineers alike. As the power tubes heat up so does the wood, the tweed or Tolex covering, and all the decades-old glue that holds everything together. The amp starts to emit its own smell! That smell is like fresh lilac blossoms in April to me.
Miking techniques
As an engineer and guitar tone enthusiast, I have always paid close attention to any anecdote or article dealing with the technique of capturing great electric guitar tone. I’ve seen hundreds of engineers each mic up guitar amps in different ways, and I have read about hundreds more. Certain common techniques seem to keep bubbling up to the surface, so recently my students and I decided to undertake an interesting experiment. How many different guitar sounds could we get using only three commonly available and affordable microphones? Based on common practice we chose the following three mics:
- Shure SM57, of course! Cardioid dynamic. The one mic almost every engineer can agree on! And not the SM Beta 57, mind you, but the original one with the black plastic capsule cover that makes horrible clattering sounds if you touch it. The Beta 57 is a superior mic in many ways, but for guitar amps and snare drum the original SM57 just has that sound.
- Sennheiser MD421. This is a large-diaphragm supercardioid dynamic mic that handles high sound pressure levels very well. The large diaphragm gives it warmth, but this mic also has a pretty big boost between 5 kHz and 10 kHz that brightens it up. The MD421 has a variable click-stop bass roll off labeled M (music—flat) on one end and S (speech—maximum bass rolloff) on the other end. We always leave this control in the M position.
- Audio Technica AT4050. This is a large-diaphragm multipattern condenser mic with cardioid, omnidirectional, and figure-8 polar patterns. It will run you about $600 on the street. We could have used any one of the many inexpensive cardioid condenser mics out there, but one of the techniques we ended up trying involves the figure-8 pattern, so we chose this more expensive multipattern mic. Many of the cardioid configurations we tried would have worked just as well using one of those cheaper mics.
The guitar we used was a Hamer solid body set neck with dual Seymour Duncan humbucking pickups: a JB in the neck position and a PAF on the bridge. Guitar junkies will know what I am talking about.
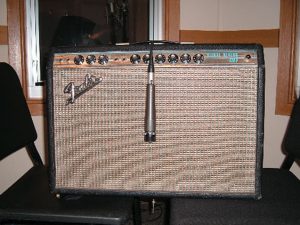
 The amp is my 1969 Fender Deluxe Reverb. It cranks out only 22 watts through a pair of 6V6 power tubes, but this means you can crank it up without peeling the paint off the walls. This amp just happens to be one of the all-time classic studio amps for rock and country. Mine is from 1969 but its circuitry is identical to the more highly-prized pre-1965 “Blackface” version. We plugged the guitar straight into the amp with a short cable. Tone controls were at 5 which is really neutral, and the volume was all the way up to 10. For the clean sounds we turned the guitar’s volume knobs down to about 2 (out of 10) and for the distorted tones we just turned the guitar up to 10. All the deliciously violent distortion we got was coming solely from the amp—we used no fuzz box!
For mic preamps we used our MIDAS Venice console. This is a relatively affordable small console that just so happens to have fantastic sounding microphone preamps and EQ. We recorded to our ProTools | HD system and mixed with no equalization or compression.
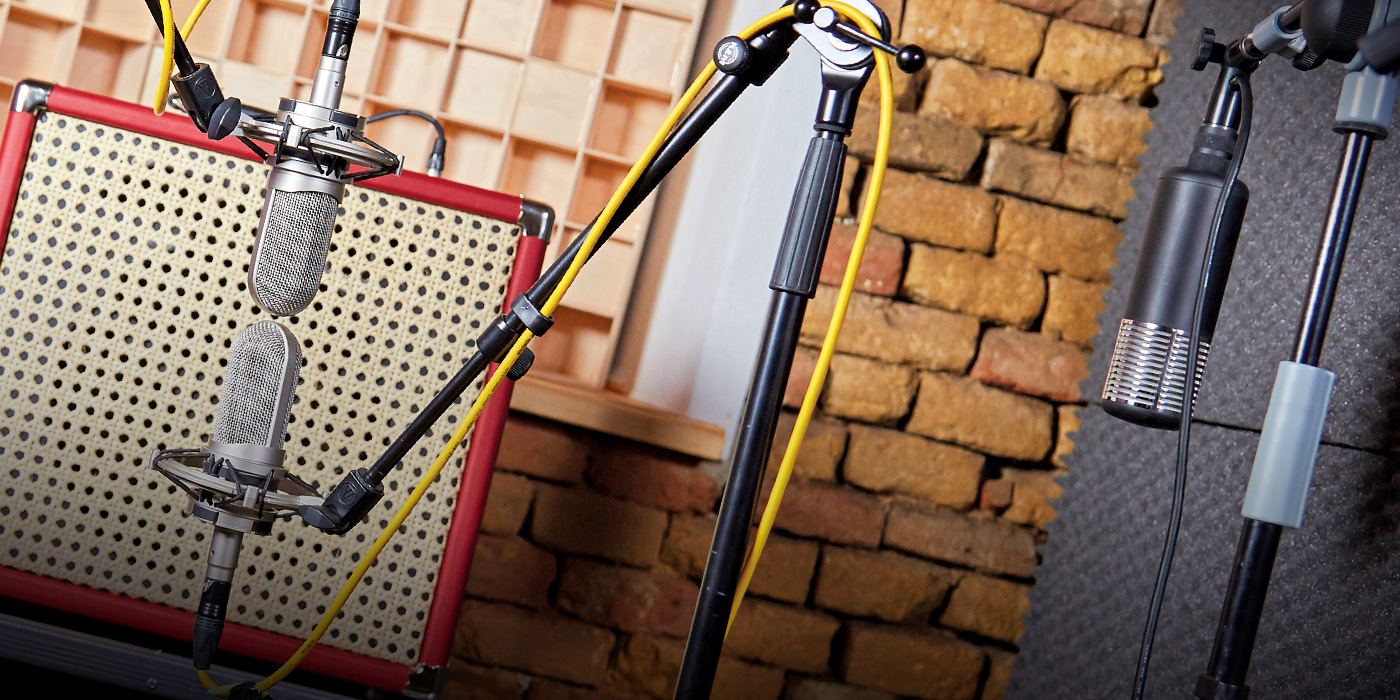
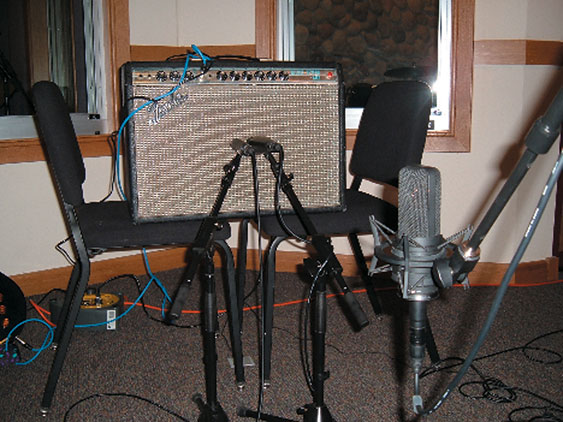
If you look at a speaker cone you will see the small circle in the center. This circle roughly marks the edges of the voice coil, which is where most of the high frequencies come from. Guitar amps usually have a speaker grille of metal mesh or porous cloth stretched in front of the speaker, mostly to keep dust (and beer bottles thrown from the audience) away from the speaker. Placing a dynamic mic right up against the grille at the edge of the voice coil is the most common method of miking a guitar amp, so that was our starting point. We put the SM57 and the MD421 one inch from grille at opposite edges of the voice coil. The AT4050 cardioid was further away, aimed at the center of the speaker.
One by one
The SM57 sounds great all by itself, picking up the lows, mids, and highs more or less equally for a nice “compact” sound that is easy to fit into a mix. The MD421 picks up more of the frequencies above 2 kHz for a more “jangly” or sparkly sound. The MD421 also picks up a more extended low end, so when the guitarist manages to hit a nice clean low string you really hear it!
The AT4050 condenser sounds nice and clear, kind of a hi-fi version of the sound from the SM57, but much thinner, and not really very useful on its own.
In combination
We set the SM57 fader to 0 and the MD421 to –10 dB to fill in the low end and extend the highs. The condenser really just muddied things up until we delayed the close mics by 0.8 milliseconds to eliminate the phasing, then bringing up the condenser to –10 helped fill out the mids. However, we all agreed we liked the two dynamics alone until we decided to try some stereo. Assuming a guitar track would end up panned to one side or the other in the stereo mix, we panned the SM57 left, the MD421 center, and the AT4050 right. This had the effect of making the whole thing sound much more real, with the guitar definitely sounding on the left, but with more body.
Just for fun we then tried the AT4050 one inch from the grille at the edge of the voice coil. The sound was dull and muddy so I did not include it in the examples.
First Conclusion: we don’t like condenser mics right up close to the speaker all by themselves!
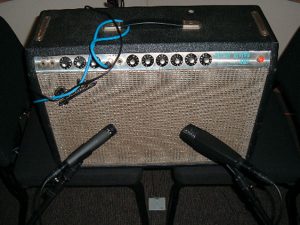
Next we put the condenser right up against the grille but at the edge of the speaker. This is a spot where you will pick up a much warmer sound than you will at the voice coil, which is where the two dynamics still were. We aligned the three mics so that they were the same distance from the speaker. This kept the mics perfectly in phase with each other.
The mix we ended up with was: 57 at 0, 421 and the 4050 at -6. The 4050 really helps round out the sound. We panned all three mics hard left, which sounded great. We then panned the 4050 to the center and got a nice widening of the sound while retaining the left heavy imaging we would need to mix this track in with other instruments.
Breaking Up
Having established our baseline, we now decided it was time to wreak a little havoc and we turned the guitar up to 10. Glorious, fiery, distorted tones belched forth like fire from someplace deep inside the earth! All of us felt that primal, guilty satisfaction that only these blasphemous sounds can instill in anyone who was born after the baby boom. Two-fingered devil signs were spontaneously thrown up all around the room as faces contorted into twisted grimaces of mock fury!
Delivery at the rear
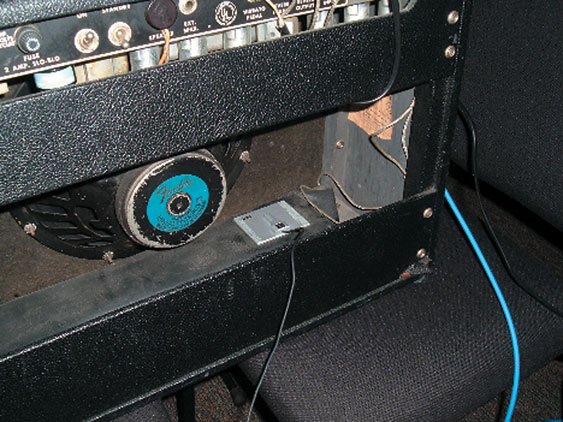
The Fender Deluxe reverb amp we were using has an open back, and if you have ever stuck your head back there you may have noticed that there is a lot of low end coming out the back of a guitar speaker. Our next mission was to try to discretely capture this low end so that we could mix it back in with the sound from the front of the amp. We were basically trying to get the kind of thumping low end usually associated with a 4 x 12 closed-back cabinet, like a Marshall or a Mesa Boogie.
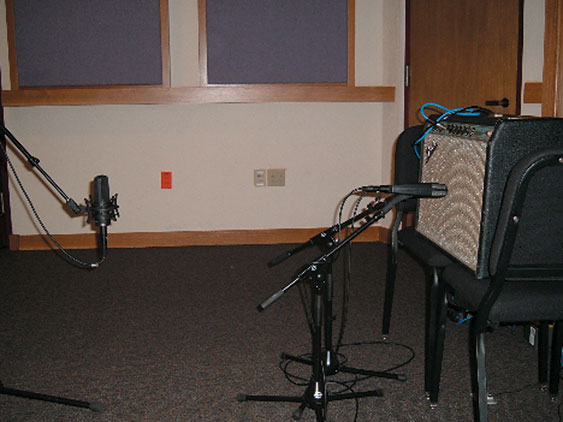
To this end we moved the MD421 to the rear of the amp as shown below. The SM57 was left at the voice coil and the AT4050 was left at the edge of the speaker cone.
The speaker moves back and forth to produce its sound. Because the rear mic is on the opposite side from the front mics, the speaker moves away from the rear mic as it moves toward the front mics. This means that the rear mic will produce a signal that is in negative polarity to the front mics.
If left alone, the signal from the rear mic will tend to cancel out certain frequencies from the front mics, so it is necessary to reverse the polarity of the rear mic. This can be done in your DAW. Your mic preamp or mixer may also have a polarity reverse switch on each channel. In a real pinch you can wire up a microphone cable where pins 2 and 3 are reverse-wired on only one end. Keep it around, but be sure to mark it so you know when you are using it.
We panned the SM57 left, the AT4050 center, and the rear mic center, under the assumption that we should try to keep all the low end in the center of the image. But when listening, we found that panning the 4050 all the way to the left with the 57 produced a tighter, more cohesive sound. In the example, you can now hear a nice low-end extension that is most noticeable in the spaces between the chords being played. The sound has now taken on a very large, weighty character without being muddy, and the low end is wide and full but still clear. This is a sound that is very difficult to achieve with only one mic! The levels were SM57 at 0 dB, rear mic and edge mics at –6 dB.
Again the Dark One reared his ugly head and told us to turn it up. We obeyed. Check it out.
As a comparison, we next put the MD421 back on the voice coil and moved the AT4050 to the rear. Being a condenser microphone, the AT4050 has a more extended low frequency response than most dynamics. Combined with its faster transient response, this location produced a clearer sound from the rear than did the MD421. The amount of low end is now getting kind of ridiculous, but we left it that way for the sake of comparison. Don’t forget to reverse the polarity of the rear mic!

At this point we also decided to try moving the dynamics out toward the edge of the speaker cone, but angled in towards the center. So the mics are at a spot where more lows happen, but pointed back at the spot where the highs come from. Both dynamics lost their upper edge, and the MD421 started to sound much more like the SM57. This sounded pretty nice and gave us an overall warmer, more compact sound.
Turning the amp up yielded more plump, delicious fruit! The angled dynamics sound fat and warm. Check out the thumpin’ palm mutes at the end of this one.
 Bright ideas
By this time things were starting to get kind of dark. We all felt we were somehow being pulled down into the depths in the reckless pursuit of low end, so we decided to open things up a bit.
We put the SM57 and the MD421 back on the voice coil and moved the AT4050 back out in front of the amp, about 3 feet away. Our intention was to mix the more distant AT4050 with the close mics to see if we could achieve a sense of space. This is a technique I have read about for years and had never gotten around to trying. (This is the layout shown in the very first picture in this article.)
Our first attempts were disappointing. Bringing up the distant mic seemed to hollow out the sound. Panning the distant mic away from the close mics produced a phasey, artificial widening of the image that was not at all complimentary. The reason for this was that the distant mic is not aligned with the close mics, and the phase relationships between the mics was causing cancellation of some frequencies and reinforcement of others. The solution was to time align! We delayed the close mics by about 3 milliseconds to match the distant one and BOOM! Everything fell into place. The distant mic really filled out the sound and made it sound, well, more real!. Mix levels were SM57 0 dB and the other two mics at –6 each. All mics panned left.
- MP3 example 13: SM57 and MD421 close, AT4050 3 feet away, NOT time aligned
- MP3 example 14: SM57 and MD421 close, AT4050 3 feet away, time aligned
Adding some room
Turning up the amp this time did not produce the same evil satisfaction it had up until this point. The AT4050 did not seem to be contributing much, and when we listened to it by itself we found that at this higher volume level the AT4050 sounded kind of thin and edgy. Dynamic microphones handle high sound levels much better than condensers, and it seemed this condenser was being pushed beyond its limit. So we decided it was time to use this multipattern condenser to capture the sound of the room, and not so much the sound of the amp.
We switched the AT4050 to the omnidirectional pattern to pick up sound in a 360 degree sphere. Again the addition of the distant mic sounded pretty bad until we delayed the close mics to time-align everything. With the dynamics panned left and the omni center, we were able to add some room sound into the mix and this made things sound bigger, but there was a fine line between just enough and too much. Bringing the distant mic up too much made the amp start to sound somewhat piercing, so we ended up with the sound in Example 15.
What occurred to us is that we really liked the sound of the close mics, but the condenser was still not picking up so great a sound from 3 feet away. But how to get the room sound without the sound of the amp? I remembered a trick that a producer from Nashville once told me. We set the condenser to figure-8 (bidirectional) and pointed it sideways toward the wall. The figure-8 pattern rejects almost all sound from the sides, and that part of the pattern, the “null”, was what was pointing at the amp.
Listening to this mic by itself confirmed this; we heard the room all by itself as if the mic was 50 feet from the amp! This let us add as much room as we wanted without adding any direct sound from the amp. This worked very well—pushing the distant mic up just made the amp sound farther away, so this worked kind of like a “distance control”. We could also pan the distant mic right on top of the close mics, which had produced a muddy sound with the other setups.
 The other surprise was that time-aligning everything seemed not so necessary anymore. The sideways figure-8 was really not picking up the same sound as the close mics, so there was less to cancel out. By not time-aligning, we preserved the delay between the sound of the amp and the slap reflection off the walls, which turned out to be a good thing. Things really opened up with the loud distorted tone, which really excited the room! The sound we got started to take on a very realistic sense of depth.
- MP3 example 16: SM57 at 0, MD421 at –6, AT4050 sideways figure-8 at –6. SM57 panned left, MD421 and AT4050 panned halfway left.
- MP3 example 17: SM57 at 0, MD421 at -6, AT4050 sideways figure-8 at –3. SM57 panned left, MD421 and AT4050 panned halfway left. Distortion!
To further explore what reflections were available in our room, we set the AT4050 back to cardioid and faced it away from the amp, pointing at the glass control room window that the amp was firing into. What we got was still good, and still did not want to be time-aligned, but not quite as nice as the sideways figure-8. So we moved that cardioid right up against the glass, maybe a foot away, so that it was pretty much getting only that one reflected sound wave from the glass and none of the other reflections in the room. The effect was impressive! The distant mic could be cranked up pretty high in the mix, and did not make the amp sound farther away as much as it made the room sound bigger!
I used to know this lazy guy who did sound in a club who would always hang SM SM57 mics over the front of the amp because he would run out of mic stands. We played so many gigs that way I decided to try it and I have included an MP3 of just the SM57 here. Any mic sounds different off axis (from the side), and the SM57 was actually quite usable this way. All the low end disappeared, but the sound was nice and kind of compact, definitely worth trying!
Pushing the boundaries
By this time we were pretty happy with ourselves and we had come up with some very interesting sounds that had tons of flexibility built in to them. Time was running out and I had tried everything I had planned to try. So I asked my students to suggest any idea we had not yet tried, no matter how weird.
 My students had been asking about Pressure Zone Microphones lately. A PZM is basically a condenser mic capsule suspended about one millimeter above a little metal plate. The idea is that you tape the mic to a surface, or “boundary”, and it picks up the sound pressure fluctuations right at that boundary. (In fact they’re more generically known as “boundary mics”, PZM being a term coined and commonly used by Crown for its PZM products.) As such they are great for picking up ambient sound at, say, a club, or in a concert hall, but in recording they are somewhat of a novelty and not often used.
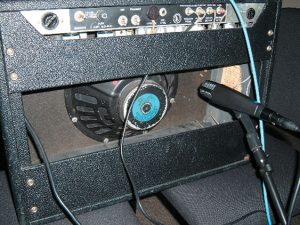
We had a couple of cheap old beat-up PZMs lying around, and I won’t even mention the manufacturer because it turned out not to be so important, as you will see in a moment! The amp was sitting on a pair of chairs about two feet off the ground, and somebody (who will remain nameless but his initials are Mark From Oberlin) had the idea of putting a PZM on the floor under the amp. So we added a fourth track and tried it. To be honest it didn’t help so much.
But it was at that time that the Dark One appeared again and through his subliminal influence a perfectly diabolical and irresponsible idea slowly crept into my subconscious. When it finally burst into my conscious mind it almost knocked me over. I spontaneously flashed a double devil sign as my entire body seemed to convulse for a moment. Then, as if under the control of some external entity I ran into the studio and picked up that poor little old PZM and quickly dropped it inside the back of the amp—jerking my hand away as if I was afraid of being burned! That poor little mic that had been used to record lectures and speeches was now cowering in the back of a Fender Deluxe Reverb amplifier—just inches away from the back of the speaker!
Now I’ll tell you what I told the kids (later, after the voodoo spell had worn off): “don’t try this with a nice mic!” This little condenser capsule was about to be completely obliterated with huge SPLs from this cranked amp, and I had every expectation that it would fry!
I commanded my minions to reverse the polarity of the PZM and flip on the 30 dB pad. I then strapped on the guitar, dropped the low string down to D, and ripped forth with a spewing torrent of searing, molten, sonic hell fury! I could see the faces on the other side of the glass: eyes wide and jaws agape. I could feel the hot wind from the 12″ Utah speaker whipping at the back of my legs. I could hear the Dark One laughing with delight as I maliciously abused that poor little mic.
When it was all over, we soloed up that sucker and damn if it didn’t sound just like something you would hear on a Tool CD! The PZM had an absolutely evil thumping midrange growl! When combined with the other three mics, the result was absolutely astounding! That little Fender amp sounded like a wall of Mesa 4 by 12 cabinets. My last two examples provide a taste of this marvelous tone.
Conclusions
Whew! I feel so violated! But seriously folks, what have we learned?
- We liked the SM57 on the voice coil best and used it as the basis for all of our sounds.
- Adding more mics significantly broadened the sound. Panning different mics away from each other gives a solid three-dimensional sense of space.
- The addition of the condenser sounded great when it was used at the edge of the speaker cone or on the rear of the amp, but it started to get thin when pointed at the center of the speaker for distorted sounds.
- Using the condenser to pick up room sound worked best when almost no direct sound from the amp was getting into it!
- Always reverse the polarity of the rear mic.
- Always time-align everything unless your distant mic is picking up room reflections with nodirect sound, then leave it alone to preserve the delay from the reflections.
- If you’re gonna stick a mic inside the amp—don’t use one you care about!
The sonic variations possible by using multiple mics make equalization less necessary. Consider mixing your mics to a stereo bus and adding very subtle EQ to this overall mix. You might also try compressing the distant mic, maybe even squashing it. This will allow you to get a very cool compressed room sound without squashing the other mics.
I had so much fun doing this, and we tried some crazy stuff I never would have wasted a paying client’s time for. If you check out the pictures and the MP3 examples you should come up with about three million ideas of your own. So next time you have an extra mic lying unused, stick it on that amp somewhere and see what happens!
Sorry for all the Satanic references. I’m a middle aged man who grew up in the mid-Seventies and the sound of distorted guitar just makes me go all silly. Besides I’m really a trombone player. Nuff said?