
An insider’s viewpoint on the vocal tracking process, with great dos and don’ts
By Eleanor Goldfield
“I guess you’re a cheap date,” he said, smiling.
I shrugged my shoulders and laughed, taking a few more sips of water and honey tea before continuing.
Yes, you’re reading the correct article. And, no, I don’t drink tea on dates… usually.
Finding the vocal mic
When the engineer/producer placed the Shure 545 in front of me, we had already been through the vocal-mic heavyweights: the Neumann U 47, U 48, and U 87, and AKG C 12. I already knew that my voice didn’t sound good on a Neumann U 67 so we skipped that one. The Shure SM7 didn’t fit either, so we kept climbing down, from top shelf to middle, eventually getting to the Shure 545, sort of like an older brother to the Shure SM57. (I bring an SM57 and SM58 to every vocal session, just in case I’ll want to use them. I know that every studio has these, but I would rather use my own, being slightly germaphobic…)
Then a visiting engineer friend of mine suggested an Electro-Voice RE20. I was wary, but a half hour later I had to give him a hug. The characteristics of this mic parallel ideally with my voice: A smooth broadcast-style rolloff starting at 200 Hz, a nice bump at 3 kHz, followed by a dip at 4.5 kHz, a gradual hill over 7-10 kHz, finishing in a slow decline after that. The RE20 is now my go-to studio mic.
Why all the fuss?
Vocals are the most uniquely personal instruments of all—just like we each have our unique DNA and fingerprints, each of us has unique vocal cords. Capturing these nuances, and finding the right mic to do so, goes beyond easy categorizations like “a rock vocal” or “a jazz vocal”. It requires experimental patience, knowledge and creativity, both from the producer/engineer and from the vocalist. Singers entering a recording studio should not assume that “their” perfect vocal mic will be ready and set up for them; they should make it their business to find out what mics complement their vocals, just like a guitarist walking into a session has to know how to adjust their amp settings.
Singers, you don’t have variable settings like an amp head does, or switchable speakers or tubes; your voice is your voice. You don’t have the ability to add a little presence to your voice, or cut a little midrange. However, there exists a vast range of microphones, some of which will highlight or dull certain parts of your voice, essentially acting as the controls on an amp head.
 Singer—know thy voice!
How do you find out what may suit your voice? While the specs of a mic are obviously easy to find, we singers can’t Google our frequency curves as easily. We have to test and build them.
For singers, this task requires you to sing into a DAW and slap a multi-band EQ on whatever it is that you just sang. Either you or an engineer can then sit down and start moving those bands up, down and over. Don’t be light-handed here, either. The point is to find the frequencies that resonate the most, in a good or bad way. Crank that 3 kHz band up and see if that’s where your bite sits. Crank 450 or 500 and see if it sounds like you’re wrapped in a blanket. This way, you’ll carve out a nice frequency response curve for yourself and can then match that with mics that complement that curve.
As an engineer, if you have no idea what the frequency response of your client’s vocals are, listen to previous releases of theirs. (This is essentially how that engineer came to recommend the RE20. He knew the frequency response of the RE20 and, having mixed my vocals more than a handful of times, he had a visual memory of my frequency curve as well.) Maybe you’ll have the time/ability to do a vocal mic shootout, so you can ask the client to come in and test with you.
Cases in point
For example, I sing rock/hard rock and blues rock and my voice parallels well to that of Chris Cornell (Soundgarden, Audioslave) and Brent Smith (Shinedown). A little online digging will tell you that Cornell has used SM57s and SM7s in the studio. SM7s are good because they can handle enormous amounts of SPL and they add a nice clarity to beefy rock vocals. They can, however, also add sibilance to voices like mine… voices that just need a little sheen in the top end, not a heavy silk mumu.
 A singer I have worked with has the most amazing pop/R&B voice and sounds outstanding through a Sony C800, a Neumann M 49, AKG C 12 VR and Blue Kiwi. (So she’s not a cheap date…) The Sony C800 is a beautiful-sounding tube mic, with more than a handful of people saying it’s their favorite tube mic. The M 49 is a classic, with smooth and clean highs and well-rounded lows. The Kiwi sets a high bar for solid-state mics, with a relatively flat response and honest features. The C 12 VR exposes more than the others, without overtly highlighting. The reason this singer sounds good on it is because she has a honey-smooth voice with just tinges of rasp here and there. The C 12 picks up on those without focusing on and pushing them—unlike, say, a U 47.
The highly praised (and highly priced) Neumann U 47 is a beautiful-sounding mic that doesn’t really hype in one place or the other, but it does have a smooth and warm tone to it that a lot of people love. In my case, that’s precisely why it doesn’t work: I like the harshness in my voice and even want it to be accentuated. The U 47 will glaze it with a warm goo that sounds awkward on my voice.
For classical vocals, the Audio-Technica AT2020 is a favorite, as well as the Schoeps MK4 that has pretty much an entirely flat frequency response. For country, I’ve found that many of the same pop mics sound great, as well as the RCA 77 ribbon mic and its modern successors from companies like AEA and Cloud.
Allow for creative surprises: As you put up the typical choices for your genre and style, throw in something a little off the radar. Add an AKG C414 to your lineup of the SM7, SM57, U 67 and U 47, or a RØDE NT1-A, which straddles several genres, having been used in studios by Amy Winehouse as well as Cornell, Black Rebel Motorcycle Club and 30 Seconds to Mars.
Make sure that when you’re testing these mics, you don’t have compression or EQ in, and that the mic pre is at an appropriate level. Which brings us to…
Microphone preamplifiers
If you can, try out a number of high-quality mic preamps, as they can make a difference. Not as much of a difference as, say, the tonal difference between an SM58 and an RE20, but still important.
The thinking behind mic pres, at least from my perspective, is that studios and home setups should invest in a couple or a few solid mic pres that focus on transparently passing along audio signal without augmenting or affecting it. In the years that I spent working at the Village in Los Angeles, I heard of maybe two or three people using a mic pre other than the 1073s available inside the Neve 8048 console. Why? Well, because they sound amazing! They work on anything and everything, from spoken word to death metal. Besides that, what’s more convenient than using the mic pre that’s built into the board?
Chances are that if you find yourself in a professional studio, the house engineer will suggest using whatever gets used the most. When I was at Sunset Sound, the home of my RE20 epiphany, I sang through their custom-built mic pre. That’s obviously not something I can pick up at the store. When we recorded tracks at my home studio, I used a Vintech X73 (modeled after the Neve 1073).
In short, when you go to test mics and to record, go through a trusted mic pre that won’t color the sound too much.
EQ and compression
Now, on many channel strips and certainly in your mixer and DAW, you have EQ options. My suggestion is that of one of my mentors: mess with everything else before you record with EQ!
The thinking here is that if you’ve done your homework by choosing the correct mic and the correct placement and a mic pre that doesn’t come in a “starter pack,” you shouldn’t have to tattoo EQ onto your vocals. Even if you think you know what EQ is needed later on for that voice to sit in the mix, you should still record onto two tracks, with and without the EQ.
As far as compression goes in this signal chain, a general consensus is to “salt” the track, i.e. to use it sparingly or not at all. I, for one, always record with a little light compression. I have a very dynamic voice and need something to smooth out the highest peaks and lowest valleys. Between that and good mic technique, I typically don’t need to really clamp down on anything, nor do I like doing so.
Engineers, if you have a singer who is incredibly dynamic, stay your hand from smashing the hell out of that vocal. Consider how that singer will react when hearing a metric ton of compression restrain every pushed word or phrase. The goal is, after all, to get the best performance, and as any producer will say, half (if not more) of producing is psychology. If a singer doesn’t like the way they sound on record, that recording won’t sound good.
This is often ignored when it comes to compression. It’s obvious when you’re listening to a microphone that sounds awful or a preamp that’s buzzing. But as you sit there, pleased with your controlled and contained waveform, the singer may be out there wondering why the hell he or she has to keep singing harder with less desirable results each time!
Depending on the singer, start with something light, and adjust for taste. If you feel that you absolutely need harder compression, try this trick: Create two audio tracks inside of Pro Tools and set two compressors (either hardware or plug-ins) that feed those audio tracks. Make the first one a light compression and record that pass first. When you’re at that place where takes start coming, and the vibe is up, ask them to double.
Switch over to the second track and record through the heavier compression. Let the singer listen to the first take while they sing the second. While the current pass will sound more compressed, the singer is less likely to notice and be bothered by it because the more dynamic track is still audible.
This of course assumes that the singer (1) can double themselves without issue and (2) doesn’t mind hearing themselves as they sing doubles. But if you can get that dynamic singer to give this a go, you’ll be quite pleased with the blend.
Now, if you happen to be working with someone like Donna Summer, who asked that the compressor be removed even before the needle moved (true story), go ahead, and then sit back and enjoy. If you have a singer who can so masterfully work their relation to the mic, to the point that the fadeout looks literally drawn in with DAW automation, don’t mess with that beauty of artistic technique. For the rest of us mortals, add a little salt to the mix.
 Care and feeding
Vocal cords are soft tissue, basically muscles. When we push them together, they create vibrations in the form of sound. You non-singers don’t know how lucky you are that your instrument is not a part of your body. Sure, you have to lug kick drums and guitar cabinets around, but if you skimp on sleep or have too much coffee, your instrument isn’t affected. Well, ours is.
Everything we drink, eat, inhale, think, and do affects our vocal cords, for good or bad. So engineers and singers alike, here are some tried-and-true ways to care for and carefully manipulate those two magical wings of soft tissue.
~ Sleep: Lack of sleep translates to your vocal cords. In short, get enough sleep the night before a session or gig, and don’t plan on re-grouting your bathroom that morning.
~ Stress: Stress also shows itself in your vocal production. Being a musician is stressful in and of itself, so all I can say is maybe try yoga and stock up in the other departments, like hydration. My guitarist constantly makes fun of me for walking around with a water bottle as if I were about to cross the Mojave. It’s true, I drink a lot of water (about half my weight in ounces a day); but I would argue that everyone should, particularly if it’s a necessary part of keeping your instrument in optimal working order. Without proper hydration, your voice won’t just lose desired timbre, it’s more likely to crack, falter and quiver, making a smooth vibrato sound like a hacking square wave.
~ Dairy products: Dairy products have been given a bad rap from classical singers (which I used to be), simply because dairy triggers your body to produce more mucous. In classical music, this is bad. Mucous obviously interferes with the desired pristine, crystal clear tones. But how about rock? Or some edgy country or R&B where you’re not looking for pristine and crystal clear?
Dairy products give singers a little more gravel to push off of, something a bit dirty and unrefined, a little bit of gritty growl. But be careful and don’t think that the more pizza you have, the more gravel you’ll get. It affects mostly the midrange and could cause cracking and wobbling in the lower and higher sections of your range, so choose your dairy consumption wisely.
~ Alcohol: Then there’s alcohol, in particular whisky and other dark liquors. I don’t include wine or beer in this because they aren’t harsh enough to get a response out of your cords. All they do is dry them out.
I’m not sure of the science behind this but if you take a shot of whisky, you’ll get some nice gritty rasp, and it’ll be easier to hit the lower notes in your range. I say shot because you shouldn’t start blending the alcohol with sweet mixers like juices or sodas. The sugar and laboratory-made multisyllabic poisons won’t do you any favors. Stick with a shot or two.
Don’t go overboard, not just because of the drying effects on your cords, but also because you don’t want to be standing there at noon recording vocals whilst having to decide which of the two mics in front of you is really there. And if you’re opposed to alcohol use in general or just in the studio, feel free to skip this step and try my other suggestions.
~ Coffee, Tea, Honey, Oil…: Just stay away from coffee. In my experience, no fun or interesting effects have come from drinking coffee except cracking and missing notes. Coffee basically just dries out your vocal cords, and even with drinking water afterwards, the effects are lasting for at least a couple of hours. As much as it may suck, give some green tea a try and ask to not start too early in the morning.
As for tea, there are several brands made specifically for the voice including Throat Coat and Golden Voice. When I go into the studio, I typically take one bag of that, a packet of honey and a spritz of lemon. That’s my go-to drink.
Honey is also good—just take a spoonful. Its sticky yet smooth nature does wonderful things for a fluid, consistent vibrato.
And while you have the spoon out, you can also take a spoonful of oil; olive, rice bran, safflower, etc. The oil will coat your cords (just like a door hinge…) and smooth them out beautifully. It can make it a little too slippery to get a good handle on your gravel or grit, but as you’ve read, there’s a remedy for that as well.
~ For your top end: Neither milk nor whisky (please don’t blend) do much to help your top end, but green apples do. They have to be green. Something in green apples gives a hydrating crisp to your cords that’s immediately noticeable. Green apples are also great to have in case you forgot about not having coffee… or you want to etch-a-sketch the whisky and milk you just downed.
~ Food: Food can be just as hydrating as water, or as dehydrating as coffee. Vegetables are typically great for the voice because they contain a lot of water. Anything with a lot of salt or sugar isn’t. Grains are not too far to either side, but my vocal cords feel a bit swollen after I’ve eaten a lot of gluten, so that may be something you want to watch out for.
~ Smoking, exercise, and the meaning of life: I won’t get too naggy here about smoking or exercise (especially since I’ve just suggested that drinking can be good for a singer!) but I think we can all guess which one of those is good and which one is bad. And none of the other information is rocket science either. Your body isn’t afraid to tell you when it likes or doesn’t like something. You’ll know just by feeling and listening to yourself sing whether that coffee cake and soda was a good idea (which it probably wasn’t).
The same goes for choosing mics and setting up your signal chain. Use your ears and take note of how it feels and sounds to sing or record through that mic, through that pre, that compressor. Allow yourself the time and freedom to experiment and to be an overly expensive or overly cheap date.
And for the record, as a wino, I’m not a cheap date. Happy recording!
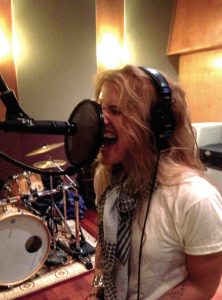
Photo of Samantha Blanchard on the Blue Kiwi by Eleanor Goldfield. Photos of Eleanor Goldfield on Shure SM57 and Electro-Voice RE20 by Chris Owens. All photos taken at Bell Sound Studios, Hollywood.