A hard look at the art and science of hearing your music right
By Joe Albano
In studios of all types and sizes, every decision made—levels, EQ, compression, reverb—is based on what the engineer hears in the studio monitoring system. And that’s not just the speakers, but also the physical environment—the room itself. It can be easy to forget just how critical this is, and to get lost in the fun of assembling and experimenting with the latest and greatest mics, plug-ins, and other studio toys. You can end up paying less attention than you should to the selection and setup of the monitor speakers and the arrangement and treatment of the control room, where those critical decisions will be made.
But a studio is only as good as its monitoring system allows, and there are a number of important considerations that need to be taken into account when setting up a production facility of any size. Naturally, top studios can choose from among the priciest state-of-the-art speakers, and have room response measured and tweaked by professional designers with big-ticket test equipment. But even smaller operators on more limited budgets can do a lot to optimize their listening environments, as long as they know what to watch out for. So let’s take a look at some of the main considerations for monitor speakers and room issues that should be taken into account when setting up an audio production facility. We’ll start with the speakers..
Warts and all
Although headphones are a necessary and useful component of any studio, it’s the monitor speakers that will provide the majority of the sound that recordists and mixers base their technical and creative decisions on at every step of the production process. I’ll touch on why speakers are favored over headphones for serious work a little later in the article.


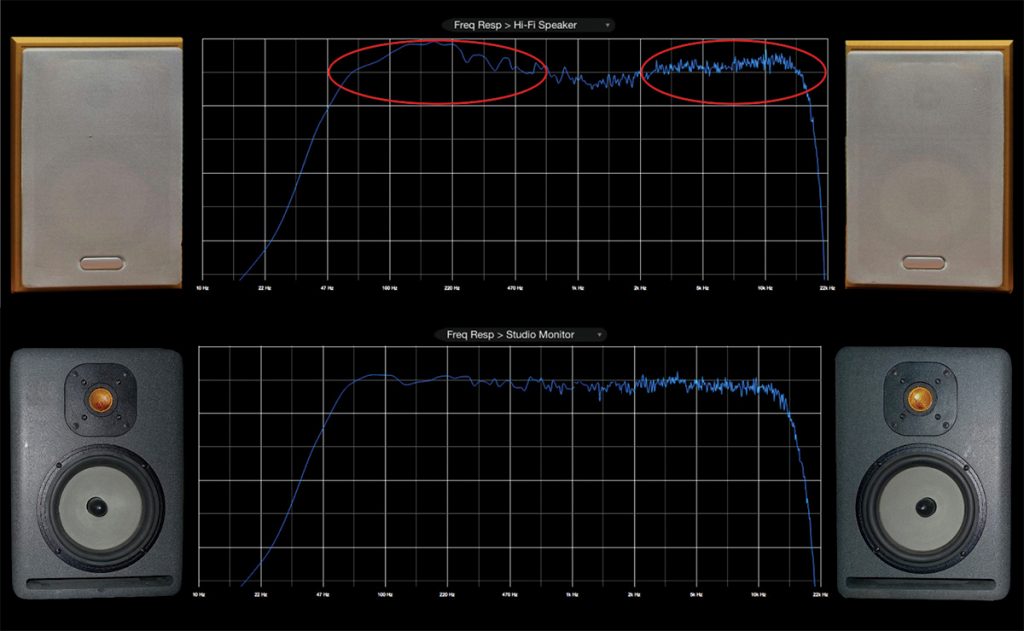
FIGURE 1. The red circles show regions of bass and treble “hype” in hi-fi speakers vs. a flatter response in studio monitors.
Casual musicians and hobbyists often press a favorite pair of home hi-fi speakers into service as studio monitors, but anyone who’s serious about getting the best sound and creating mixes that “travel” well—sound good on speakers outside their own studio—knows that what’s needed are dedicated studio monitors, designed specifically for that purpose rather than for the simple enjoyment of casual music playback.
Home stereo/hi-fi speakers are often designed to make everything sound “good”, and that often means loud, bright, and thumpin’. To that end, they may have a deliberately hyped frequency balance, with both treble and bass accentuated for a more dramatic listening experience, especially at lower listening levels. But studio monitors are not intended to make everything sound good—in fact that’s the last thing you want them to do. Instead, they need to have as neutral a tonal balance as possible, so the listener can hear what the recording or mix actually sounds like—if it’s good, it’ll sound good, but if it’s flawed, the engineer/mixer needs to know, so they can make the appropriate adjustments and corrections before finalizing things. See Figure 1.
A pair of speakers that smoothes over rough spots with a pleasantly hyped frequency response, or by deliberately exciting extra ambience from the room via reflections, may make for a pleasant listening experience, but wouldn’t be doing its job as a studio monitor. A flat response and freedom from other colorations is necessary, and that’s what most dedicated studio monitors—even the smaller ones—will try to provide.
Naturally, a flat frequency response is the goal of any studio monitor, but of course in the real world no speakers are perfectly flat, and no two speaker designs will sound exactly the same. Still, even though differences in overall tonal balance may be obvious when comparing different monitors, the differences should be subtle enough not to drastically alter decisions made about EQ by more than a dB or two here and there. Assuming you’re selecting a set of monitors from among a number of options that are all well-respected designs from recognized companies, it could be good idea to choose a set of monitors whose specific response slightly leans to your own listening taste—this could help you avoid overly-EQing all your mixes to get a certain tonal balance your chosen speakers lack.
The low end
The low end of the frequency scale—the bass—is often the area that’s most likely to trip up operators of small studios. It’s not only the speakers’ low end response that can be problematic; the room itself is typically a major factor in low-end monitoring issues, as I’ll get into in the second half of this article. But the speakers’ actual low-end response is always a major consideration. In a perfect (studio) world, there’d be enough money and enough room to buy and (optimally) install large, full-range monitors capable of shaking the floorboards, but in the real world bass response is often where the biggest compromise has to made.
Low-frequency response in any speaker is a tradeoff between three physical factors (not to mention cost)—size, level, and bass extension. You can’t have all three—conveniently small size, loud playback capability, and deep bass response. A speaker that’s small and loud will need to sacrifice low end for volume; small size with deep bass will sacrifice volume/power handling; and loud playback plus deep bass will require a bigger box.
Most typically, size limitations in smaller studios mean smaller boxes, with an accompanying loss of bass extension. Now, keep in mind that this doesn’t mean a smaller speaker will have poor bass and tinny sound—a good design should still have enough low end to balance out the mids and highs. What it will lack is not overall bass, but bass extension—response down to the lowest octave. The bass range typically extends from around 200 Hz or so down to 40 Hz, or even to 30 Hz. Most musical fundamentals are above 40 Hz, but post-production FX (impacts, explosions) can easily extend lower. Unsurprisingly, many smaller studio monitors don’t provide that depth.
Typical smaller monitors come with 5″, 6″, and 8″ woofers (or thereabouts). An 8” design should be able to provide bass extension down to around 40-something Hz without too much falloff or too large a cabinet, but smaller 6″ and 5″ models may roll off closer to around 50–60 Hz or so. Even smaller 3″- 4″ speakers may roll off below 80 Hz, but these are really designed to be used with subwoofers.
The phantom fundamental
Still, 5″ and 6″ designs are very common. It’s important to remember that fundamental frequencies that fall in the lowest octave will still be perceived even with speakers that don’t actually reproduce that octave, thanks to the psychoacoustic phenomenon of the phantom fundamental.
If a low note, like, say, low E on a bass guitar (41 Hz fundamental) is played on a small (5”) speaker that rolls off the lows around 60-something Hz, a listener will still hear the 2nd/3rd/4th/5th/etc harmonics that make up that sound—since the harmonics are multiples of the (41 Hz) fundamental frequency, those harmonics will all start and finish their cycles together at a rate of 41 cycles/second—41 Hz. Thanks to our psychoacoustic perception of complex sound waves, human hearing perceives the missing frequency—and therefore the correct fundamental pitch—of 41 Hz (low E) even though the actual fundamental frequency is too low to be reproduced strongly by that small speaker.
The bass tone is thinner, of course, but the note is there, and if the speaker’s overall response is well-balanced, with enough even low-end response in the 60-200 Hz range, that speaker can still be perfectly useful for critical monitoring purposes—as long as the user is aware of its limitations and doesn’t attempt to EQ things to try to make it sound like a larger cabinet. If he gets to know what most recordings should sound like with that more limited bass extension, then he could have a well-balanced small speaker with a suitably flat response for monitoring purposes.
Know your monitors
And that’s a key aspect of working with studio monitors—the engineer/mixer needs to get to know the sound of their monitors well—to know what most commercially- produced/mixed/mastered music in the appropriate genre(s) sounds like on those speakers, and develop an internal reference based on that response, rather than on some idealized response that could only be achieved with massive speakers and subwoofers (to that end, frequent A/Bing of current mixes with multiple selected reference tracks can be very helpful).
That’s how so many successful mixes were made on the old Yamaha NS-10 speakers, a consumer design adapted for studio monitoring use, with tweeters so harsh that people used to cover them with tissue paper, and sorely lacking in bass. While I found I could never mix well on them, many people I know and respected swore by them.
On a side note, most studio monitors these days are active, with built-in amplification, and this takes one more consideration off the table. Rather than having to match the power handling and efficiency of a pair of monitors with the appropriate amplifier wattage and impedance, all that need be done in regard to power is to make sure that the speakers can play loudly enough in their intended installation without overtaxing the built-in amplifiers…. which brings us to the next important consideration when it comes to the monitor speakers—their placement.
Speaker placement
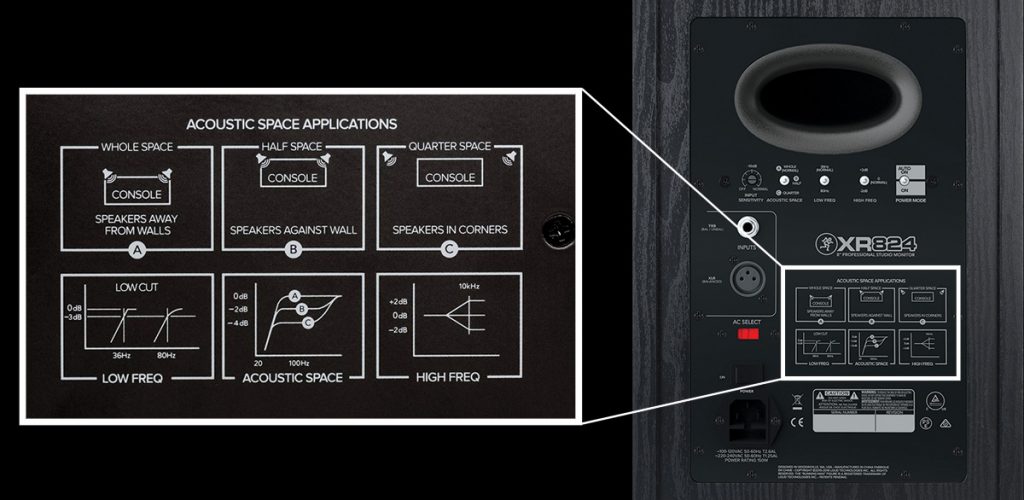
FIGURE 2. A typical monitor (here, the Mackie XR824) with a diagram
explaining acoustic tweaks for speaker placement.
Obviously, the sound coming from any studio monitors will interact with the room, and so the placement of the speakers is a very important consideration. I’ll dip into the acoustic phenomena of rooms toward the end of this article, but for the moment I’ll focus on how to arrange your speakers for the best results.
In bigger studios, you’ll often see large soffit-mounted speakers installed within the front walls. These are great for cranking up the music, but nowadays, many engineers and mixers prefer to use somewhat smaller monitors mounted on or just behind the console or control surface. While those large soffit-mounted monitors are designed for that kind of placement, typical standalone monitors should generally be kept away from the walls—and other room boundaries, especially corners.
As I’ll explain later, when a speaker is placed near a wall, the bass is emphasized. This can be tempting, especially with speakers that are somewhat lacking in bass—hey, it’s free bass, right? Unfortunately, it’s not good bass—the bass boost from a speaker’s proximity to a room boundary is uneven, with boosts and dips at different frequencies, depending on the room’s dimensions and the speaker’s distance from the wall/boundary.
The most even bass response will be had by keeping the monitors a few (two or three) feet away from the nearest walls. This is called free-standing, or full-space, placement, and most monitors are designed to provide their flattest response with this positioning. The speakers may sound a bit thinner compared with a wall placement, but again, big fat bass is not the goal for studio monitoring—a neutral, even response is. If you need more bass, buy a bigger speaker, and then still place it in a free-standing position.
That said, some monitors do offer bass EQ/filtering for wall or even corner placement (half-space or quarter-space, respectively), if it’s unavoidable… as it might be in very small rooms. (See Figure 2.) But this is still usually only a simple rolloff to compensate for any overly boosted response, and it won’t necessarily counter any unevenness that results from proximity to a wall, so it’s still better to go with a free-standing placement whenever possible.
It’s also a good idea to shoot for symmetrical placement of the monitors, vis-à-vis the side wallsthat is, the speakers should both be equidistant from the side walls. That way, reflections (particularly mid-and high-frequency reflections) will be consistent on both sides of the stereo sound field. Asymmetrical placement can result in stronger reflections on one side of the stereo image at the listening position, potentially skewing the left/right balance of mixes done in that space.
Playing the angles, playing the field
Most studio people agree that the optimal angle for stereo speakers is 60°, 30° between each speaker and the sweet spot, the primary listening position exactly between the two speakers. This recommendation is based on the position and orientation of human ears, and regardless of the distance from the listener to the speakers, this angle should be maintained for the best stereo imaging. Too wide an angle may result in a mixer panning most tracks in a mix too close to the center, bunching everything up in the middle, for a less-spacious stereo soundfield; too narrow an angle, and the mixer may end up panning tracks too widely, bunching everything up at the left and right speakers, for a “hole-in-the-middle” effect.
When it comes to distance between the listener and the monitors, there are a couple of options. With larger free-standing speakers, a midfield placement may be best—just behind the console or work surface, around six feet or so from the sweet spot. With smaller “console-top” monitors, the preferred distance is around three feet. This is referred to as nearfield monitoring—the speakers are close enough to the listener to minimize the inevitable effects of room reflections at mid and high frequencies (again, more on that below).
Those reflections can smear the tonal character and imaging of the sound coming from the monitors, resulting in a loss of detail, clarity and depth. This will likely have a negative effect on any mixes, especially when it comes to the application of effects that utilize delays and ambience/reverb, as well as potentially compromising the ability to judge if a mic is picking up too much room tone in recording. With nearfield monitoring, due to the proximity of the speakers to the listener, any interference from those room reflections is weaker than the direct sound coming from the monitors, providing cleaner sound and preserving more detail and clarity.
With either midfield or nearfield monitors, the preferred height for the speakers is to have the tweeter at approximately ear level for the listener in the sweet spot. This is referred to as “ear-level monitoring,” and it should provide the clearest response in the critical upper-midrange and high-frequency part of the spectrum, where human hearing takes its psychological cues for depth and stereo imaging.
What about the cans?
Before I shift over to talk about the room’s contribution to the monitoring environment, I want to briefly touch on headphones. Now, once again, many casual musicians and hobbyists may opt to work primarily in headphones, for their convenience and the level of control they provide over potentially problematic sound levels in the room. And of course, when recordings are being tracked, closed-ear (circumaural) closed-back headphones are a necessity for the performers to be able to hear themselves and the rest of the tracks clearly, without leakage from other parts getting into their microphones.
For mixing, though, it’s best to work on loudspeakers instead of phones. Headphones can provide a deceptive level of clarity and imaging—mixes made in headphones may not sound as clear or well- balanced in speakers, with a loss of detail. On the other hand, mixes made in speakers will usually sound good in phones, possibly revealing additional detail, but not losing anything in the translation.
The reason for this is a fundamental difference in the way stereo sound is heard in headphones vs speakers. In phones, the left ear hear hears only the left channel and the right ear only the right channel. But over speakers, both ears hear both channels—this is called interaural crosstalk, and it results in a significantly different perception of stereo image, depth, and detail.
So the general approach is to mix in speakers, and check the mix in headphones. Ideally, additional speakers (and rooms) will also be pressed into service to check the mix, as will different types of headphones (studio phones, earbuds), to help insure that the mix will sound good wherever it’s played.
The room
And that brings us to the room. Even studio operators who understand the importance of flat response for the monitors may not be experienced enough to realize just how much effect the room itself will have on the sound ultimately heard by the engineer in the sweet spot. This is especially critical for mixing—if the room alters the sound too much, this will lead to the mixer making choices in EQ, delay, and reverb that only work when the mix is heard in that specific spot in that specific room.
Mix decisions that compensate for anomalies of the room can make the mix sound worse in other rooms that don’t share those same colorations. The flattest speakers in the world will still be subject to room colorations, and so for a truly professional production environment, the room usually needs to be considered part of the monitoring chain, and treated with physical sound control treatments to minimize any detrimental effects.
Room colorations are the result of sound waves reflecting off the room’s boundaries—the walls, floor, and ceiling. Reflected sound waves bounce off these surfaces back into the path of the direct sound waves traveling from speaker to listener, and phase cancellations and reinforcements alter the harmonic and overtone balance of the sound, leading to EQ choices that don’t work in other rooms. Additionally, delays and ambience in the room can give the mixer a false picture of the overall ambience of the mix, leading to dubious decisions about the use of delay-based effects like chorusing, echo, or artificial reverb. An overall loss of detail from the room sound can result in less-than-ideal choices made even in basic aspects of the mix like level and panning.
Room sound problems can be divided into two basic categories—low- frequency and mid-/high-frequency issues. I’ll start with the low-frequency issues, since these can be the most severe, and are the most common cause of mixes that don’t “travel” well.
Don’t stand for standing waves
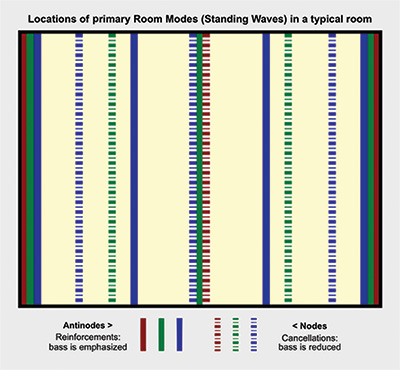
FIGURE 3. This diagram shows nodes and antinodes for standing waves between two walls.
In any room, sound waves reflect off room boundaries—I’ll use wall reflections as an example, but floor and ceiling reflections are also part of the issue. When the shorter wavelengths of mid and high frequencies are reflected, the resulting phase issues/colorations are spread throughout the room (see below). But the longer wavelengths of low frequencies are often as long as or longer than room dimensions, and these reflections produce cancellations and reinforcements that are localized to specific spots in the room.
There isn’t space to get heavily into the math/physics of it here, but these localized areas consist of spots where the bass at certain frequencies is either cancelled (nodes), for a loss of bass at those frequencies, or reinforced (antinodes), for a boomy response. This happens at frequencies whose wavelengths are related to the room’s dimensions, and typically a room will have several for each pair of parallel surfaces (wall to wall, floor to ceiling). These low-frequency anomalies are called standing waves or room modes. See Figure 3.
For example, there’s always a buildup of bass at certain frequencies at the walls themselves—that’s why speaker placement away from the walls is usually recommended, as above. And since the frequencies of standing waves are based on wavelength and room dimensions, room modes also occur at harmonics of those frequencies—as a result, the level and tonal balance of bass notes in a typical room is different at different locations in the room, as different harmonics are either boosted or sucked out in different listening positions.
The best way to deal with standing waves is to utilize room treatments to try and break up the worst of them. This involves calculating the affected frequencies (with a fairly simple formula) for the several types of room modes, and placing treatments in or at the walls that will prevent them—these are generally called bass traps, and there are various types, including Helmholtz Resonators, Diaphragmatic Absorbers, etc. Again, there isn’t room here to go into detail, but there’s plenty of material available that does, including articles in Recording available on our website.
Designing and placing cavities in your walls may not always be an option, but there are also surface-mounted solutions available from a number of companies that can be ordered and positioned (usually in corners) to address standing wave issues—some companies will take room dimensions supplied by the buyer and calculate the optimal size/depth for a particular studio space. At the very least, locating the monitor speakers and the primary listening position (sweet spot) at locations that avoid the worst of the standing waves (like positioning speakers and listener away from walls or other problems areas like the center of the room) can help minimize the problem.
Comb filtering
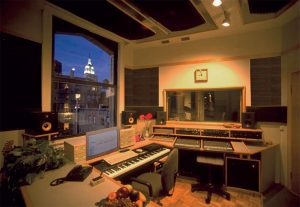
FIGURE 4. A studio (the author’s former room) with absorbers
on the walls and ceiling.
At mid and high frequencies, reflection issues are a little different. There are still phase cancellations and reinforcements, but since the wavelengths are shorter (inches rather than feet), they’re not localized to specific spots in the room—instead they’re spread out throughout the room a little more evenly. They still cause tonal colorations—in this case the effect is referred to as comb filtering, because the altered frequency response resembles the teeth of a comb in a frequency-response graph.
A little of this is normal—it’s part of the natural, desirable ambience of the room. But too much of it, or specific overly-strong reflections (i.e. “slap” or “flutter” echoes) that are too strong at the primary listening position, can cloud the sound. Again, this can lead to poor decisions in using EQ and reverb/delay.
The worst of these problem reflections will mostly come from reflective surfaces close to the speakers/listening position. The standard solution is to apply absorbers (like the familiar studio foam wedge sheets) at those locations, usually at the front and sides of the room. See Figure 4 for one example.
Some approaches completely deaden the front of the room, leaving the back of the room more live, to preserve some natural ambience (a completely deadened room would be an unnatural listening environment, unsuitable for musical/mixing decision-making). More commonly nowadays, absorptive panels are placed in spots where the strongest reflections come from, alternating with more reflective areas.
A traditional low-tech technique for locating the best spots to place absorbers is the “mirror trick”—one person sits in the sweet spot, and another moves a mirror around the room until the monitor speakers can be seen in the mirror by the guy in the chair. Since light reflects just like sound, this identifies the locations of the strongest sound wave reflections, and absorptive foam panels mounted there will have the most effect, again, without overly deadening the room. Additionally, reflective diffuser panels are often employed to scatter the rear room reflections, to insure even, well-balanced ambience.
Wrap-up
I’m out of room, so I’ll quickly finish with one last reminder—a little time and effort spent optimizing the monitoring system may be the single most important thing you can do when setting up any studio or recording space. If you can trust what you’re hearing, then there’s nothing stopping you from creating the best recordings and mixes you’re capable of.
Joe Albano ([email protected]) is a recording engineer, musician, educator, and studio consultant, working in New York City.