By Alex Hawley
Line 6 is celebrating its 20th anniversary this year. From 1996’s AxSys digital modeling guitar amplifier, Line 6 soon expanded into pedalboards and stomp boxes with the POD amp modelers, as well as wireless systems, the Variax modeling guitars, more powerful DSP amplifiers, and audio interfaces.
The new Line 6 flagship guitar processor, Helix, takes the user experience to a whole new level. It acts as the nerve center for your entire guitar rig. Focused on authenticity, realism, and an intuitive interface, Helix has a lot to offer for the recording and touring guitarist.
Helix is very forward-thinking; loaded with plentiful I/O and flexible internal routing, it suggests a lot of ways it can be used in your rig. It can be used as a traditional stompbox/amp modeler as an all-in-one unit — it’s loaded with effects, amps, and impulse responses to simulate the sound of miked cabinets. But that only scratches the surface!
Top side, back side, inside
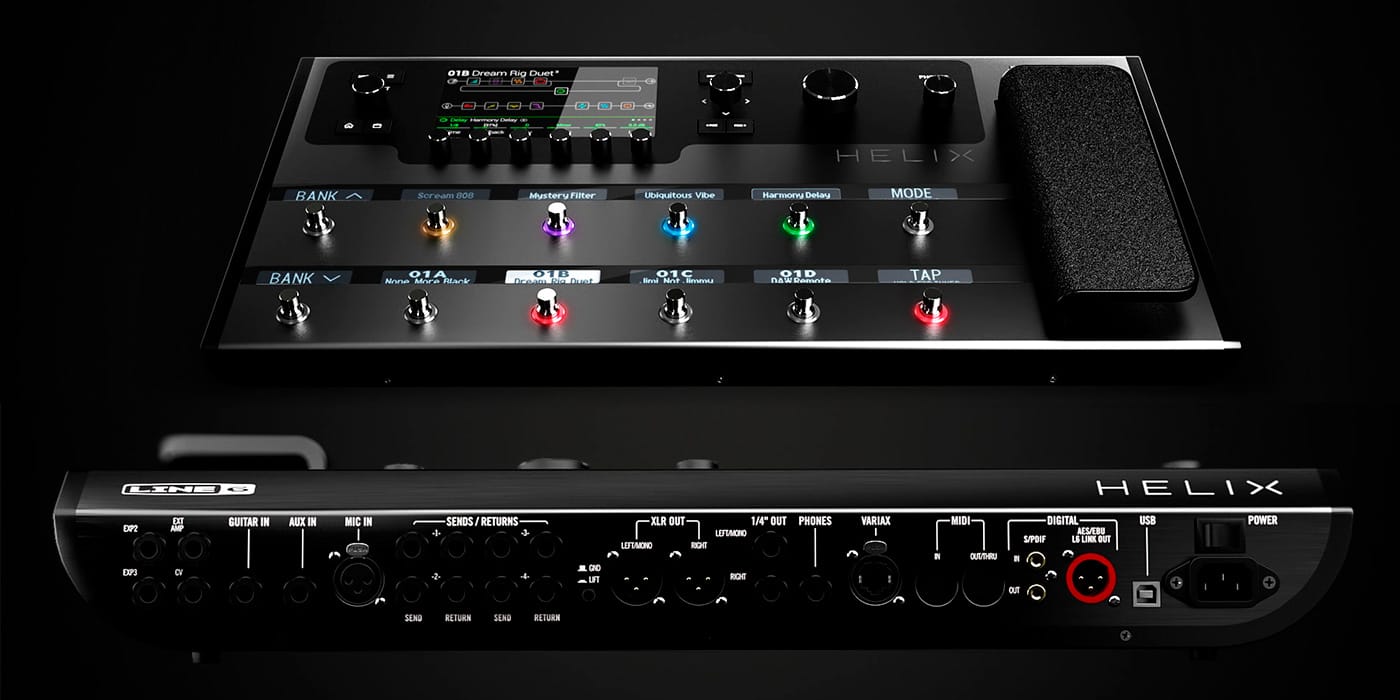
Helix is made of solid aluminum, so it’s clear that it was designed with weekend warriors and serious touring acts in mind. The front panel is sleek; it’s laid out very intelligently without too much going on to clutter the settings. The centerpiece of the front panel has to be the 6.2″ high-rez color LCD display screen, which has plenty of color coded symbols and easy to read fonts. There’s minimal eyestrain if you have to tweak any settings on the fly. There are backlit LCD “custom labels” above each of the 12 touch-sensitive footswitches. These display the effect names, which you can edit when adjusting assignments on your own saved preset files. There’s also one for the heavy, smooth-feeling expression pedal.
2016 Reviews
- DECEMBER 2016: Apogee ONE For Mac
- NOVEMBER 2016: Ears On – AKG K872
- OCTOBER 2016: Lauten Audio LA-320 Tube Condenser Microphone
- SEPTEMBER 2016: Audio-Technica ATH-E40, ATH-E50, and ATH-E70 In-Ear Monitor Headphones
- AUGUST 2016: Allen & Heath ZEDi-10FX Desktop Mixer/Interface
- JULY 2016: Line 6 Helix and Relay G10
- MAY 2016: Shure KSM8 Dualdyne Cardioid Dynamic Microphone
- APRIL 2016: Reviewed and Revisited, Acoustica Mixcraft Pro Studio 7
- MARCH 2016: Amphion Two18 Passive Monitors (and Amp500 Power Amplifier)
- FEBRUARY 2016: Lewitt LCT 550 Condenser Microphone
- JANUARY 2016: Soundware Showcase – Spitfire Audio HZ Percussion
Helix’s rear panel is loaded with an impressive I/O complement. On the left side, there are 1/4″ jacks for two additional expression pedals, EXT amp out, Control Voltage input, Guitar input, and Aux in. The expression pedals can be assigned to any digital effects parameter, and the EXT amp out is intended for an amp channel or reverb on/off switching relay. The guitar input provides a selectable input impedance, accessible on the front panel screen.
Next comes an XLR Mic input with switchable 48V phantom power, and four pairs of 1/4″ send/returns for mono or stereo FX loops. The returns can be used for connecting keyboards or drum machines if you need additional I/O, and you can use the Mic input for vocals processed with the internal effects, or to process a miked amp signal along with the direct Guitar input.
Next on the back panel are the main stereo XLR outputs, as well as stereo 1/4″ outs (to feed your guitar amps, speakers, etc.) and 1/4″ headphone output. These outputs are adjustable by the Volume and Phones pots on the front panel.
The last bit of I/O includes a Variax input, MIDI In and Out/Thru ports, coaxial S/PDIF I/O, AES/EBU L6 Link, and USB to connect to a computer for use as a recording interface. The Variax input provides power, digital audio, and instant recall between Helix and a Line 6 Variax guitar. The L6 Link provides an easy connection between Helix and the Line 6 StageSource monitors and DT series amplifiers. This covers a lot of bases here, so almost any imaginable configuration of Helix should be possible through the available I/O. Using Helix as an audio recording interface is seamless with the USB jack on the back panel — it’s a full-on 8-in/8-out interface, complete with a good quality mic preamp!
Helix comes loaded with 48 amps, 30 cabinets, 16 microphone models, and 91 effects, with the ability to run four discrete stereo signal paths and up to four amplifiers simultaneously. Third-party impulse responses can also be imported and placed anywhere in the signal path. You can store up to 128 1024 or 2048-point IRs, with the ability to run up to four at once (DSP permitting). Connecting via USB with your DAW allows you to set up Helix for reamping previously recorded guitar tracks.
Helix has some serious power under the hood. It is driven by a powerful dual-DSP processor powering what Line 6 calls the HX modeling engine. The mission behind the HX modeling engine is to achieve a level of detail, tone, and feel that was previously unattainable. The majority of effects on Helix have been designed from the ground up for the new HX platform. All amps and cabs have been built from scratch, and only a few popular HD effects models (like Elektrik, Doom, and Epic) have been converted and enhanced for the new platform.
Configurations
Line 6 put a lot of thought into how musicians are recording and gigging in the modern age, and Helix is a flexible tool that can integrate all of your tones into one road-ready floor unit. (A rack version with optional floor remote is also available.) The amp and cab models are easily bypassed, so you can choose to use Helix purely as a digital effects processor with your amplifier. Helix can also host all of your own custom impulse responses (IRs). In this configuration, you can run a tube amp into a load box, then the line out of the load box into Helix for an IR profile. This works brilliantly for home recording setups.
Another way to apply this concept is implementing one of the FX loops on Helix. You can set up all of the desired front-end effects, then insert an FX loop block sending signal to an external amp/load box. You can then take the line out from the load box back into Helix via one of its returns, for a cabinet IR to finish out the chain (I’ll get into configuring signal chains with FX loops below). In that scenario, you are using all of the digital effects from Helix, then integrating your own amp rather than a digital model of an amp, and running it through an impulse response of a cabinet. You can hear and mic your own amp, and the cabinet IR gives a full, live sound to the direct signal sent to your DAW. This really pays off if you add stereo effects to the chain as well; a lot of the onboard effects really make use of the stereo spectrum, so just running signal out to an amp in a mono setup can sacrifice some of the stereo depth that Helix has to offer.
Helix is much more than your average digital effects processor because of its flexible routing. I’ve already mentioned the ability to run inline with pedals and amps, thanks to the four rear-panel effect loops. In simpler configurations you can simply use the loops to insert your own pedals. They can be placed anywhere in the signal chain by editing the internal signal flow on the LCD display screen (which we discuss below).
Interface
The GUI is fast, responsive, and easy to use. Considering how much ground Helix covers, I was surprised at how manageable it was to have an understanding of the different features and settings after only a couple of hours of hands-on work.
I started by flipping through some presets, and tweaking parameters with the six knobs that live just below the LCD display screen. These knobs have different assignments depending on what block of the signal chain is selected. The signal chain is creatively shown, with different symbols and color coding to represent EQ, dynamics, distortion, delay, reverb, amp, cab, and so on.
For example, preset 05C is labeled Brit Plexi Bright. The signal chain on the display shows a volume pedal assignment first in the chain, then a Scream 808 and a Transistor Tape Delay going into the Brit Plexi amplifier, with a plate reverb and looper following the amp. However, not all of these effects are active when you switch to the preset. Every effect shown on the signal chain has a footswitch associated with it — as if you had a TS808 and a Transistor Tape pedal at your feet to toggle on and off as you need. These are indicated by the custom labels above each footswitch.
The footswitches have color LED halos for quick identification in dim light. They are also touch sensitive, so if you want to pull up the parameters of a certain effect without activating it by fully stepping on it, lightly touching the footswitch will select that effect and pull up the parameters on the LCD screen to start tweaking. This feature is common among digital mixers, so it’s very cool to see these touch-sensitive footswitches integrated with a digital effects stompbox. Clever!
BYOT — Build Your Own Tone
Even though there are pages and pages of factory presets that cover everything from blistering Hendrix tones to, well, whacky tones you’ve probably never even imagined — there’s something satisfying about building your own from scratch. Pressing down on the Preset knob opens up the different setlists. This is where you can dive into a user setlist and start creating banks of your own tones. Editing itself is aided enormously by a multifunction knob that can be turned, pressed, or tilted as an XY joystick.
For one of the signal chains that I created, I started with a compressor to help push the front end. I used the LA Compressor into the Scream 808 Drive pedal. From there I added a slight touch of ’70s chorus before hitting the amp and cab. I reached for the Essex A30, which is modeled after a Vox AC30. I wanted a clean tone with some bite to it, just on the edge of breakup, so I lowered the gain and made adjustments to the EQ bands on the amp. Next, I started to dial in the cabinet settings. There’s a fair amount of microphone selections to choose from, and they play a huge role in shaping the overall tone. Helix gives you control over the microphone model, the placement, distance, channel volume, and amount of early reflections.
I landed with a close-miked Sennheiser MD421 for the tone I was trying to capture; it pairs well with the mid-range bite of the characteristic AC30 sound. That being said, the modeled versions of the Coles 4038 and Royer R-121 ribbon mics also sound great. Helix captures a surprising amount of nuance and depth overall in the microphone selection; I could easily identify the warm characteristics that those ribbons bring to the table for guitar cabs.
Adjusting the distance of the mic placement isn’t completely believable by itself; the signal seemed to simply attenuate rather than spatially adjusting the mic with a room sound, as I was expecting. That’s when I started to adjust the early reflections parameter. For a room miking scenario with Helix, the relationship between distance and early reflections is key to bringing the room to life — with some tweaking, you can feel the distance in the room between the cab and the microphone!
The whole process of creating and editing signal chains is surprisingly intuitive. When I initially started, I was expecting to be flipping through the manual halfway through to understand how to navigate that portion of the interface, but I didn’t need too. On the LCD display, it’s easy to scroll to different boxes in the signal chain, click them, and add whatever effect or amp model you desire. You can also place any of the send/return loops into a specific place in the chain, to integrate analog pedals in line with the digital modeling.
It’s also easy to change up the order of the signal chain without having to start from scratch. In one example, I built a tone and wanted to add another effect before the preamp circuit. I worried that I wouldn’t be able to move everything downstream in order to simply place one more effect earlier in the chain… and three clicks later, it was done.
The next step is to assign each of the effects in your chain to a footswitch. For this, all you have to do is scroll over to the effect you want to assign, then lightly touch the footswitch you would like to assign (remember — these footswitches are touch sensitive!). Hold the footswitch for three seconds, and then a dialog will appear asking to assign that effect to the corresponding footswitch. This is also where you can change the name of the effect, so you can customize the identifiers on the scribble strips in whatever way makes sense to you. Assigning footswitches gives you the power to toggle on/off any of the effects in your chain very quickly.
Conclusions
Helix covers a lot of sonic bases, everything from lush reverbs and delays to gritty distortion and overdrive. The interface is fast and reliable, and gives you the power to adjust anything and everything in your signal chain down to the microphone placement on the cabinet. The I/O is flexible enough to integrate Helix to a number of different configurations for the studio or stage — and it plays well running into tube amps acting as a digital effects processor. It’s built like a tank, and the tones feel and react like their analog counterparts.
I can see this pedal as a workhorse effects rig in the studio for engineers that work with a variety of bands and need a range of tones on a daily basis. If you combine studio work with live playing, Helix could be the answer you’ve been looking for in order to simplify and consolidate your rig. It shines as an all-in-one amp modeling and effects processor, and adds great sound and variety to a live rig already loaded with pedals and tube amps.
With its clever touch-sensitive footswitches, and insanely powerful yet intuitive routing and settings navigation, Helix can fit into any guitar rig in whatever role you envision it. If you are an engineer or musician that covers a wide range of genres and textures, then Helix may be just what you need.
[Editor’s Note: The day we went to press, Line 6 announced Helix Edit, a free Helix control program for Mac and PC. We’re told that it does everything the Helix’s hardware user interface can do, but on your computer. — MM]
Price: Helix (as reviewed), $1499.99; Helix Rack, $1399.99; Helix Control pedalboard, $399.99
More from: Line 6, www.line6.com
Alex Hawley ([email protected]) is a performing guitarist and recording engineer working at Coupe Studios in Boulder, CO (coupestudios.com).
sidebar:
Studio-Ready Wireless: the Line 6 Relay G10
Line 6 also sent us the new Relay G10 wireless guitar system ($179.99). It’s designed to provide impeccable sound quality and ultimate ease of use, and that’s exactly what it does.
The Relay G10’s transmitter is a small unit that plugs into your guitar, and its receiver is a small box with 1/4″ and XLR outputs, plus a micro-B USB connector to work with any USB power supply. You plug the transmitter into the top of the receiver to charge it; it will provide 8 hours of play on one charge and up to 200 hours with automated sleep mode enabled. Colored LEDs on both units indicate charging status and sync.
And that is literally it — no changing batteries, no fussing with frequencies (it’s digital with automatic channel selection), charge it, plug it in, done. Line 6’s built-in Cable Tone modeling gives the system a very natural sound and playing response. I got at least 40 feet of range on a clear stage without a hint of interference, and my tone wasn’t compromised one bit. A hidden switch on the transmitter even keeps it from popping when you plug or unplug it!
In my small home studio, the Relay G10 has been a lifesaver. It gives me crystal-clear sound while letting me move around freely; I needn’t worry about clotheslining myself or damaging my gear or instruments with snagged cables. It’s become an indispensable part of my guitar recording chain. — MM