By John Shirley
Previously, I stated that the exact technology used to record or make music is much less important than how it’s used. Though Stevie Ray Vaughan was known for his signature Strat, I have no doubt that he could have picked up any halfway decent guitar and played some amazing and inspiring music. Why then would he choose to rely so heavily upon a single guitar? The answer is simple: it fit his personality and playing style while achieving the distinctive tone he was after. At the same time, just because it was the right guitar for him does not mean it would be the ideal axe for every guitarist.
Specific choices in audio equipment are made for much the same reasons. Both gear and studio setup should reflect a recording engineers individual nature, working habits, musical style and sonic goals. This is true of instruments, microphones, preamps, effects, and acoustical environments: even mixing and multitrack recording systems.
This installment offers an overview of popular recording technologies as well as both the process and terminology involved in getting a good signal “to tape” (OK, that’s the “old school” description: now usually “to hard disk.”)
Recording Platforms
There are many types of multitrack recording systems, often called platforms, available these days: they use different technologies and offer widely varying features. Still, each uses either tape, hard disk or flash ROM… and no matter how different the systems may seem in other ways, most of the underlying concepts and methods for using these systems are quite similar, if not the same.
Tape
Tape machines, whether analog or digital, are easy to use as well as fairly stable and reliable when properly maintained. On the other hand, they are very limited when it comes to editing, track count, extended feature sets, flexibility, capacity, cost effectiveness, and possibilities for expansion or upgrade. Most of them rely heavily on additional gear such as mixing boards, effects units, dynamics processors, and patch bays (not to mention a generous supply of tape). This is why they have largely been replaced by disk systems in studios around the world.
Computer DAW
Computer-based hard drive recording systems (DAWs, or digital audio wokstations) can offer a lot of the exact things that tape cannot. They have cool graphic interfaces that use the computer screen to show the user exactly what’s going on; they offer loads of features, powerful editing capabilities, high track counts, large capacities, and open-ended expansion/upgrade options.
Their shortcomings are few, but they can be weak in precisely the same areas where tape technology is strong – for one thing, computers tend to crash. Expansion, complex file structures, viruses, and changing operating system elements make computers less reliable than tape machines. The complexities of the interacting hardware, software, and operating system not only make these systems volatile, but also more confusing and difficult to learn than a tape machine hooked up to a mixer and some outboard equipment.
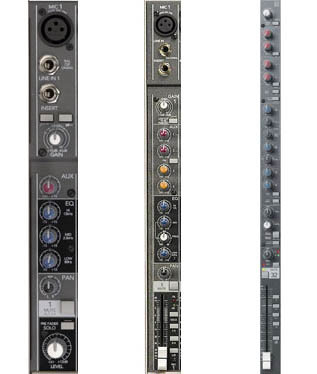
A small, medium, and larger channel strip
Standalone DAW
Many manufacturers now offer hybrid, standalone multitrack digital workstations (or integrated DAWs.) That are complete recording systems by themselves. They combine mixing console, dynamics, effects, multitrack recording, and CD-burner into a single unit. While they come close to offering the editing and mixing power of their computer-based brethren, they trade some of the computers flexibility in expansion and upgrade for greater reliability and simplicity of use.
Their stability is further enhanced because their function is limited to audio tasks only. Although they have a computer brain onboard, they do not play games, surf the net, do your taxes, or help you write letters to granny. These workstations are becoming increasingly popular and systems are now offered by such notable companies as Tascam, Yamaha, Roland/Boss, Akai, Korg/Tone Works, and Zoom.
The Recording Process
Most often, when people describe the basic recording process, they use either a tape-based model, complete with separate mixer, tape deck and outboard effects units, -or- a specific computer-based DAW, with software effects and editing as well as a hardware interface (connectors, knobs, faders). In today’s industry, operating systems, computer hardware, recording platforms, graphic user interfaces (GUIs), and software (even software versions) can all be different from one studio to another. What’s more is that all of these things can change from year to year (and often do).
Because of this, relying too heavily on knowledge of a single platform or paradigm can lead to real problems. I have seen numerous audio engineers lose (or pass up) jobs, embarrass themselves in front of clients, produce sub-par recordings (despite past success and ample talent) and fall way behind in their knowledge of current industry technology.
In the Sound Recording Technology program at the University of Massachusetts Lowell (where I teach) we are very careful to stress underlying methods, concepts, and techniques rather than a specific operating system or recording platform. Each of our studios houses a different platform and diverse technologies. Students are expected to acclimate quickly to each environment and begin work immediately.
Over the last 15 years I have done a fair amount of project studio work in various environments; I have done major projects on ProTools, Studio Vision Pro, Digital Performer, Logic Pro, Cubase, Deck II, Sonic Studio and Nuendo. Trust me when I tell you that it’s much easier to adapt in the long run if you learn audio and recording fundamentals thoroughly, rather than where to find a specific button or menu in a particular DAW program. Then, as you explore a new platform, keep in mind all of the elements that make up the recording chain and process.
For this article, I will endeavor to outline the overall recording process in a generalized way that can translate easily from system to system. For demonstration purposes, however, I will sometimes refer to an M-powered ProTools/M-Audio Firewire 410 platform running on a Mac. It is a popular combination that includes a number of the fundamental technologies and methodologies we need to address. Those of you who use a tape, standalone or different computer system will find that the underlying concepts hold true and are equally applicable on all systems.
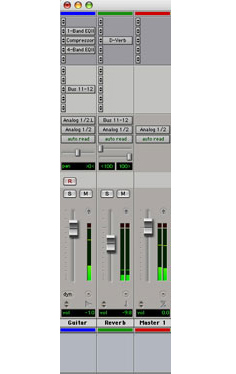
ProTools channel strip, aux return, and master fader.
A new Project
Before you begin recording a new tune, you must create a new project (called a session in ProTools). This is a way to separate, title and define settings for different songs (or other recording endeavors).
In ProTools, a new session is created by choosing “New Session” from the file menu. The dialog box that follows allows you to name the project, choose its location on a drive, and select from the following options:
- File Type – allows you to choose the format of the audio files associated with the session (choose an uncompressed format such as .wav, .aif, or .SDII. There will be more on file formats in TCRM #4)
- I/O Settings – defines how signal will be routed to/from connected interfaces.
- Bit Depth – determines the accuracy of the conversion of your audio amplitude and, in turn, the inherent noise floor. More bits are better. The CD standard is 16-bits. (More on bit depth in TCRM #3)
- Sample Rate – how often the system digitizes audio: higher rates allow you to record higher frequencies. The CD standard is 44.1 kHz.. (More on sample rate in TCRM #3)
- Fader Gain – determines how much amplification a fader is capable of (above digital 0 dBFS). Options are +6 dB and +12 dB.
- Enforce Mac/PC Compatability – When checked, ProTools saves in a session format that is cross platform, allowing you to move easily between ProTools systems running on either Mac or PC.
In some programs you may also see options for the number and type of tracks you want your session to be. In my M-Powered example you must do this after your session is set up. Under the “File” menu, choose “New Tracks.” Now you get to choose how many tracks to add, what type they should be (audio, aux in, master fader or MIDI) and whether they should be mono or stereo.

Screen shot of the control panel for the M-Audio Firewire 410. It is especially handy for creating non-latent record monitoring.
There’s a common misconception you should be aware of regarding this last option (mono versus stereo tracks): that stereo tracks are needed for a mix to be “in stereo.” I have seen many novice (and even some seasoned) engineers working entirely with stereo tracks due to this faulty reasoning. Let’s be clear about this: a single microphone on a singer creates a mono signal; there’s no need to record it to a stereo track.
A mono track is a single audio signal. It can be placed within a stereo field by bussing it to a stereo master fader and panning it (using a pan knob to control the amounts sent to the left and right sides).
A stereo track is comprised of two audio signals, generally with one representing the left side of the image, and the other representing the right. They are still bussed to the stereo master fader and panned.
Recording a singer with a single microphone to a stereo track (with the sides panned hard left and right respectively) will sound exactly the same as a mono track panned to the center position in the stereo field, as both left and right sides are identical. The downside to using the stereo track here is that it uses twice the disk space and processing power, often constraining your track counts needlessly. Furthermore, controlling stereo location can actually be more difficult on a stereo track.
Stereo tracks are most appropriately used:
- when you’re recording using two microphones setup using a specialized stereo technique (more on these in TCRM #11).
- when the audio is already pre-mixed in stereo from a multichannel source.
- when the audio incorporates a special stereo effect (like a stereo reverb, chorus, or panning delay).
This leads to another note (especially in ProTools): always create a stereo master fader; it is easy to do and an absolute necessity for ascertaining your overall mix levels. A new ProTools session will not generate a master fader in the mix window automatically, but you will still hear your stereo mix… so you may be tempted to just work without one.
Because of the increase in amplitude when many tracks are summed to the stereo buss, the signal on the master fader can easily get “too hot” (“too much”), causing distortion. Alternately, if the mixed signal is low, you can either boost it here, or bring it up equally on all channels. You may also want to do something like EQ or compress your stereo mix.
The source
The best way to understand how the recording process works is to play “follow the signal.” The very first thing we need is a sound source. These come in two basic forms: acoustic or electronic.
An acoustic instrument is one which does not rely on electricity as a means of producing or amplifying it’s sound. Since all modern recording devices require an electrical signal as input, a microphone must be used to convert the acoustic energy to electrical energy. This process of changing one form of energy into another is called transduction. Therefore, a microphone is a type of transducer.
If a source is already electronic (like a keyboard or drum machine) then it’s audio outputs can be used to interface with the recording device directly. No microphone is necessary.
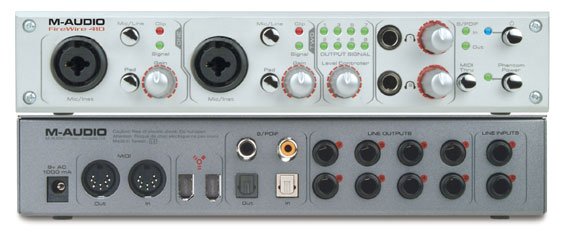
The M-Audio Firewire 410 itself. Note the pad, gain, level indicators (LEDs), and “Inst” inputs.
The Input
Once the sound has become an electrical signal, it can be brought into the recorder through a channel input. This is a pathway for a single signal to enter the mixing system.
Typically, a signal enters a channel through a connector and attached circuit that is either a microphone input or line input. In TCRM #8 we’ll discuss how a microphone works in great detail. For now, it’s enough to realize that a microphone signal is usually quite a bit weaker than the signal sent directly from a synthesizer, sampler or tape deck, so for a mic a dedicated input with extra signal amplification is required. The impedance (aka Z: the resistance to the flow of electrical current) is also different between mic and line input types. Since some mics require an external supply of power to function, many mic inputs can send what’s called phantom power. Typically, this is 48 volts.
Many interfaces are now equipped with a third input option, usually labeled INST (Instrument), Guitar, DI (Direct Inject), or Hi-Z (high impedance). This is useful for recording an electric guitar or bass without the use of an amplifier in a process called “recording direct.” The extra input is called “Hi-Z” because the signal coming directly from the outputs of these instruments is of a much greater impedance than what’s expected at a regular line input. Recording this way used to require a separate piece of equipment, called a Direct Inject box (DI) but many new recording platforms and interfaces now have this feature built in.
Setting input levels
After the channel inputs the signal may go through an analog amplification stage called gain, trim, or sensitivity. This is especially useful on microphone and Instrument (Hi-Z) inputs, which can both vary greatly in level. The amount of amplification is controlled by a rotary knob or potentiometer (“pot”). Proper setting of this gain is one of the most important, yet often overlooked, aspects of making a good recording on any type of recorder. If the input gain is set too low, the signal will have to be raised later; in either the analog or digital domains, this will add noise. If the input gain is set too high, the signal will clip and distort. (more on clipping in TCRM #3)
Often, there is also a switch called a pad associated with the input stage; it’s job is similar to the input gain or trim – it selects one of two or more amplification ranges. The pad can be activated to accommodate (“pad down” or diminish) stronger signals, or it can be turned off to give extra boost to quiet microphone signals. In an effort to save space some of the more compact interfaces and mixers do away with the pad and simply include a greater range of amplification on the trim pot.
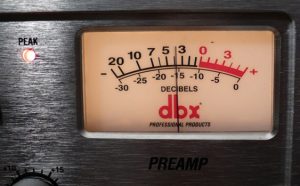
A dbx VU meter. Note that the needle on the meter registers a decent signal level here, but the peak LED indicates an over.
Input metering
How do you know what is the appropriate recording level for a given signal? Before setting the input gain, you must first locate your input metering. This is a graphic display of a signal’s level expressed in decibels (dB). You may have such metering in one or more of the following locations: on your preamp, on your hardware mixer, on your interface, in your interface’s software control panel, in your DAW edit window, in your DAW mix window.
In the case of the Firewire 410, the metering consists of only a green LED for “signal present” and a red LED to signify clipping (sometimes this is labeled over or peak). The software control panel for the 410, however, offers much more metering detail and added control over the interface itself. The input signal also appears on the channel meter in ProTools.
Be certain that the levels you are looking at are pre-fader for recording (post-fader for mixing). Pre-fader means that the levels displayed are taken after the input section (including the trim pot) and may not represent the amount sent to the monitor mix or the stereo bus.
In ProTools, channel metering can be set to pre-fader under the Operations menu. On some systems the appropriate tracks must be set to record (record enabled or armed) before the input (or record) meter will become active. (more on this below)
Note: on some systems, the pre-fader levels may not be the same as the levels sent to the record tracks. In these cases there are separate faders or knobs to control this level after the trim pot.
Monitoring post-fader on input is a recipe for a bad recording – you will not see what is truly happening to the signal you’re recording. For example, if you are clipping the input (which would register on pre-fader metering as overs or clipping) but have your channel fader down 6 dB (labeled -6 on most DAWs), your post-fader metering will look great; it will not show the clipping at all. The problem here is that the distortion caused by the clipping is still recorded!
Once you know that you are viewing a pre-fader input gain you can now work out the best setting. To do this, the source to be recorded should play the tune while you pay close attention to the levels. The trim should be set so that the peak moments display around –12 dB. This is a good strong level but still allows a bit of leeway, just in case things get louder during the actual take (which they almost always seem to do in the heat of battle.) This leeway, called headroom, allows for an extra 12 dB before the signal will distort. The goal is to record as strong a signal as possible without clipping. It’s better to have to turn down a hot (strong) signal than to boost a weak one, adding noise.
(much more on levels and metering coming in TCRM #5)
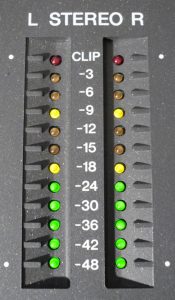
Similar metering on the Yamaha 01V mixing console: Master levels.
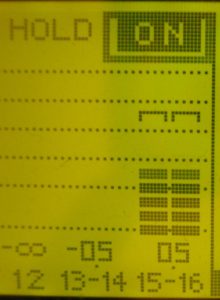
Multi-Layered Faders and Hidden Power
Traditional mixing consoles will be the subject of a future installment. You may have already worked with a mixing board of some kind, and most of the analog types are “what-you-see-is-what-you-get” devices: each rotary knob or fader (aka slider) has a single function, and its position (how far it has been turned or shifted) tells you its current status; assign buttons are either on or off, in or out, and they may or may not have a status light.
To save space, increase features, and reduce cost (all good things…) many digital mixers, control surfaces, stand-alone workstations, and even DAW software packages are incorporating layered functionality. Here, buttons, knobs, data wheels, joysticks, and faders (sliders) perform multiple tasks. For example, the 12 faders on the Roland VS-2400CD workstation serve 8 separate functions each (ie thay have eight layers.) Exactly what job they are doing at a given time is determined by a series of lighted FADER assignment buttons. In the case of other equipment there may be a heading at the top of the screen, or a little graphic symbol to show what function a layered fader is currently representing.
Channel levels
Assigning tracks
This is not an option on some DAWs, as they assume you want to record the levels you have input (post trim) and that each input is recorded to its own track. To allow a greater number of inputs to record to a fixed track count, however, some recording devices allow multiple inputs to be combined and recorded to a single track. In this case the summing of the signals (individually at good levels) increases the overall and causes clipping. Here it is useful to have separate control over input and record levels.
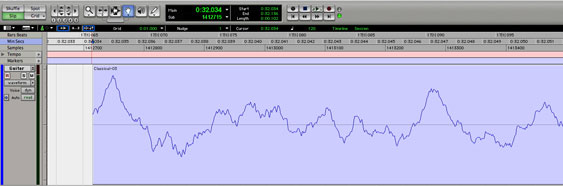
This picture shows a bad edit. Note the fact that the waveform is not at the zero-crossing when it starts…. This will cause an audible “click” in the audio.
Recording
After routing the signal to the chosen track(s) you are almost ready to record. All that’s left to do is “arm” or “record enable” the track(s).
In ProTools this is done by pressing the “R” button to the left of the track in the Edit window, or at the bottom of the channel (above the fader) in the Mix window. When record-enabled it turns red and blinks. When the main record and play buttons on the transport are pressed… you’re recording.
Now, the usual behavior of most DAWs is to record the signal to the hard drive at the levels set at the inputs (recording is pre-fader, remember?). You can create a pleasing monitor mix by moving the channel faders up and down without affecting the levels you are recording. That gives you the option of changing your mind later when you mix down your work.
Most recording consoles work this way, even with analog or digital tape: they have direct inputs and outputs that feed hot signals from the inputs directly to tape, and let you listen back to them from tape, without the channel faders affecting what’s being recorded. These are called tape outs or direct outs, and tape inputs or tape returns (because they are being returned to the mixer from the recorder).
When you’re done recording, you must be careful to disarm the tracks so that you don’t record over them by accident. That can be a colossal bummer. (This is why the light is RED; on some platforms it even BLINKS!)
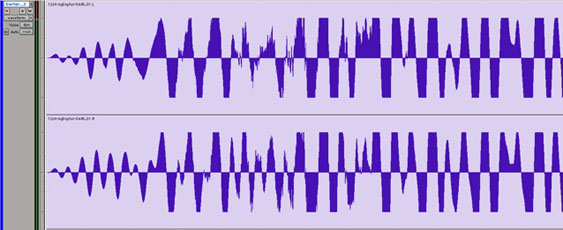
A flat top to your waveforms signifies that clipping distortion has occurred.
Virtual Tracks
Virtual tracks greatly increase the capabilities of many DAWs – they are tracks that can be recorded and stored but not all played back at the same time.
For instance, in my version of ProTools M-Powered, there are 32 voices (mono signals that can be played simultaneously), but 128 total possible mono tracks (making 96 virtual tracks). This allows multiple takes of a performance to be recorded, auditioned, and then edited together into one final definitive version, called a comp track (short for composite track). Here again, it should be noted that stereo tracks use up two voices and count as two virtual tracks. Their use can cut your track count in half, so use them only as needed!
The same recording with more rounded peaks shows no signs of this distortion.
Tune in Next Time
OK, so it took us over 3500 words to get something recorded…. The important part is that we’ve explored the foundational elements of the process as well as the terms used to describe it. It aids in both communication and understanding when we all speak the same language. (I believe it’s called audiogeekese)
This becomes even more important for the many folks who frequently move from one studio to another – they have to work with the many variations of recording technologies out there right now. Someone with a thorough knowledge of the fundamentals we’ve outlined here will be able to adapt to a new recording environment quickly and confidently.
Next time we’ll see how and why digital audio technology works. This will help you make the most of what digital has to offer.
John Shirley is a recording engineer, composer, programmer and producer. He’s also on faculty in the Sound Recording Technology Program at the University of Massachusetts Lowell. Check out his wacky electronic music CD, Sonic Ninjutsu, OR on iTunes.
Check out the audio examples below of the effects of various gain settings, clipping and data compression schemes.
Audio Examples
Editing
The following soundfile represents a good edit, where cuts were made at zero-crossings.
Here, no effort was made to make edits at zero-crossings. Notice the extra “pop” or “click” sounds at both the beginning and end of the example.
Gain
The following demonstrates what can happen when gain is set low (there will be excess amounts of noise), too high (audio will clip and distort), and if it’s set just right….
Now let’s listen to what various clipping levels sound like….
The original unclipped file: TCRM2_3a.wav
Now the gain is increased by 9dB: TCRM2_3b.wav
Now the gain is increased by 15dB: TCRM2_3c.wav
Finally, the gain is increased by 30dB: TCRM2_3d.wav
The gain of the clipped files has been reduced again after clipping to bring the soundfiles to a similar loudness.
Mono and Stereo
The files here demonstrate what happens in various mono and stereo situations as well as the effects of recording a mono signal to a stereo track (a common mistake that utilizes twice the space and processing resources, usually without any benefit whatsoever).
First, there’s a guitar sample recorded in mono (with one mic) and mixed to mono:
Now, let’s hear that same mono source recorded to a stereo track and mixed in stereo:
Is there any difference in the stereo image?
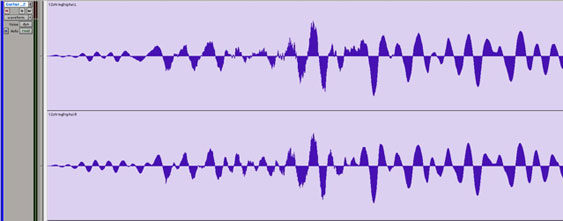
To compare, let’s listen to the same guitar recorded in stereo (using two microphones) and mixed in stereo:
Compare that to the previous samples.
OK, here’s what happens if the stereo recording is bussed to mono and then mixed in stereo:
Finally, let’s see what happens if we take the original mono signal, recorded to a mono track, and create an artificial stereo image using differing delays and EQ to each side of the stereo field (using an auxiliary channels):
Compare that to both TCRM2_4b.wav (mono mixed to stereo) and TCRM2_4c.wav (recorded in stereo).
Another example of mono versus stereo is provided now with drums…. First, the multiple mono mic channels are mixed to stereo:
Then each mic is recorded to a stereo channel and panned equally in the stereo mix:
Though this second example uses twice the processing and disk space, it does not exhibit any real stereo imaging.